9098764
Help Guide
Select your Role
Select Feature
- How can I enroll in the website
- How do I Login to the website
- How to subscribe the Free Courses
- How can I purchase the courses Bundle
- How can I view the Course Categories
- How can I Access the Courses
- How can I Check my Courses performance
- How can I download the detailed information as PDF about the course
- How can I attempt the Course Quiz
- How can I download my certificate
Select Feature
- How can I enroll in the website
- How do I Login to the website
- How do I create a course
- How can I create the Bundle
- How do I create Lessons & Assignments
- How to know who is accessing my courses
- How can I assign the Course Categories to the students
Select Feature
- How can I enroll in the website
- How do I Login to the website
- How to create a student account
- How to create multiple student accounts at a time
- How can I purchase the Course Bundle for the student
- How to track the performance of the students
Select Feature
- What are the privileges I have as an admin
- How to configure Stripe Account Details
- How can I Create and Manage the Course Catalogs
- How can I create multiple Course Catalogs at a time through Data Import
- How can I Create and Manage the users like Student, Faculty & Mentor
- How to create multiple student, faculty or mentor accounts at a time through Data Import
- How can I assign the course categories to my students & Faculties
- How can I track the student Courses performance
- Explore a variety of courses available for learning.
- Easily purchase desired courses through a straightforward process.
- Access courses conveniently for a smooth learning experience.
- Monitor personal performance through user-friendly dashboards.
- Download certificates for completed courses with ease.
How can I enroll in the website?
-
Open the URL in Your Browser:
- Launch your web browser and enter the provided URL in the address bar.
-
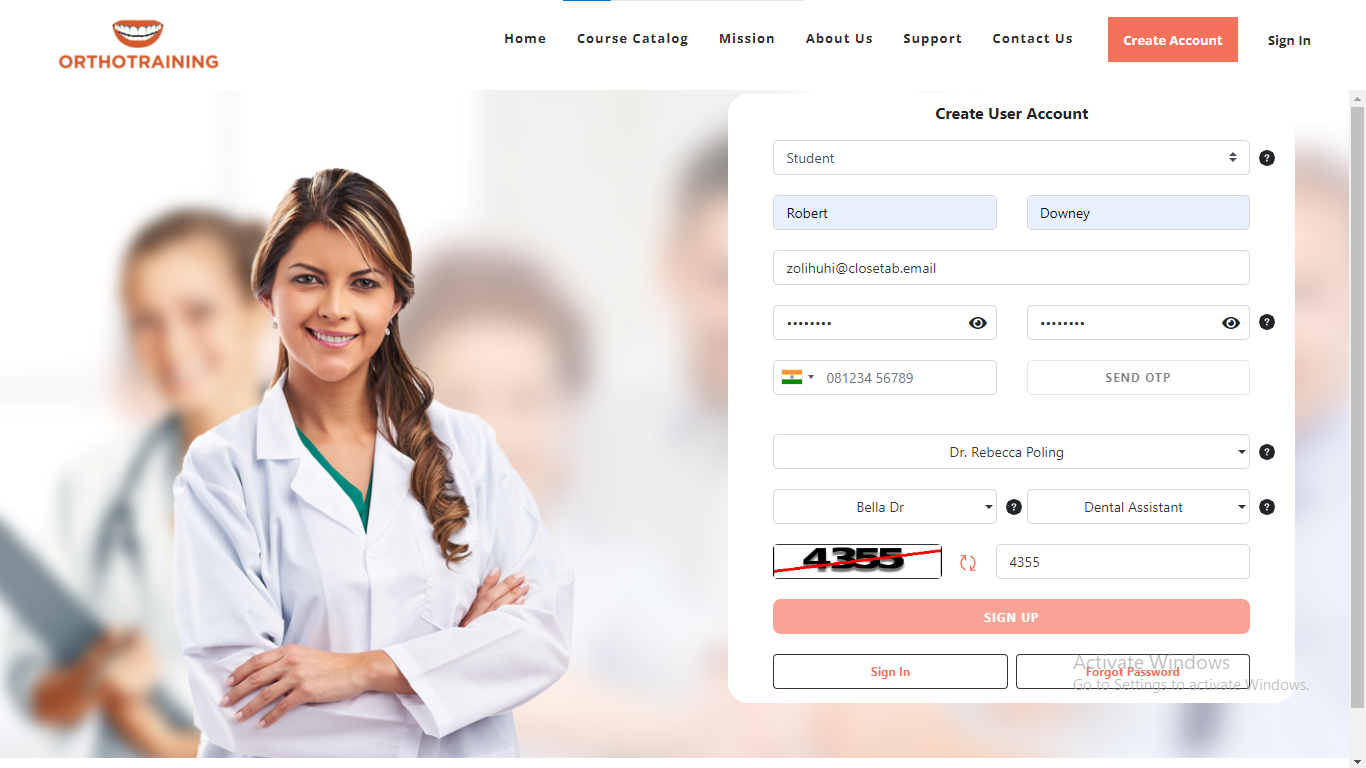
Navigate to the Create Account Page:
- Once on the website, locate the menu list and click on the "Create Account" page.
-
Choose Your Role as a Student:
- On the Create Account page, find the "Select your role" field.
- Open the dropdown menu and select "Student" as your role.
-
Fill in Your Details:
- Below the role selection, you'll find a form. Provide the necessary details as requested. This may include your name, email, password, and any other required information.
-
Click on the "SIGN UP" Button:
- After filling in the form, locate and click on the "SIGN UP" button.
-
-
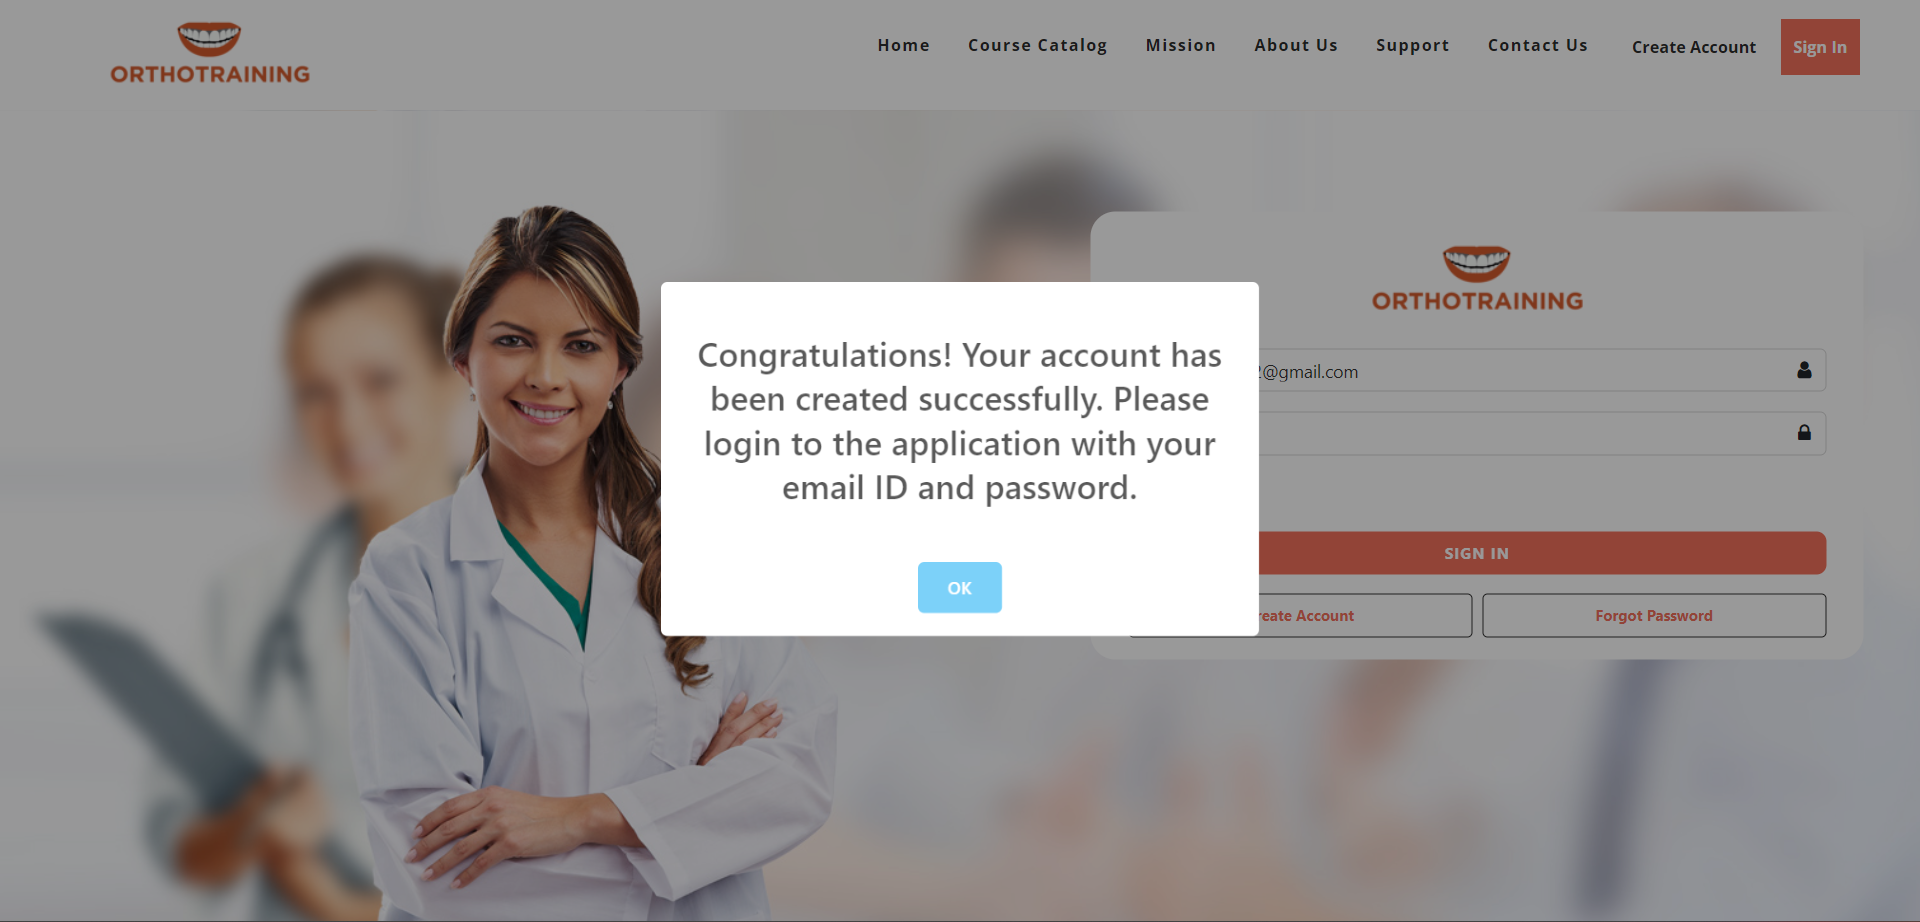
Check Your Email for Login Details:
- You will receive an email with login details to access the website.
- Open your email inbox and look for the message related to your account creation.
-
How do I Login to the website?
-
Open the URL in Your Browser:
- Launch your preferred web browser and enter the provided URL in the address bar. Hit 'Enter' to access the website.
-
Navigate to the Sign In Page:
- Once on the website, locate and click on the "Sign In" button. This action will redirect you to the Sign In page.

-
Provide Your Credentials:
- On the Sign In page, you'll find a form requesting your Email ID and Password. Enter your registered Email ID and Password into the designated fields.
-
Click SIGN IN:
- After entering your credentials, click on the "SIGN IN" button. This action will validate your information and, if correct, lead you to your account.
-
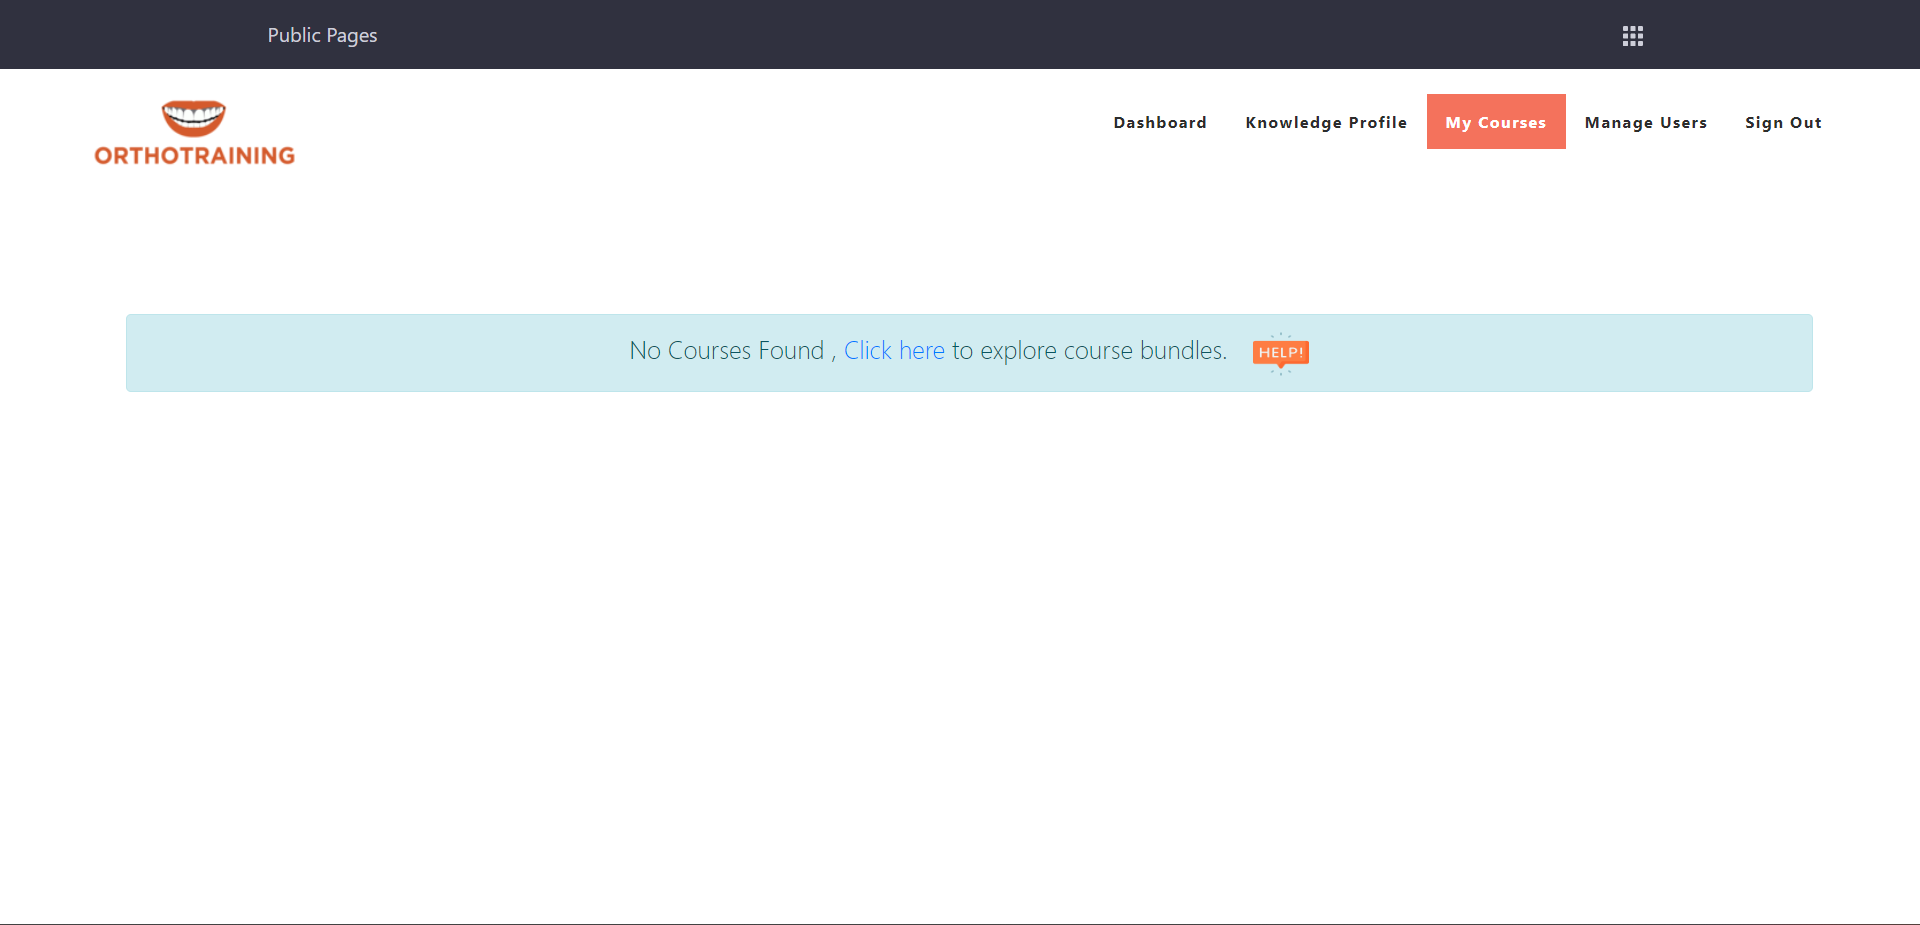
Explore Your Courses:
- Upon successful login, you will be redirected to the "My Courses" page, where you can explore and manage the courses associated with your account.
-
How to subscribe the Free Courses?
-
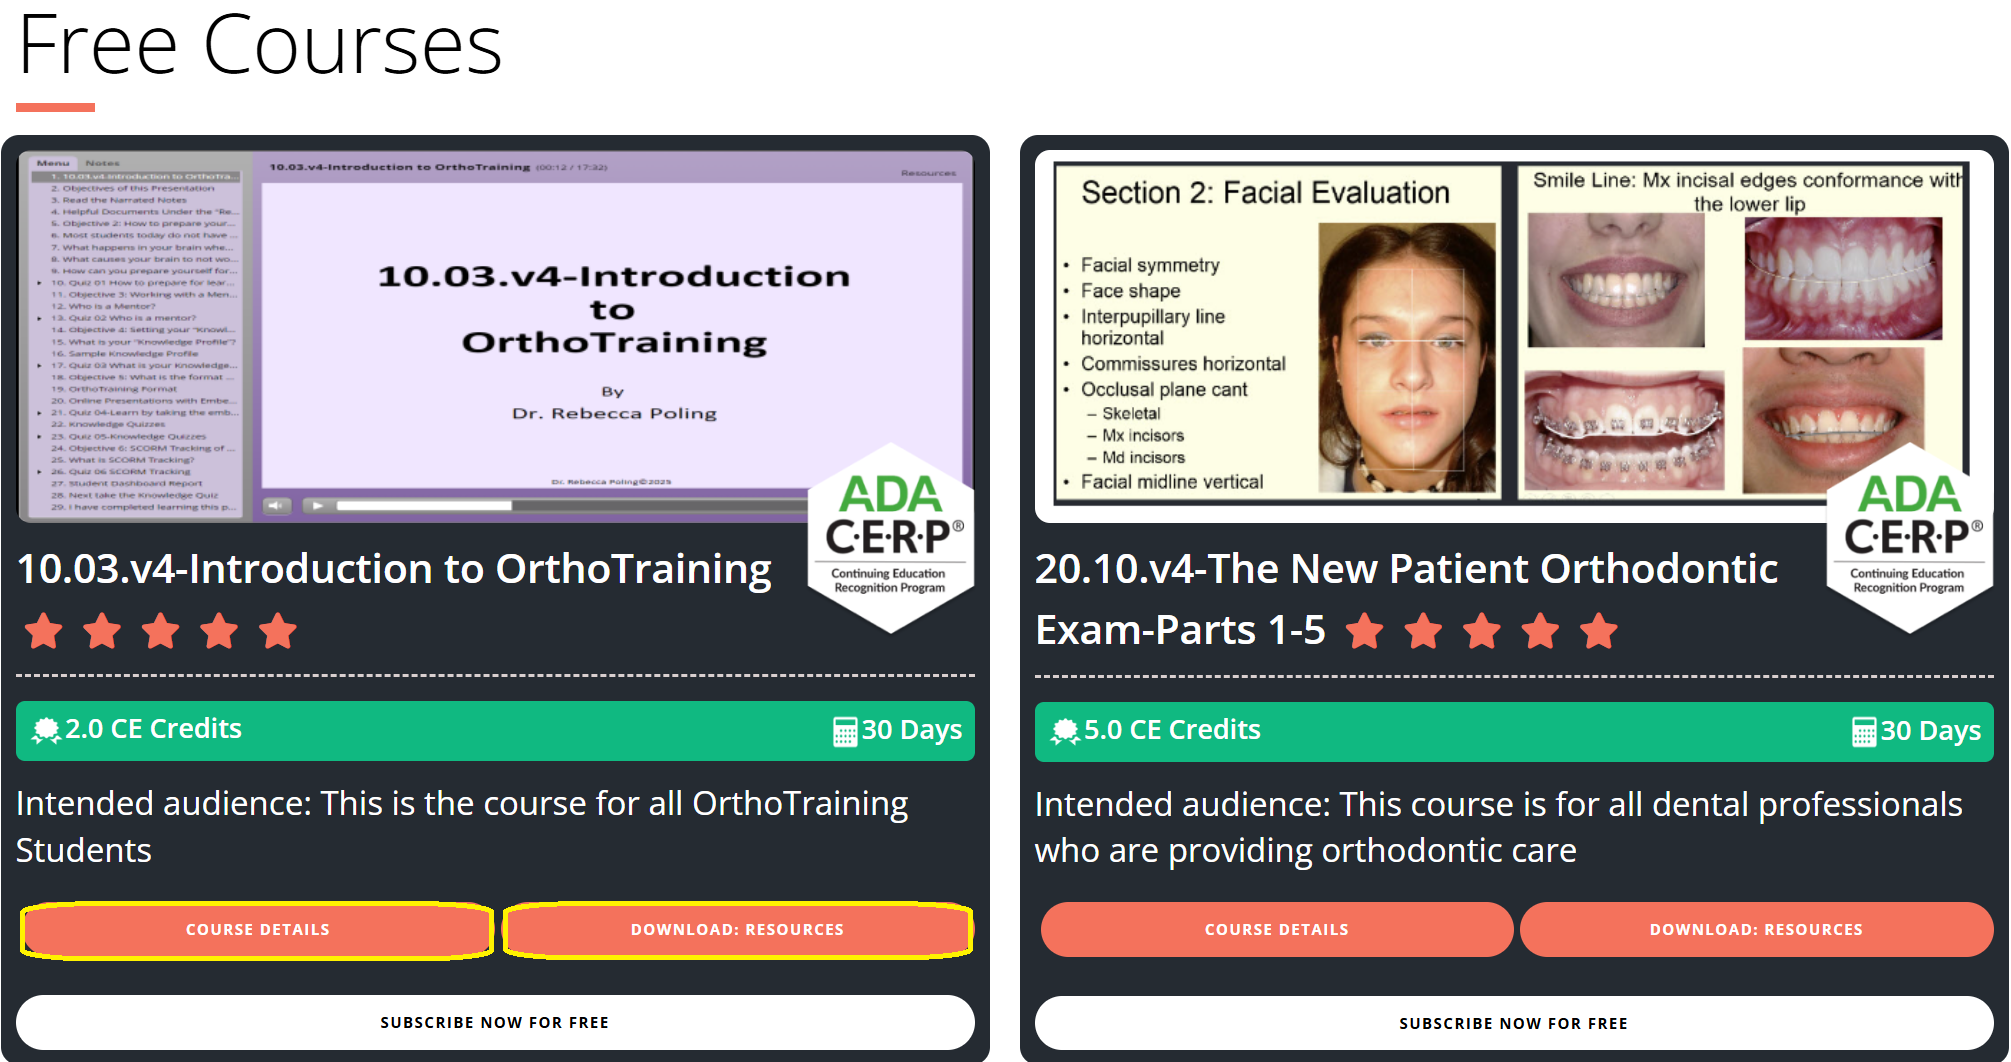
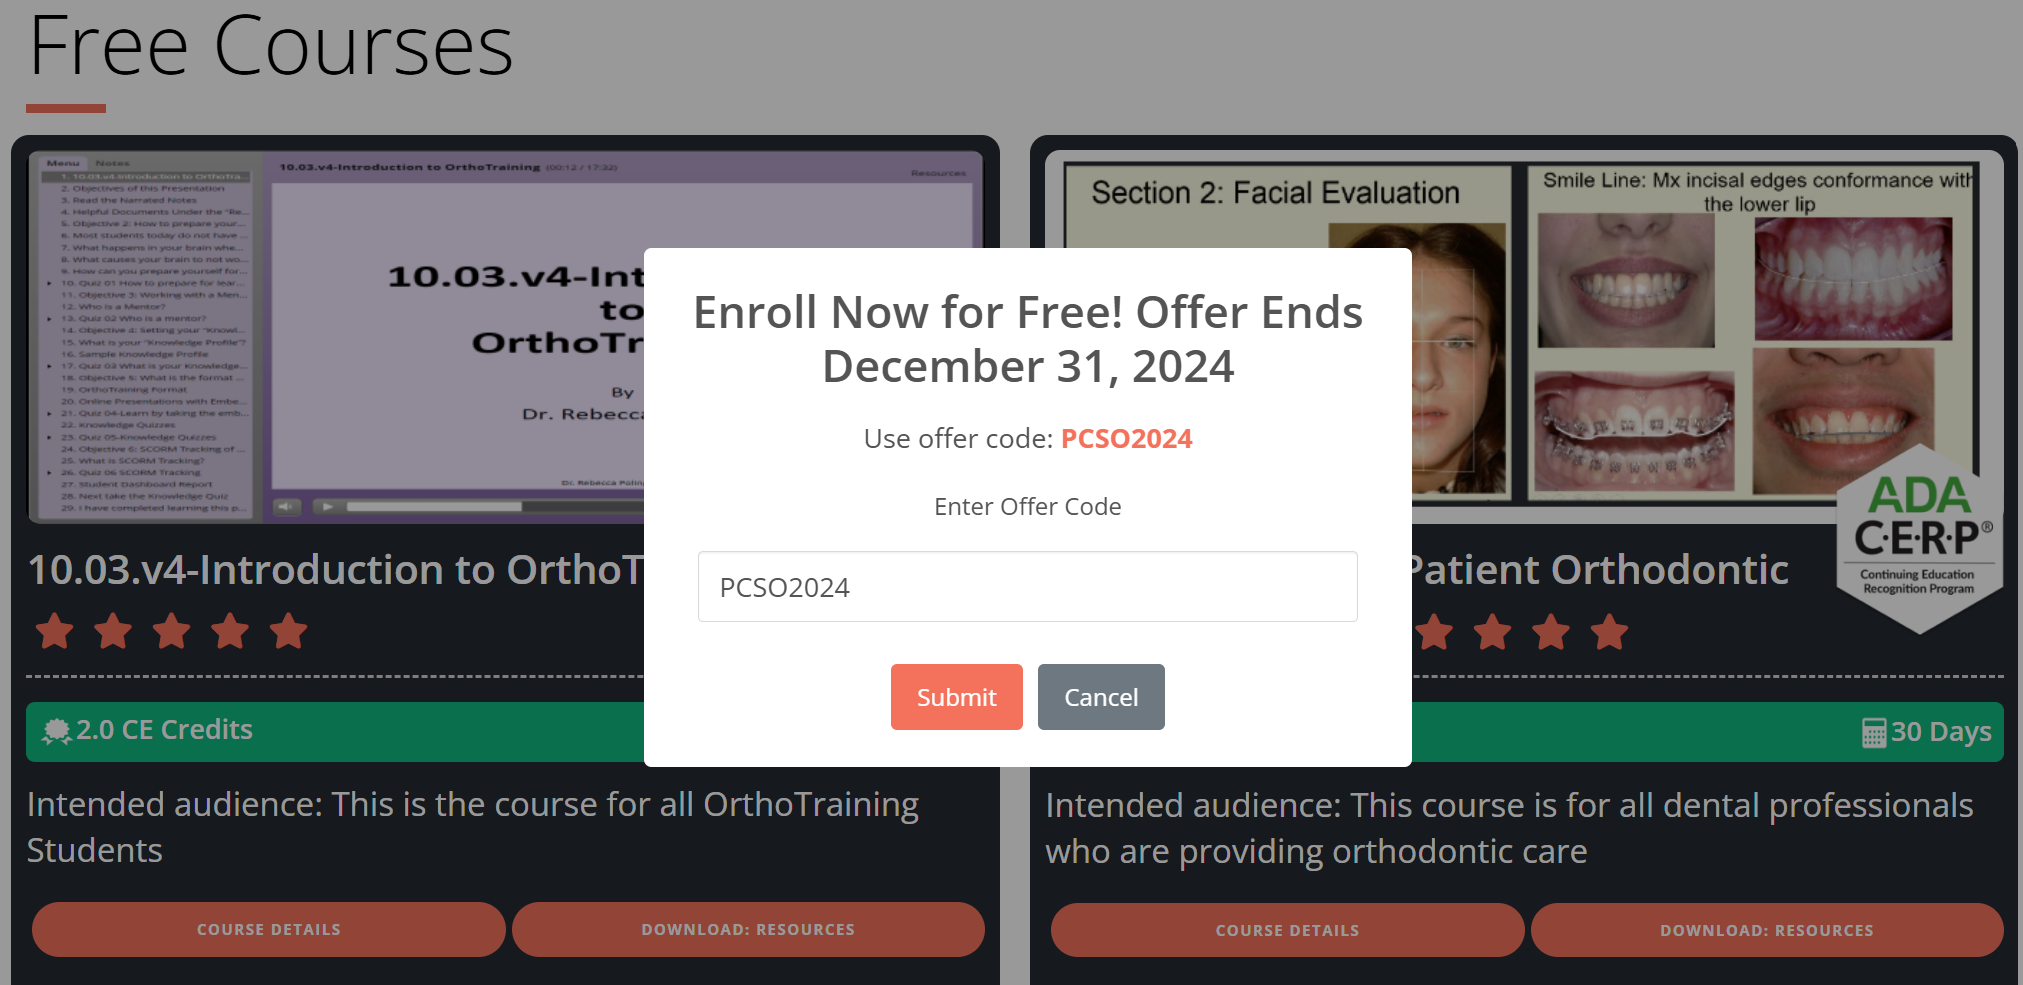
- Click on "Subscribe Now for Free" button to enroll in the free courses.
- You can also enroll in the free courses from Course Details page.
- You can get the course content of free courses from Download Resource section.
-
- Enter your login credentials and click on Sign In.
- If you don't have an account, then click on Create Account.

-
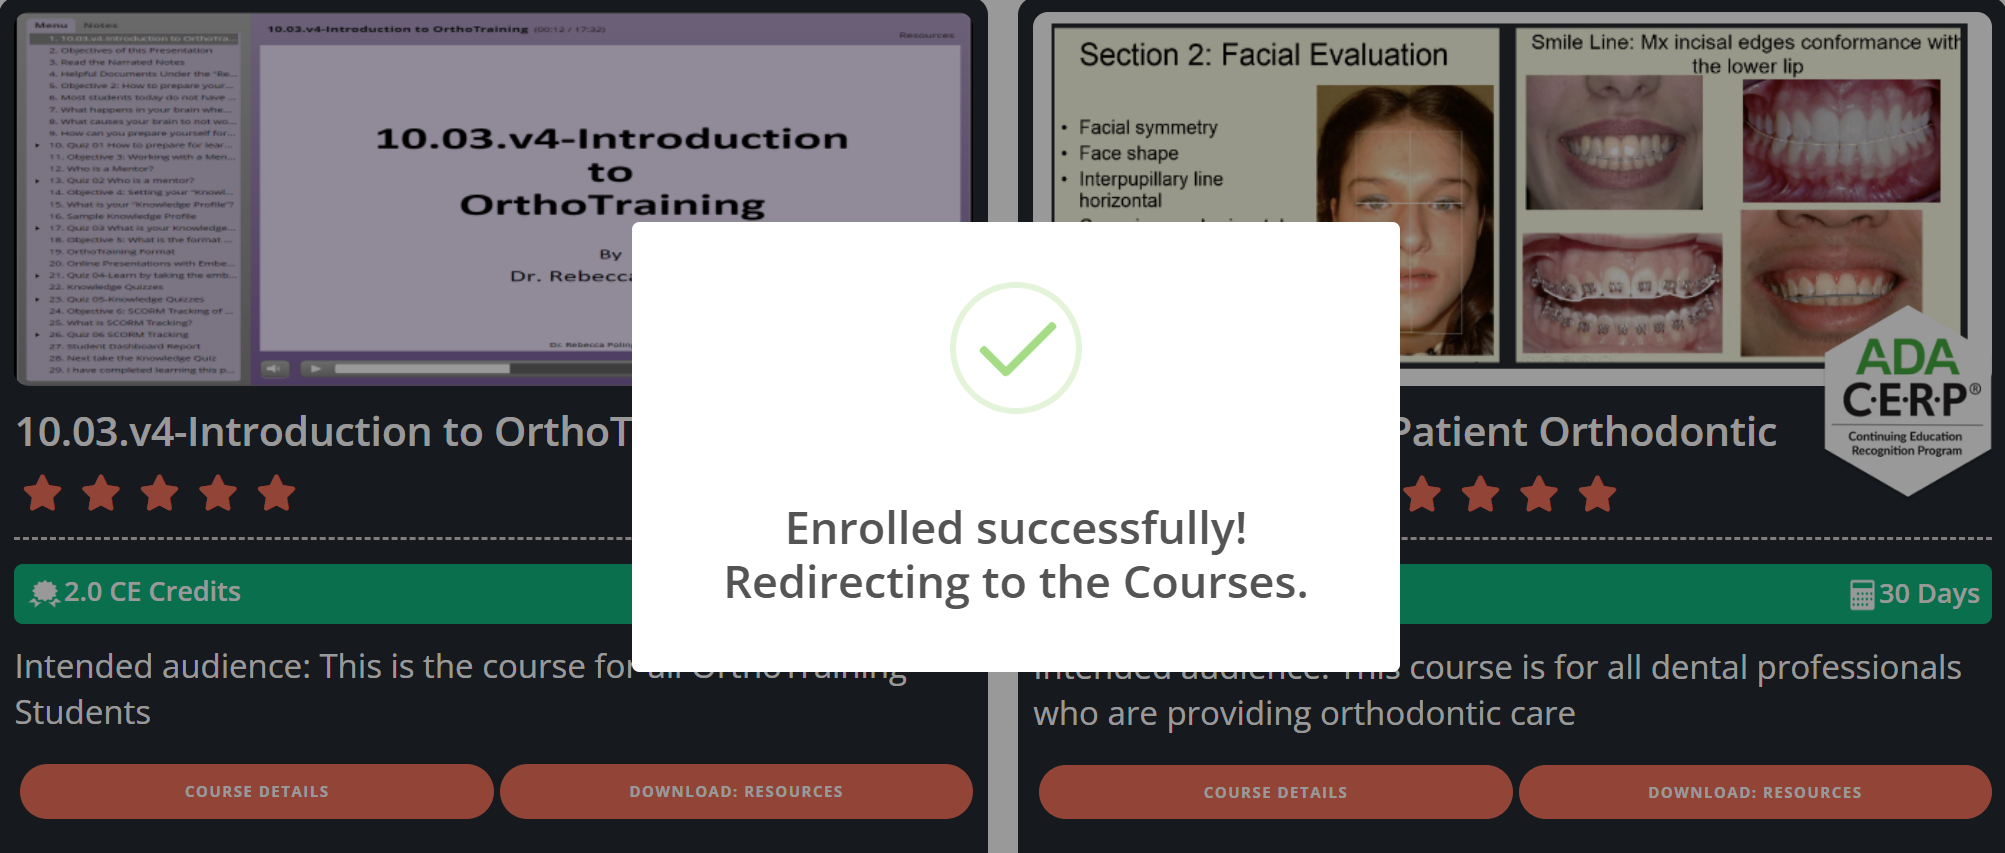
- Enter the offer code PCSO2024 and click on Submit.
-
-
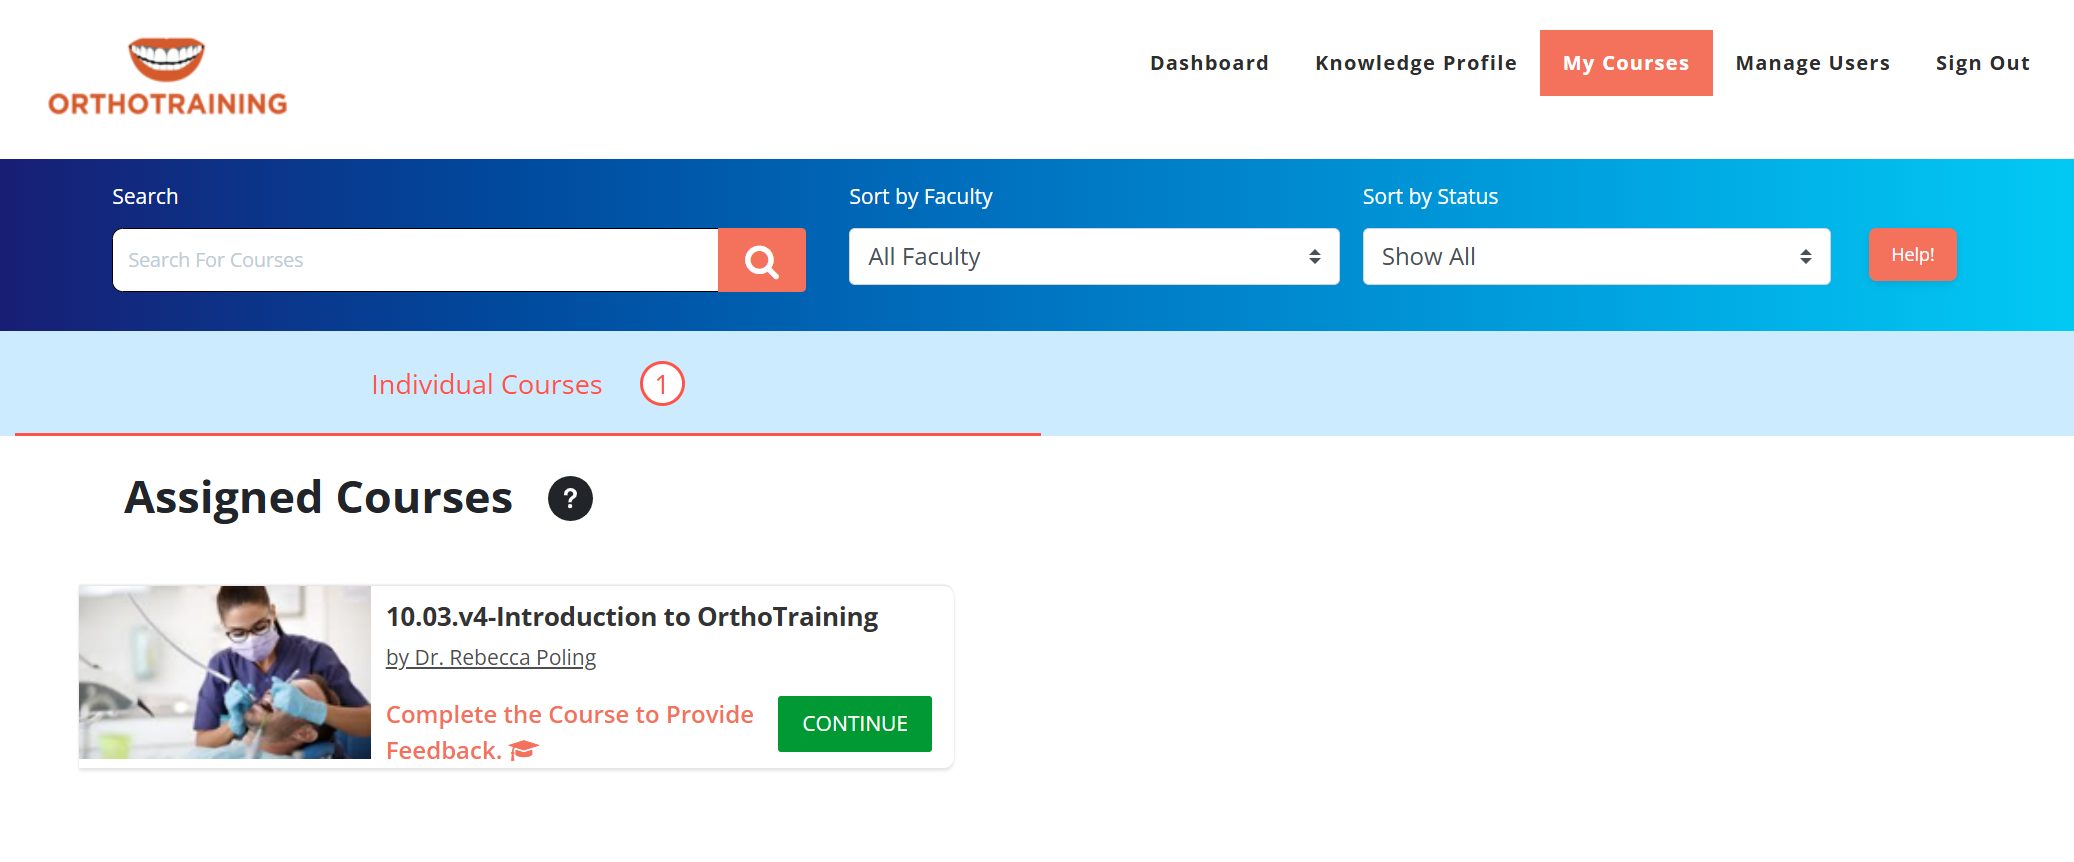
- Now, you can start learning the free course by clicking on Continue.
-
How can I purchase the courses Bundle?
-
Browse Courses:
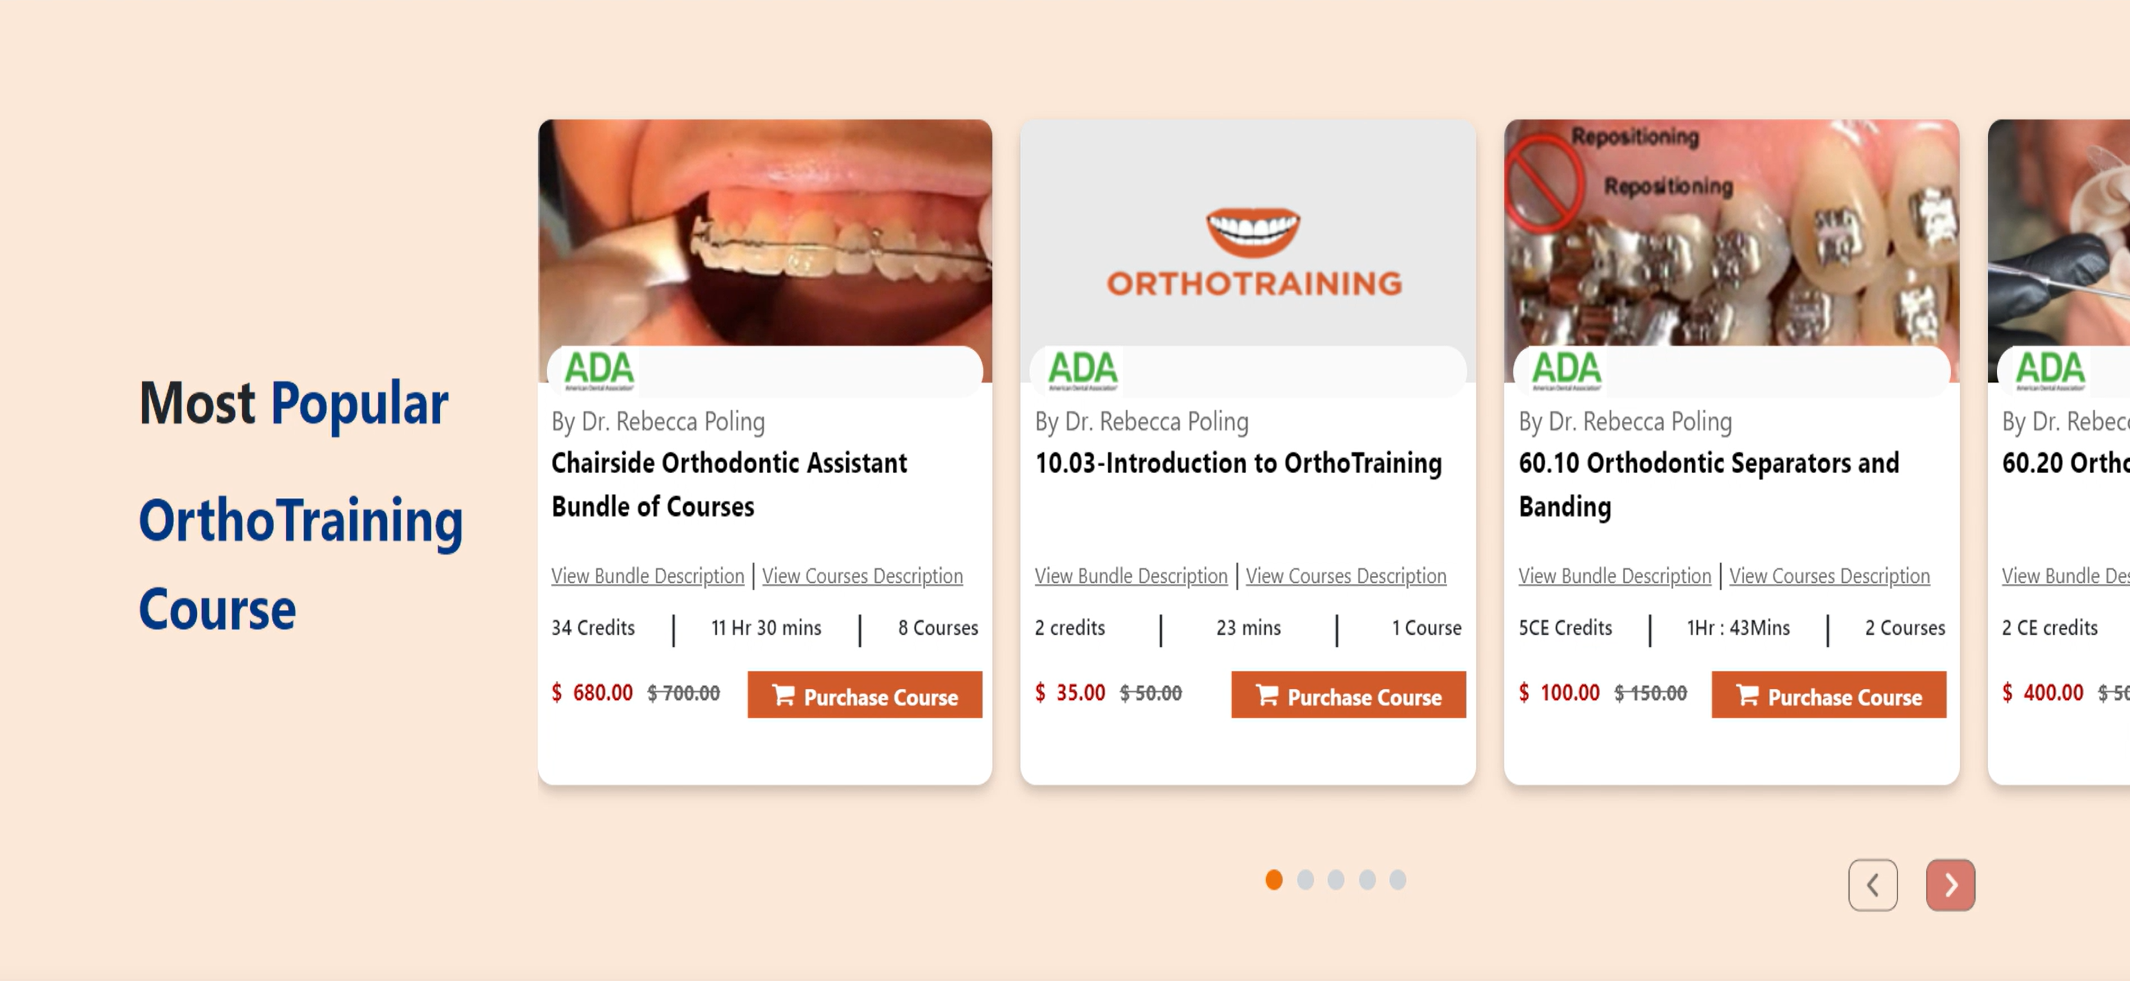
- Visit the Home page to view our diverse range of courses.
-
Enroll in a Course:
- Select the desired course and click on the "Enroll" button.
-
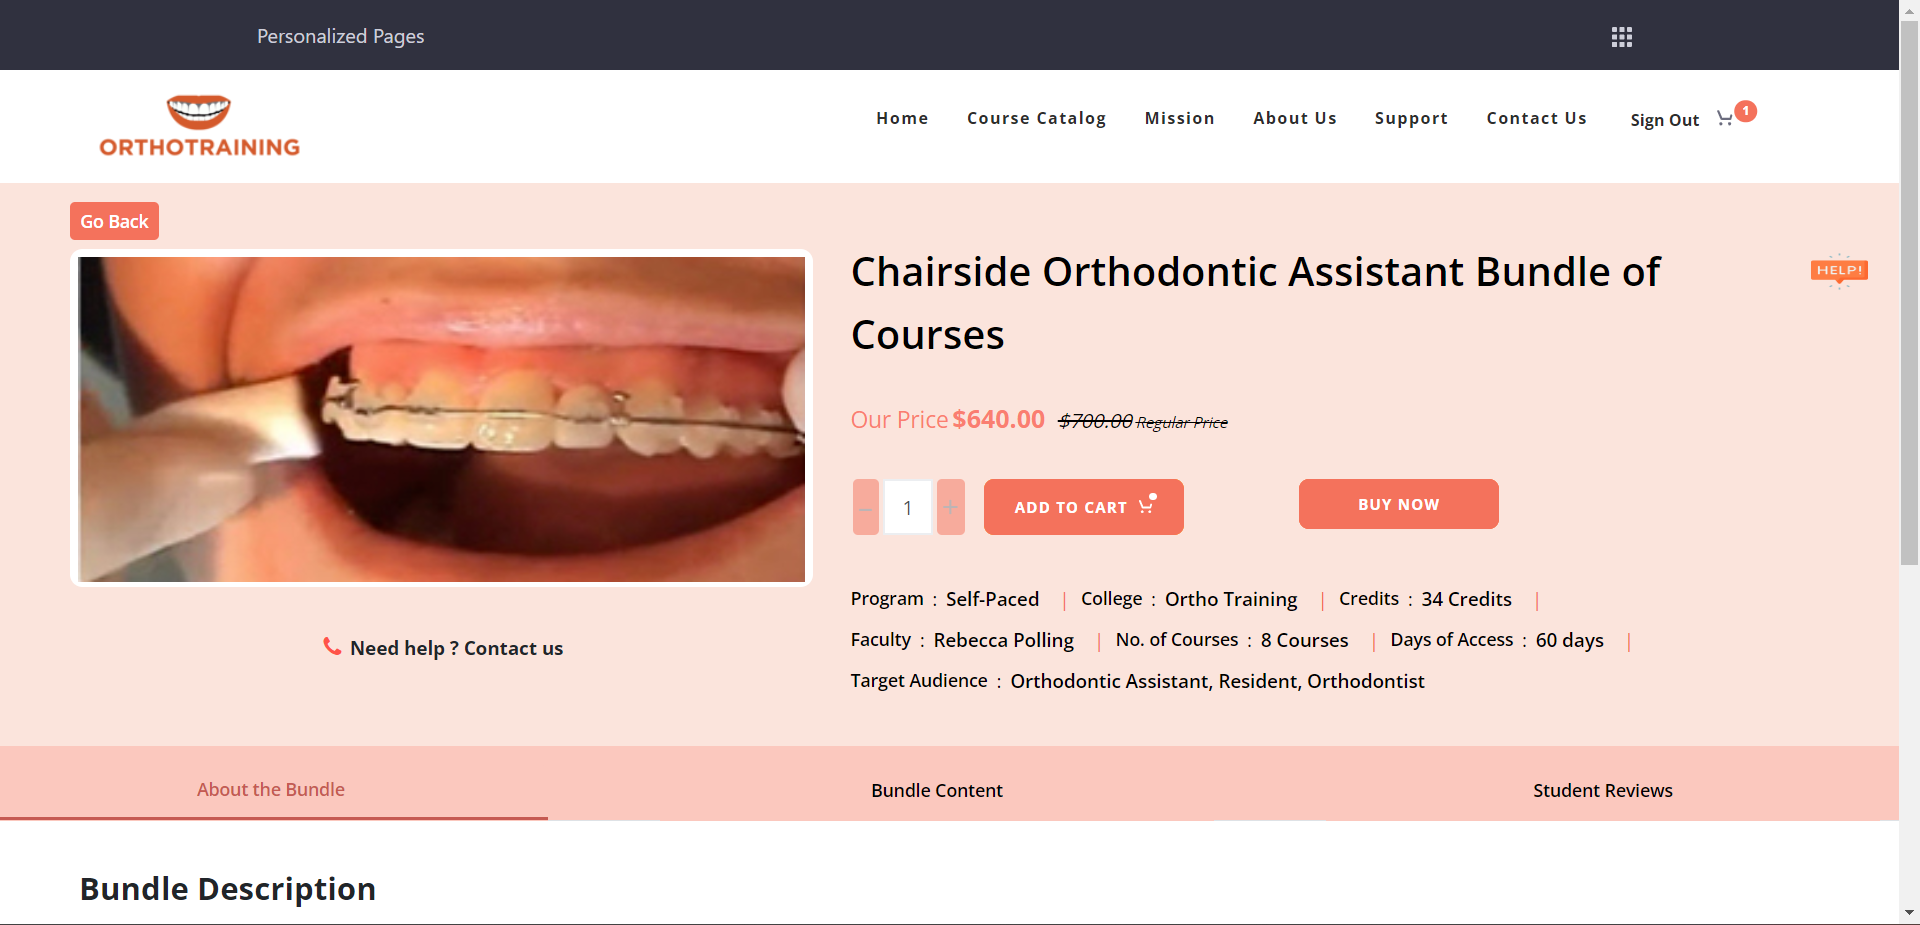
Course Information Page:
- You will be redirected to the course information page. Click on "Buy Now" to proceed.
-
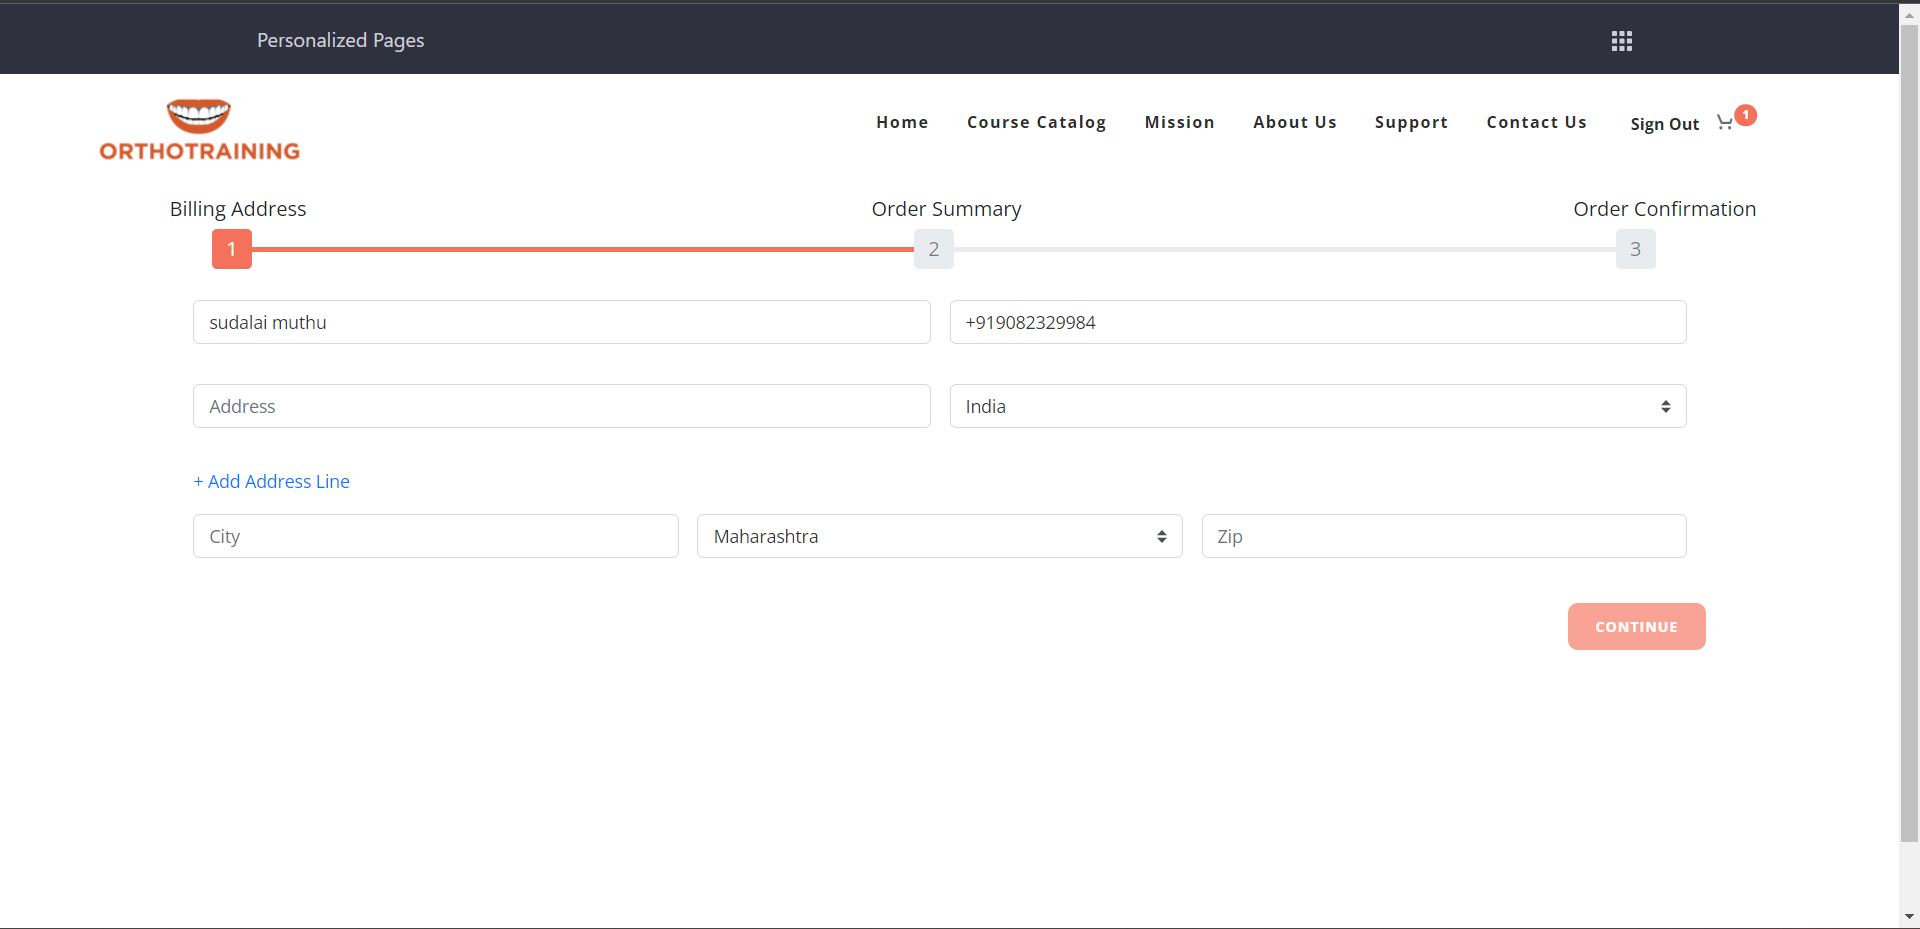
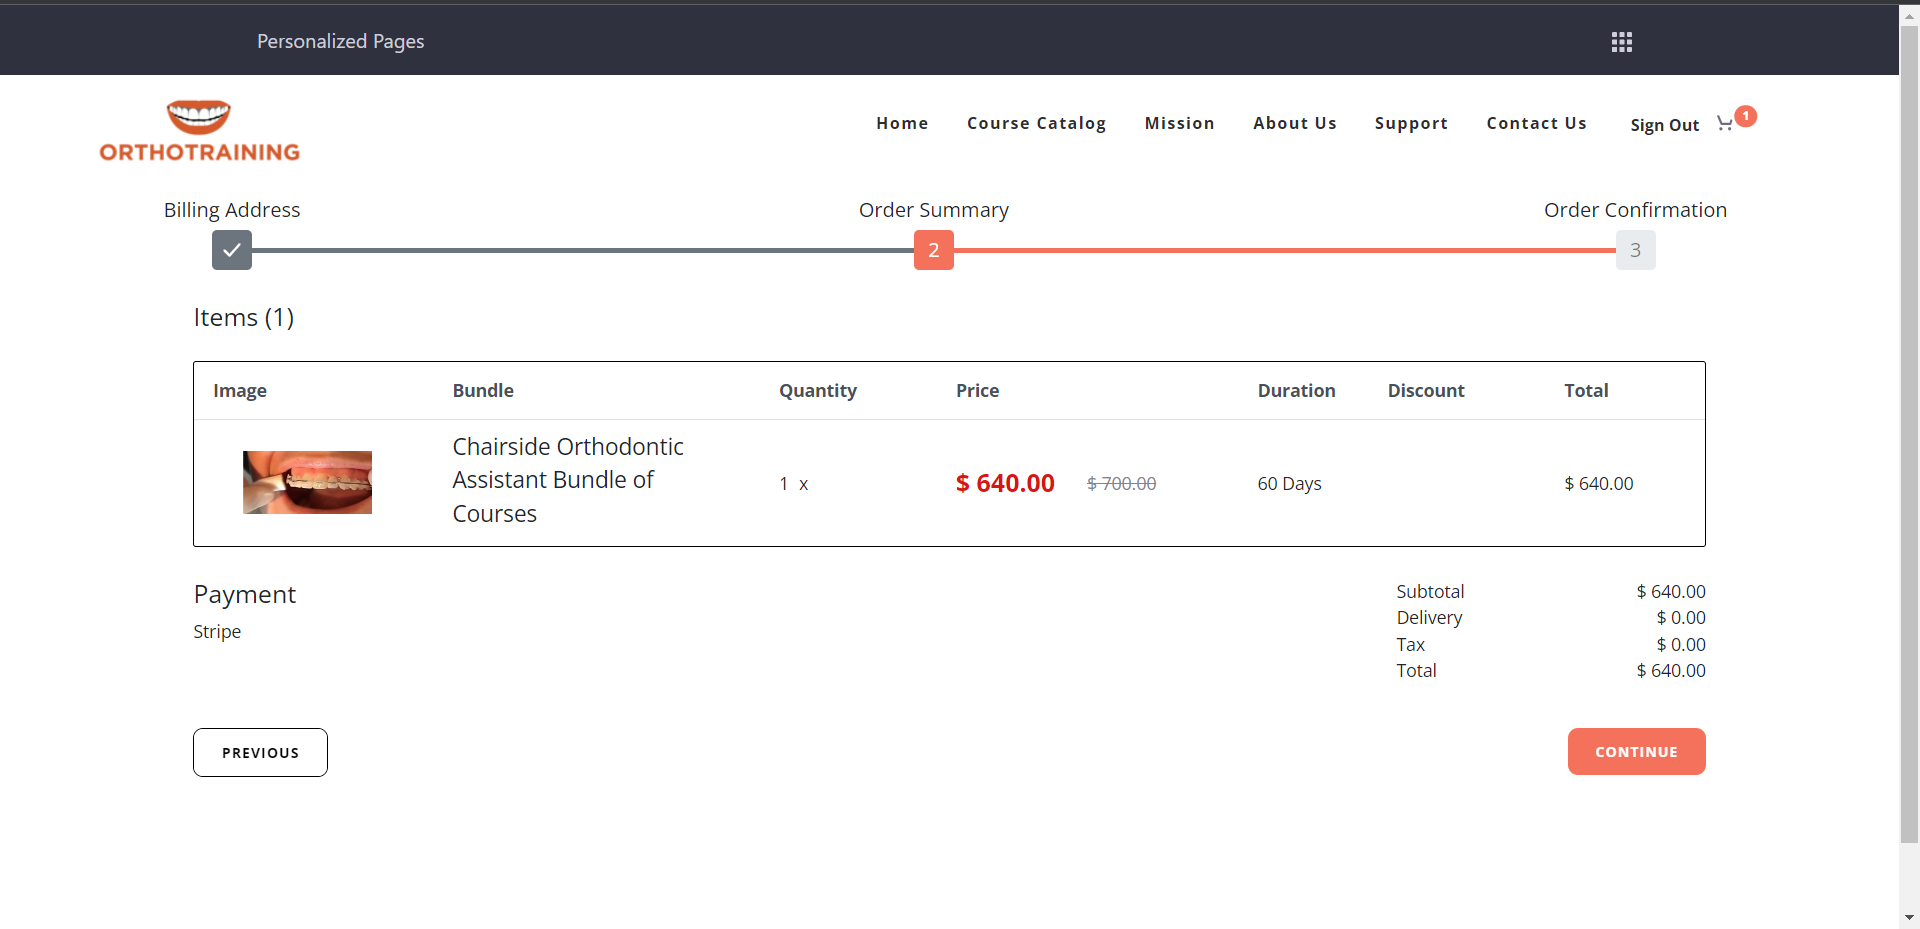
Billing Address:
- Navigate to the Billing address details form.
- Provide billing details and payment information.
- Click on "CONTINUE" to move forward.
-
-
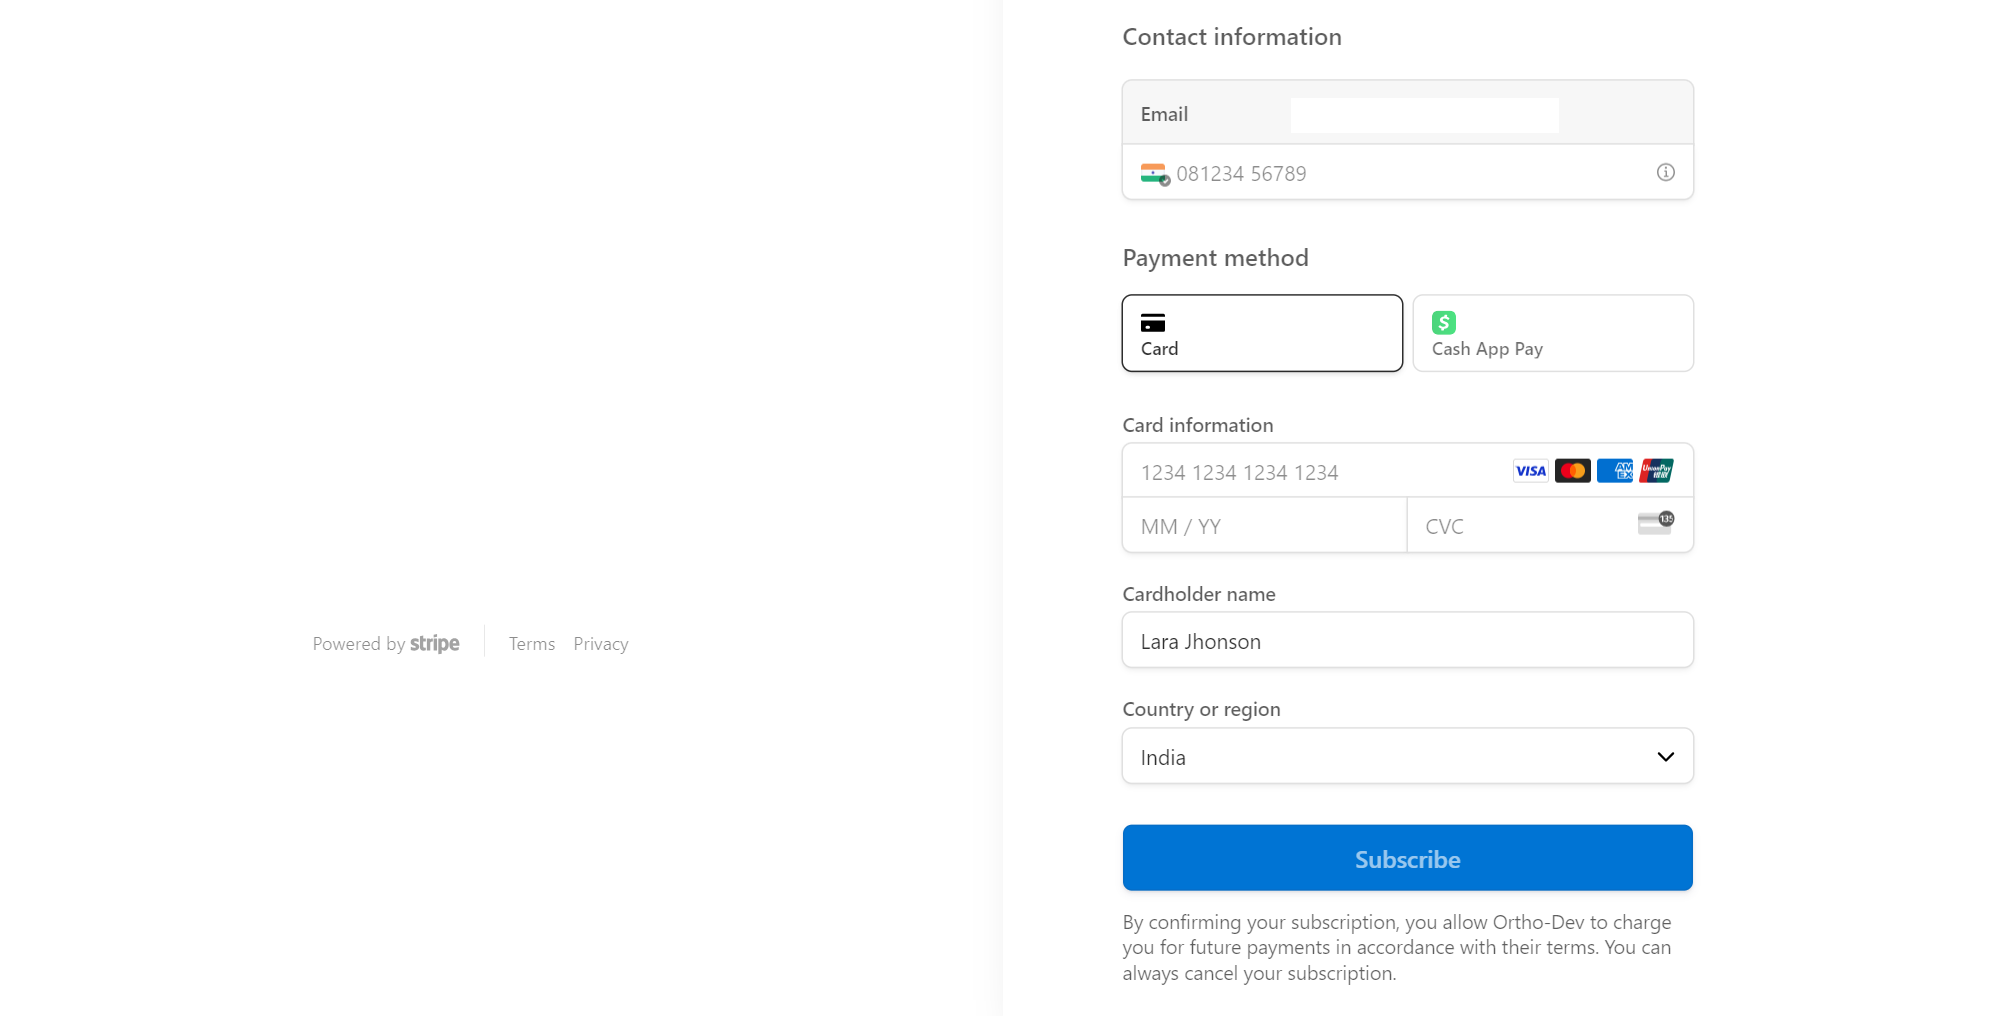
Payment Gateway:
- You will be redirected to the Payment Gateway page.
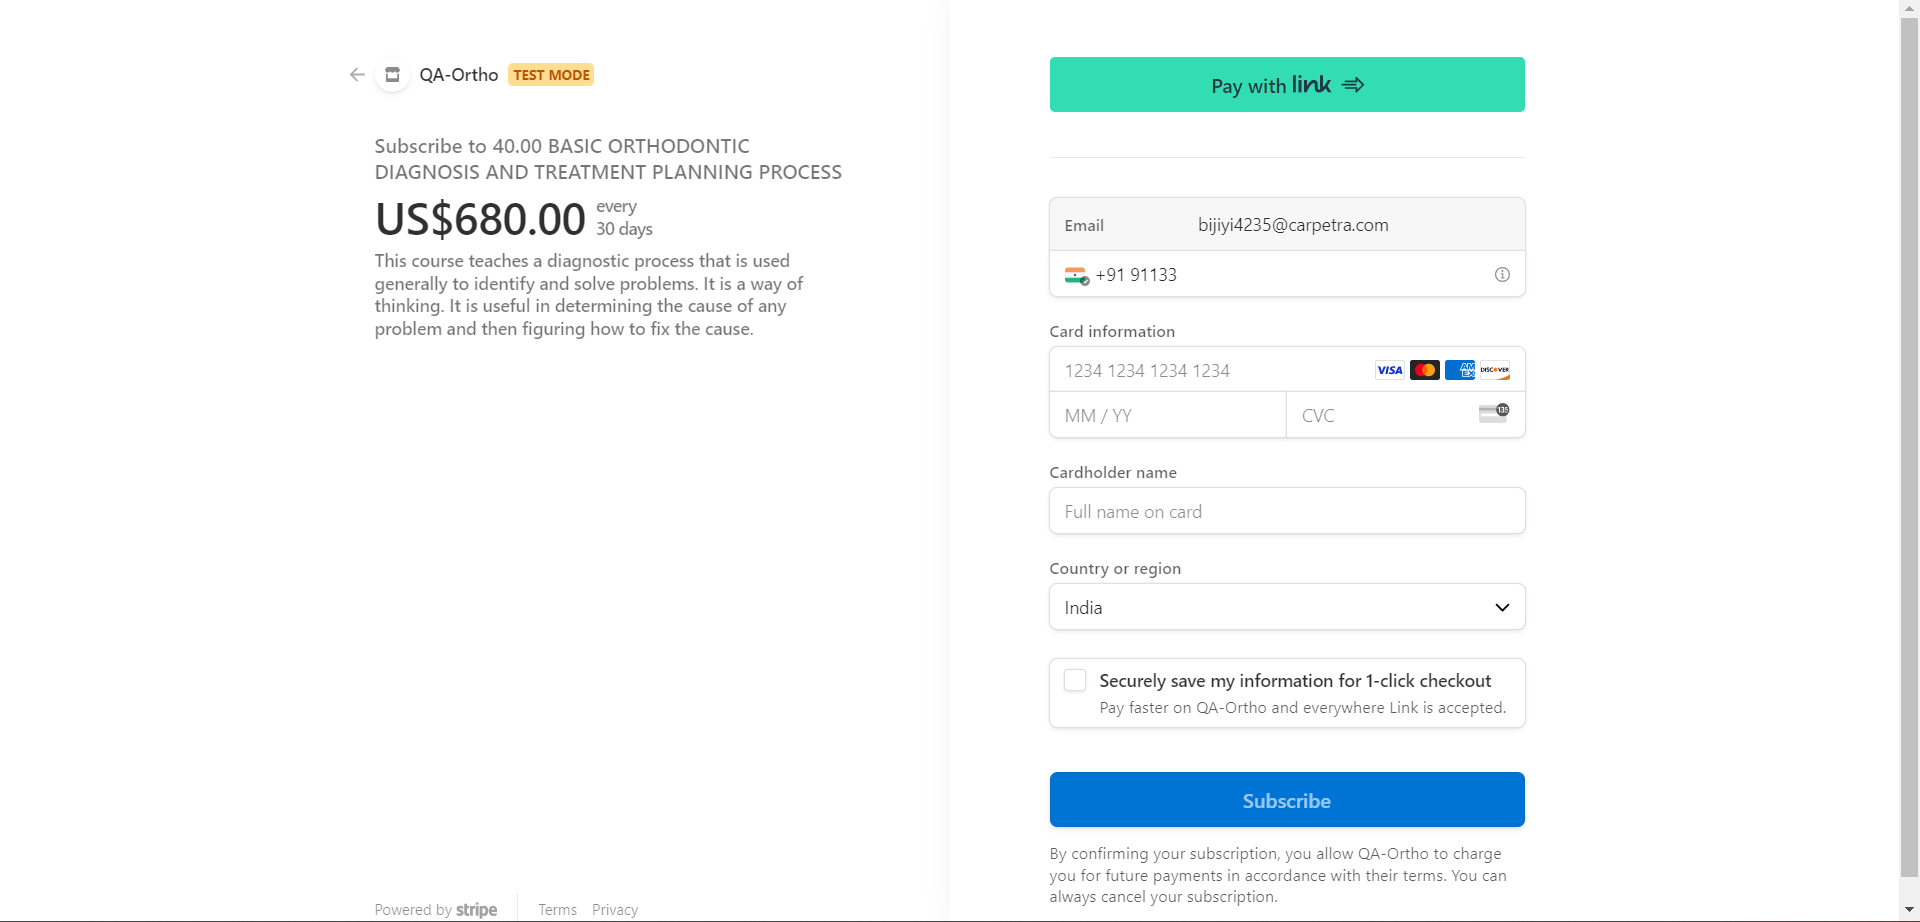
- Enter your card details and click on the "Subscribe" button to confirm your enrollment.
-
Subscription Confirmation:
- Upon successful payment, you will be redirected to a page where you can view the details of the subscribed courses.

-
How can I view the Course Categories?
-
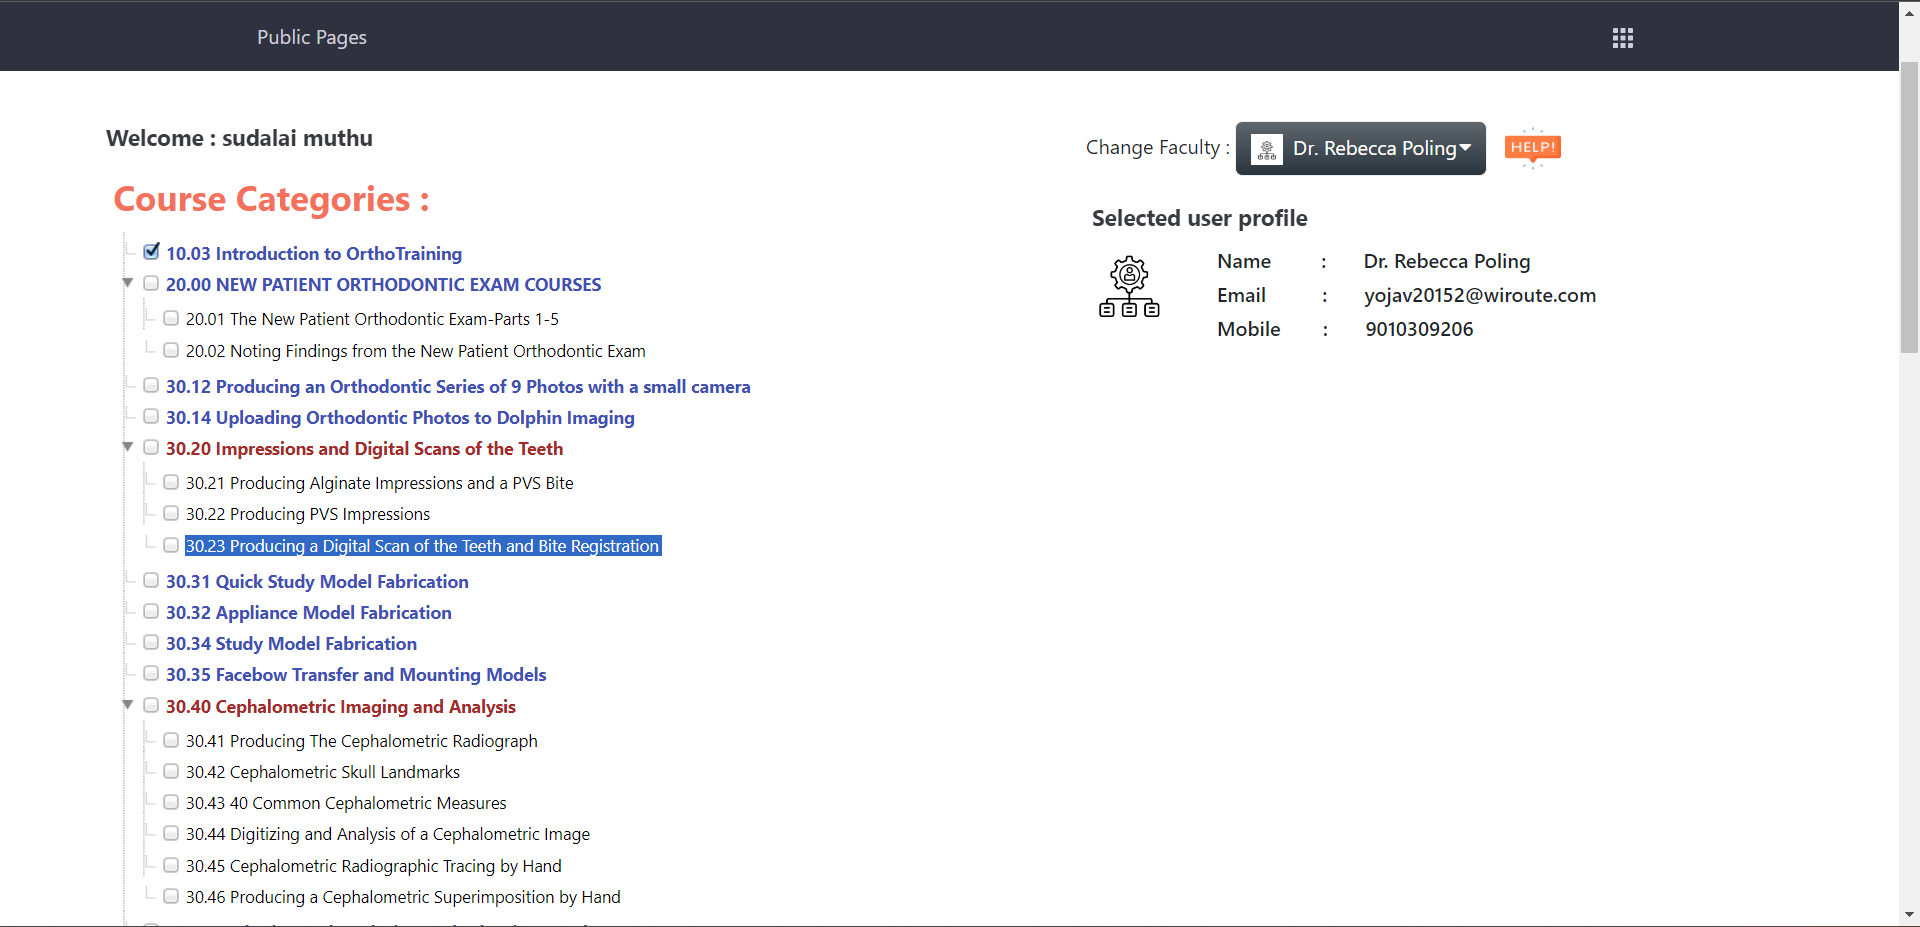
- Go to the Knowledge Profile page.
- You can view all the course categories assigned to you.
-
- Based on these Course Categories students can learn the courses.
-
How can I Access the Courses?
-
- Log in to the website using your student credentials.
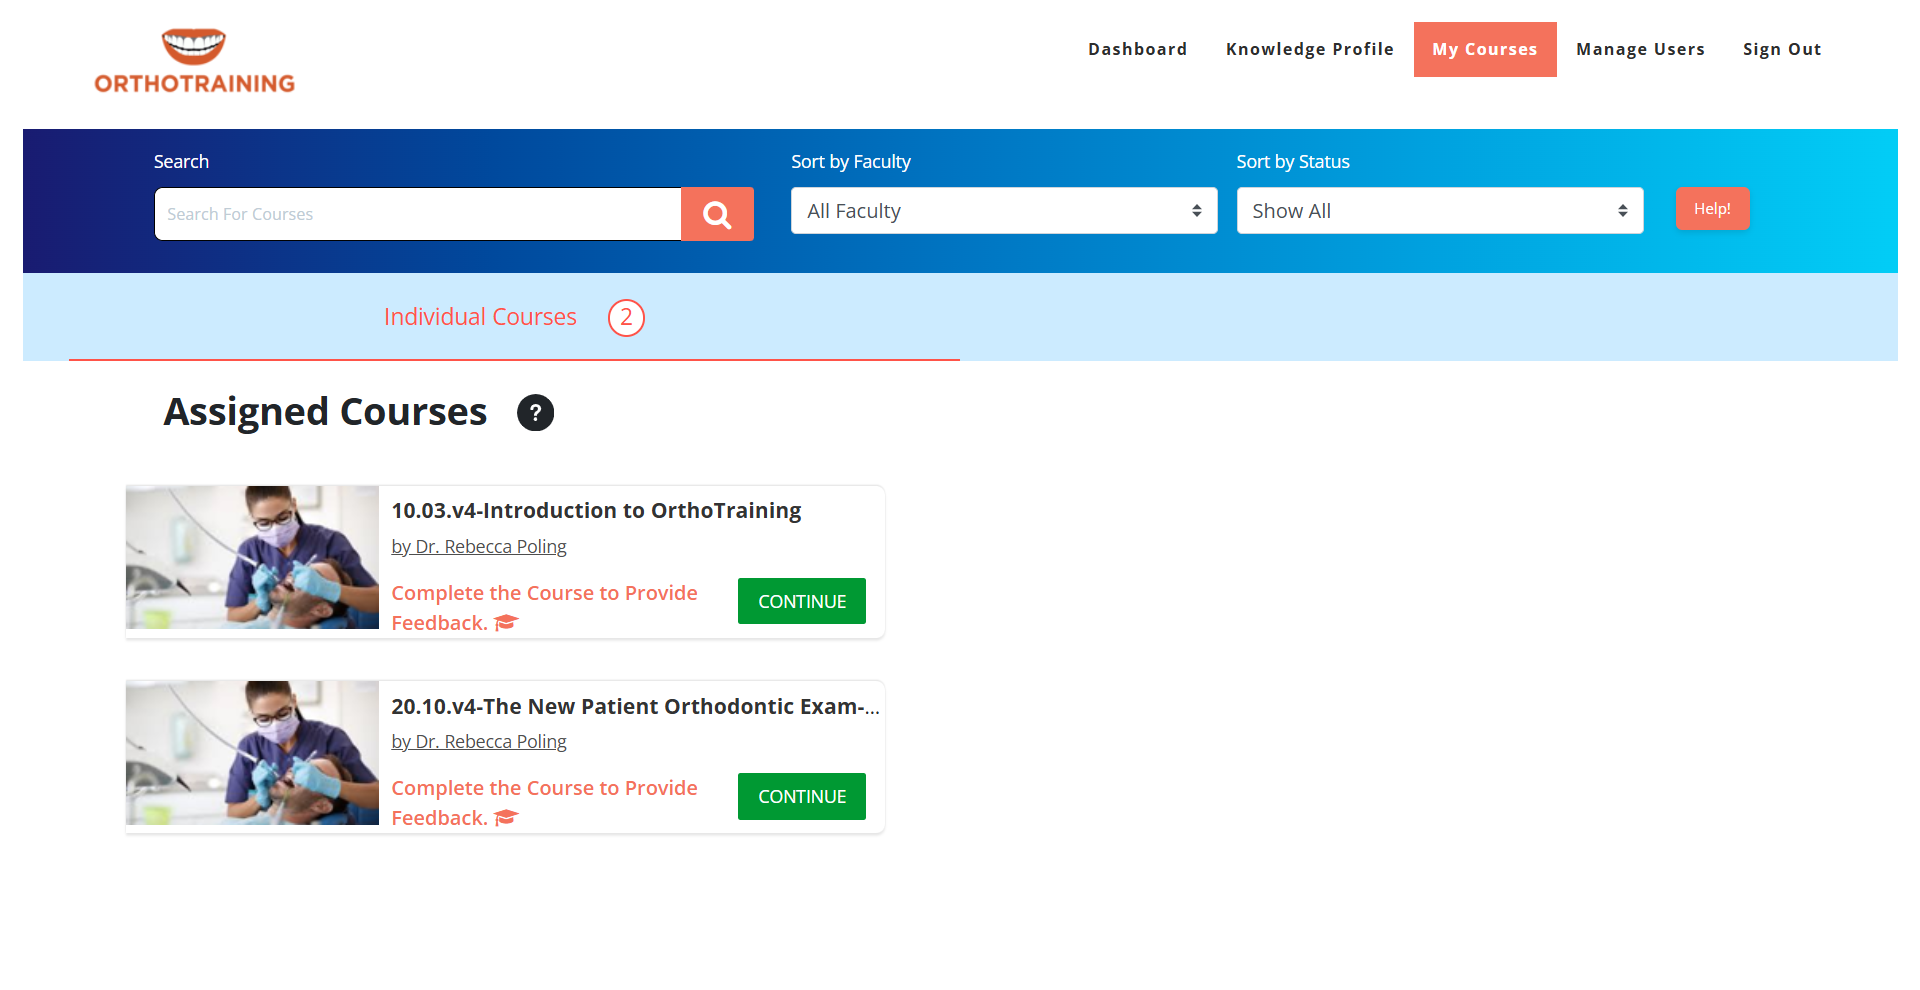
- Upon logging in, you will be directed to the MyCourses page.
- View all the courses assigned to you or purchased by you.
- Click on the "Continue" button to begin your comprehensive learning journey through the selected course.
-
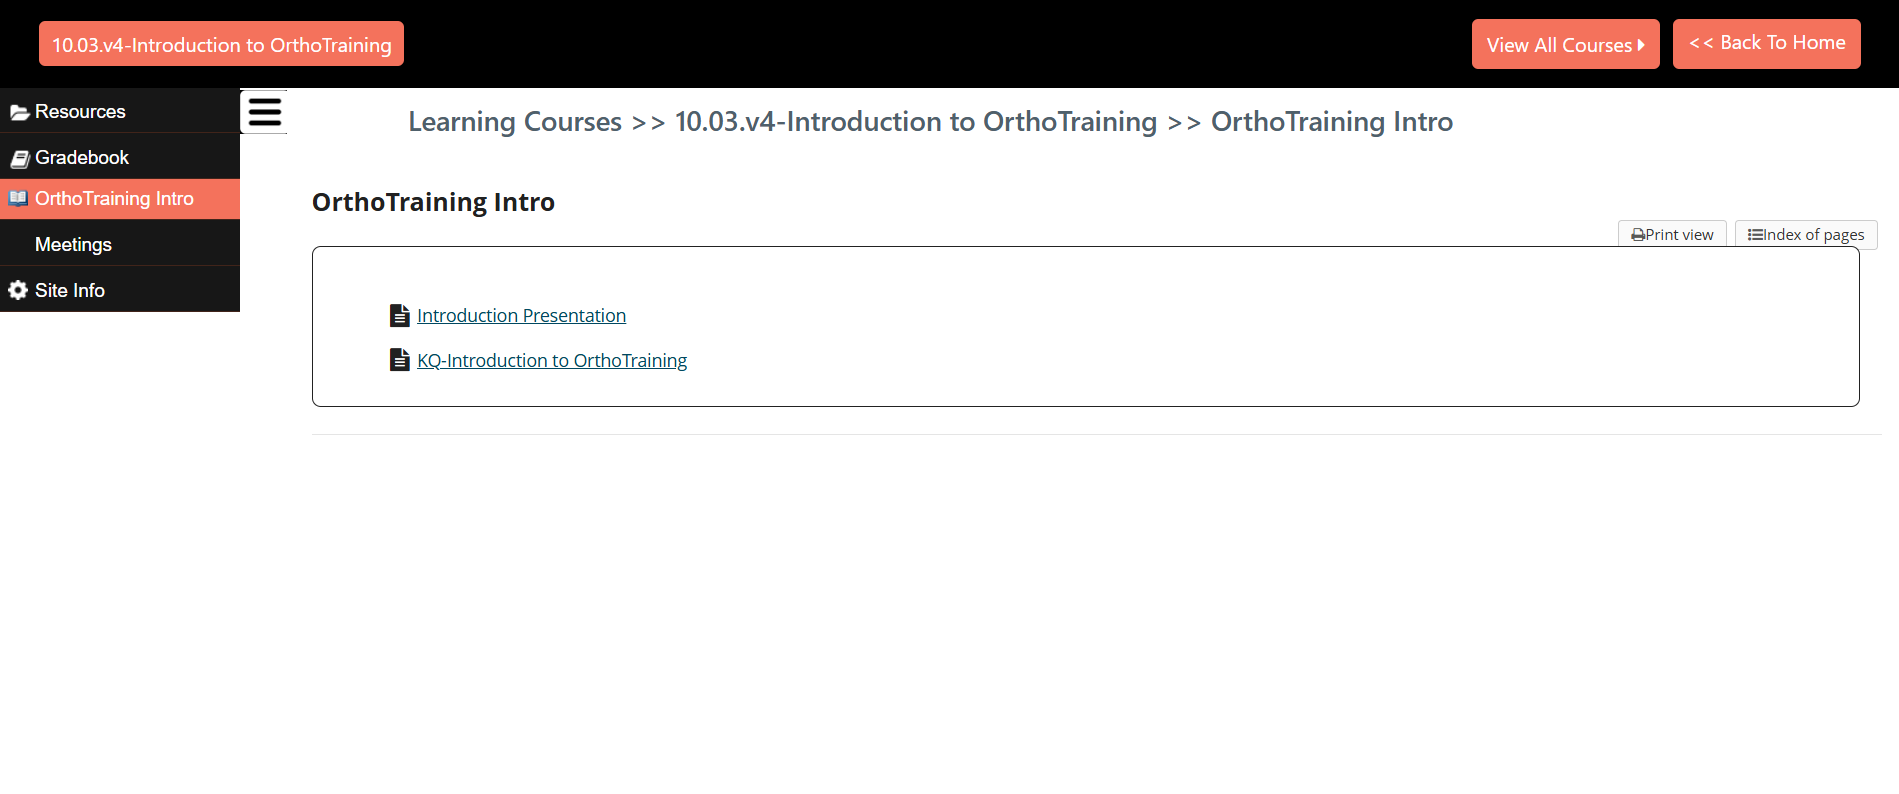
- Explore detailed information by navigating through the course content.
-
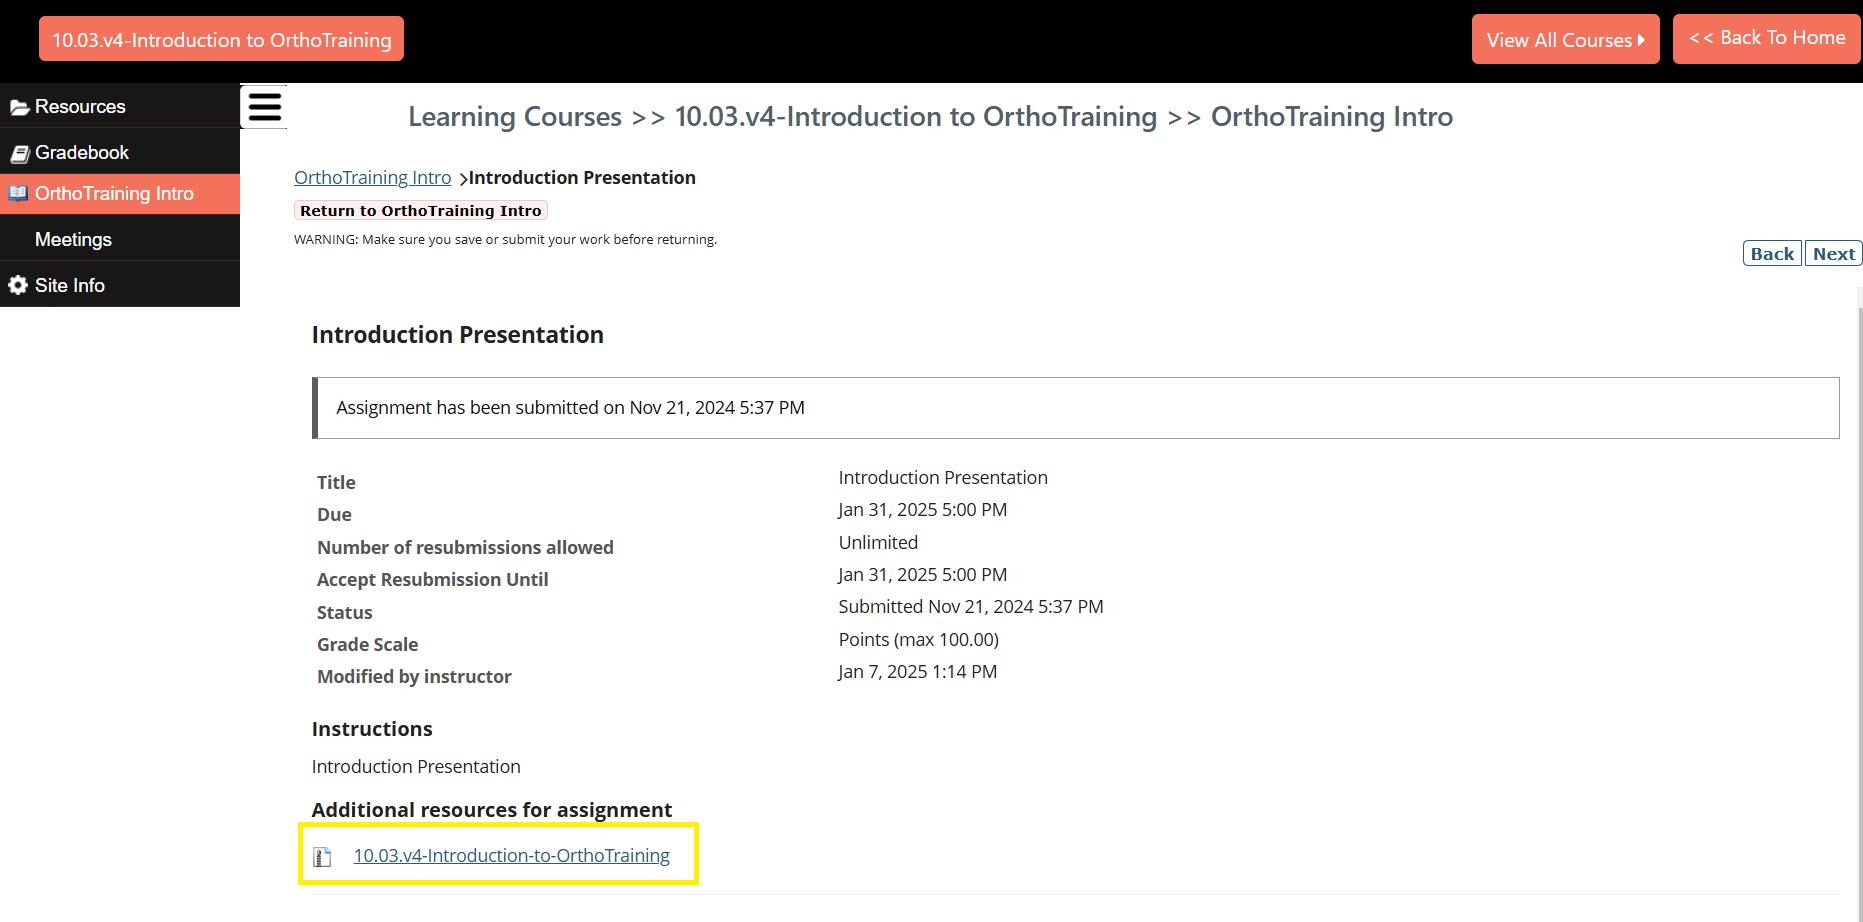
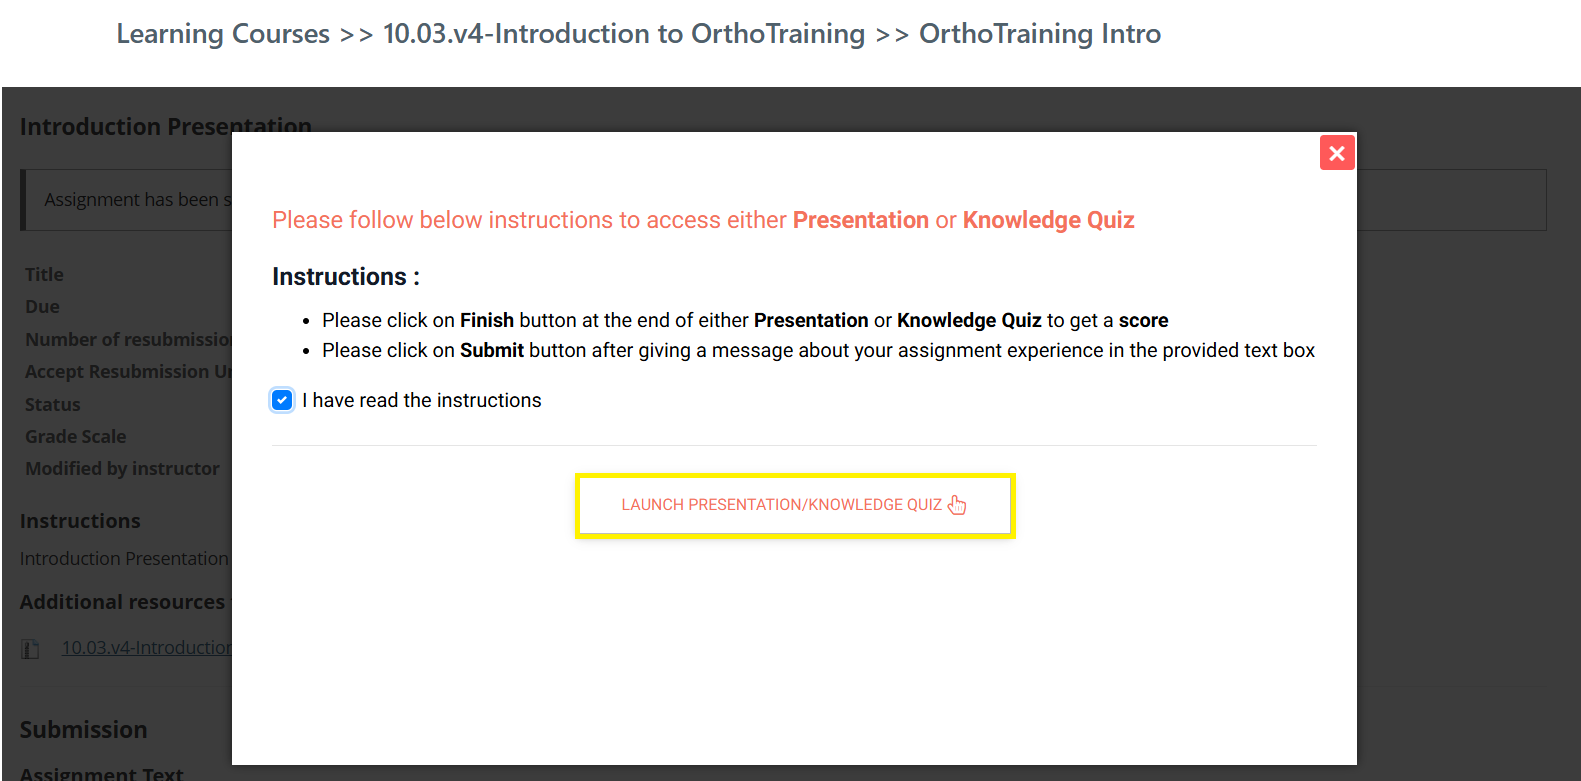
- Click on the Presentation Link
-
- Launch the Presentation
-
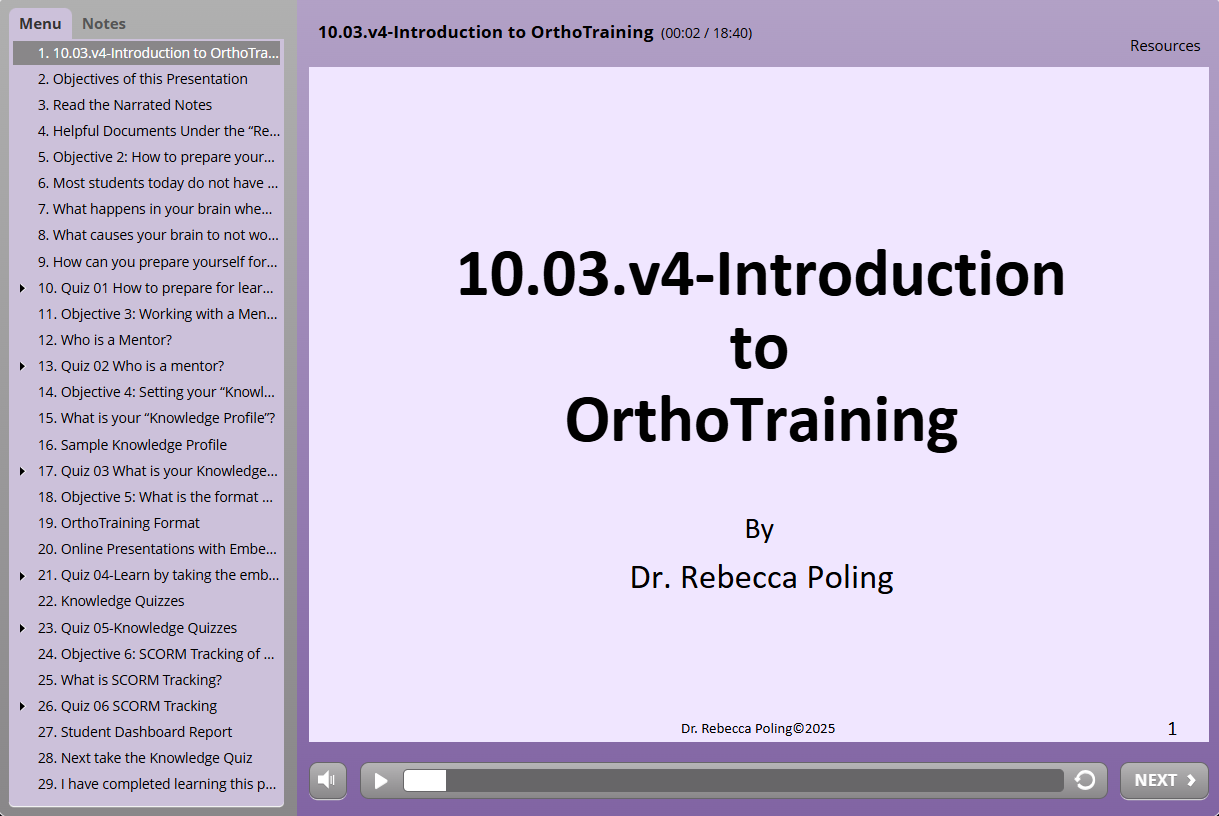
- Learn about the course by going through the Presentation created by Dr. Rebecca Poling
-
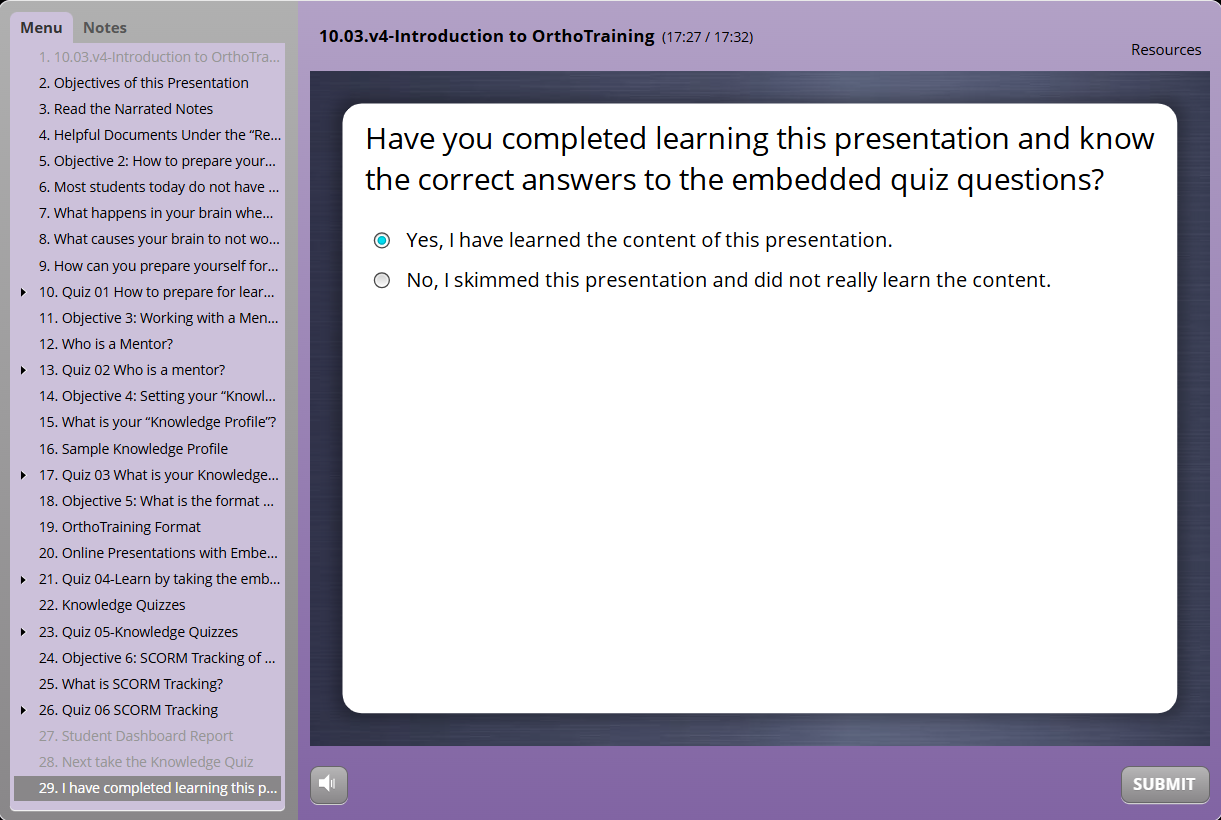
- Select "Yes, I have learned the content of this presentation."
-
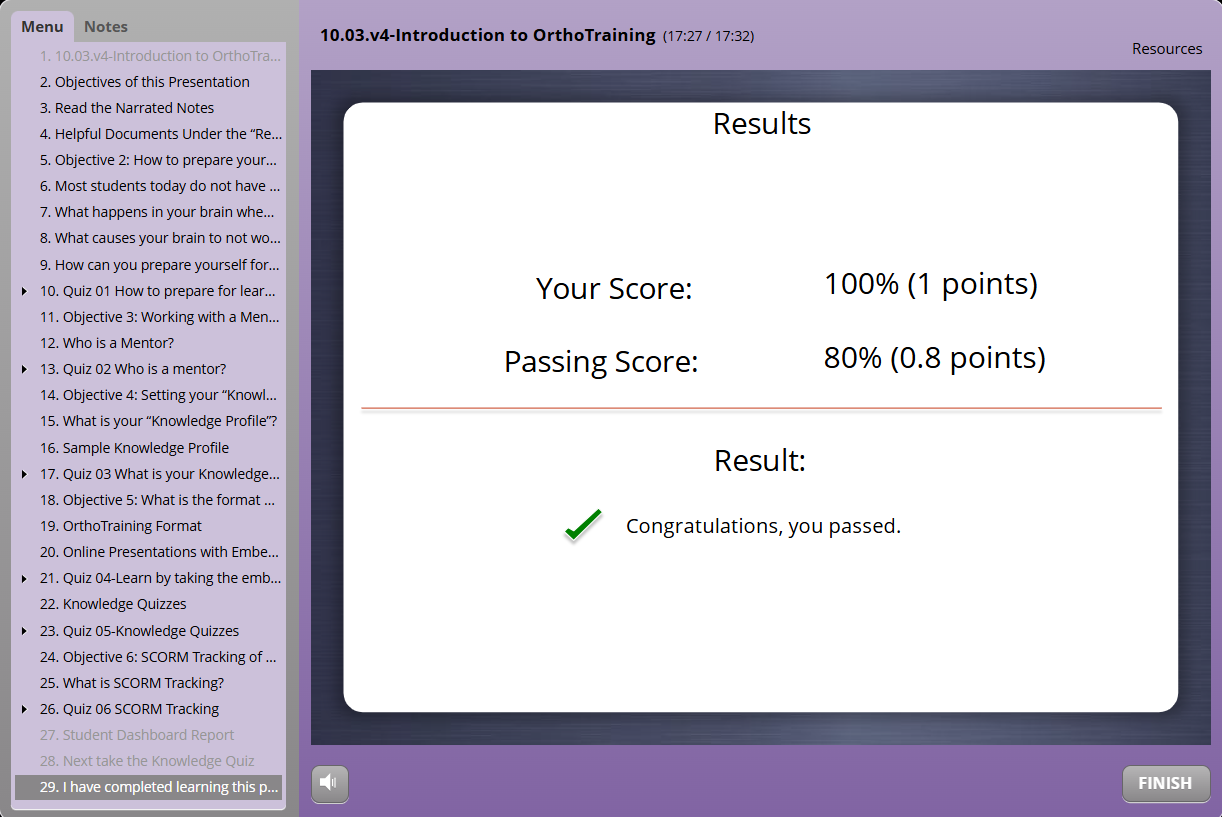
- Review your Passing Score, then click "Finish" to complete.
-
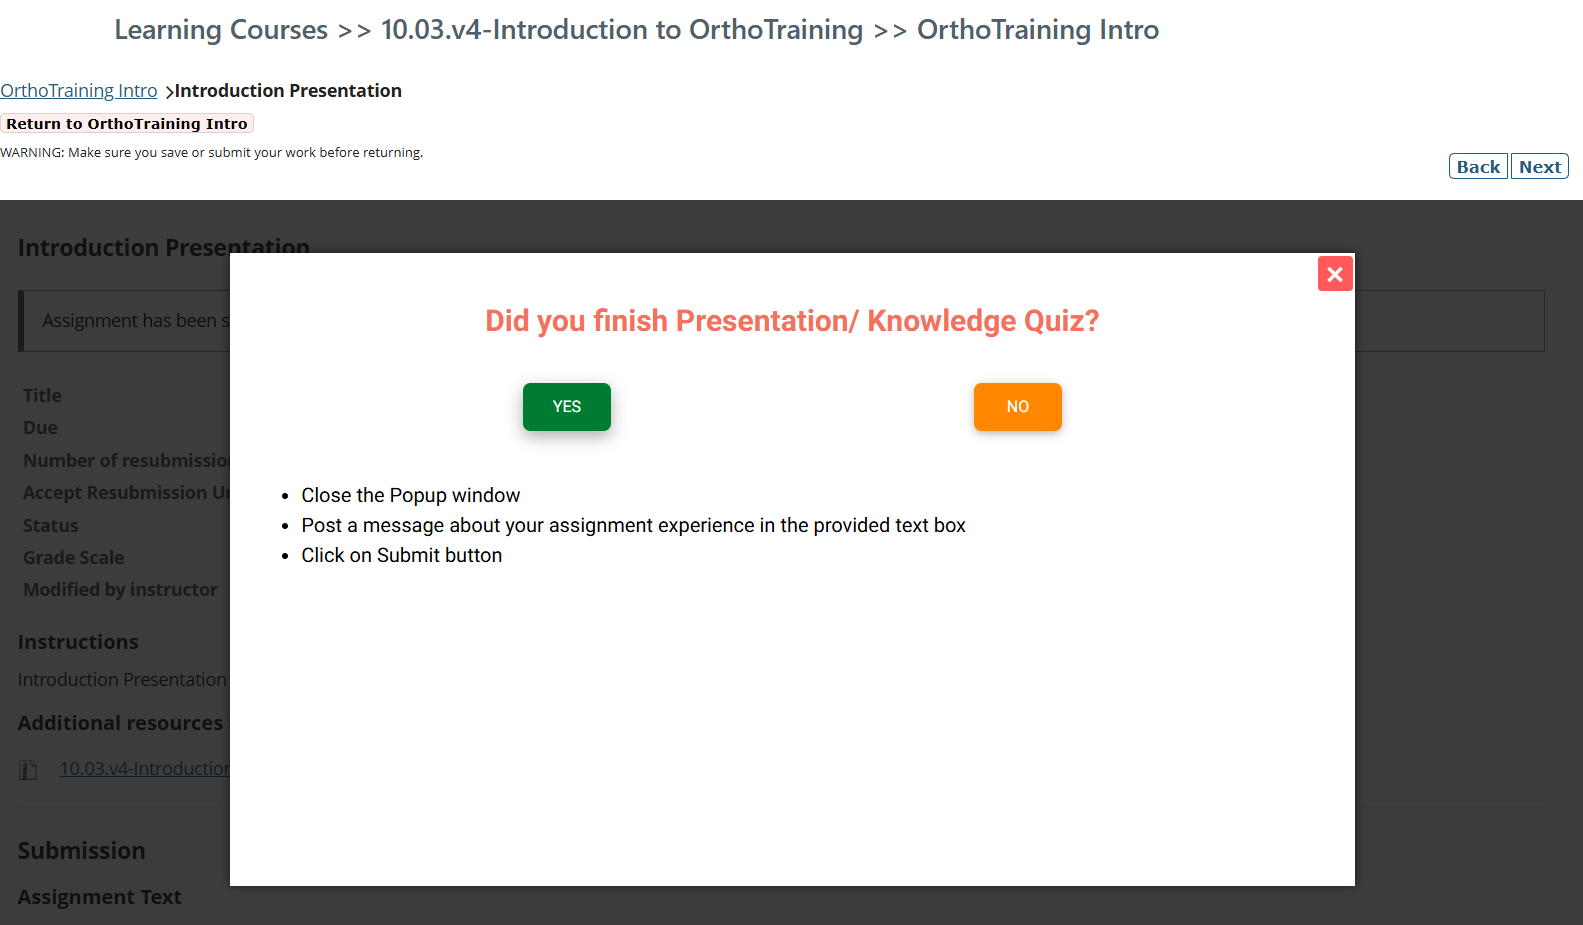
- Click Yes and provide your valuable feedback
-
- Go to Dashboard page to view your course result
-
How can I Check my Courses performance?
-
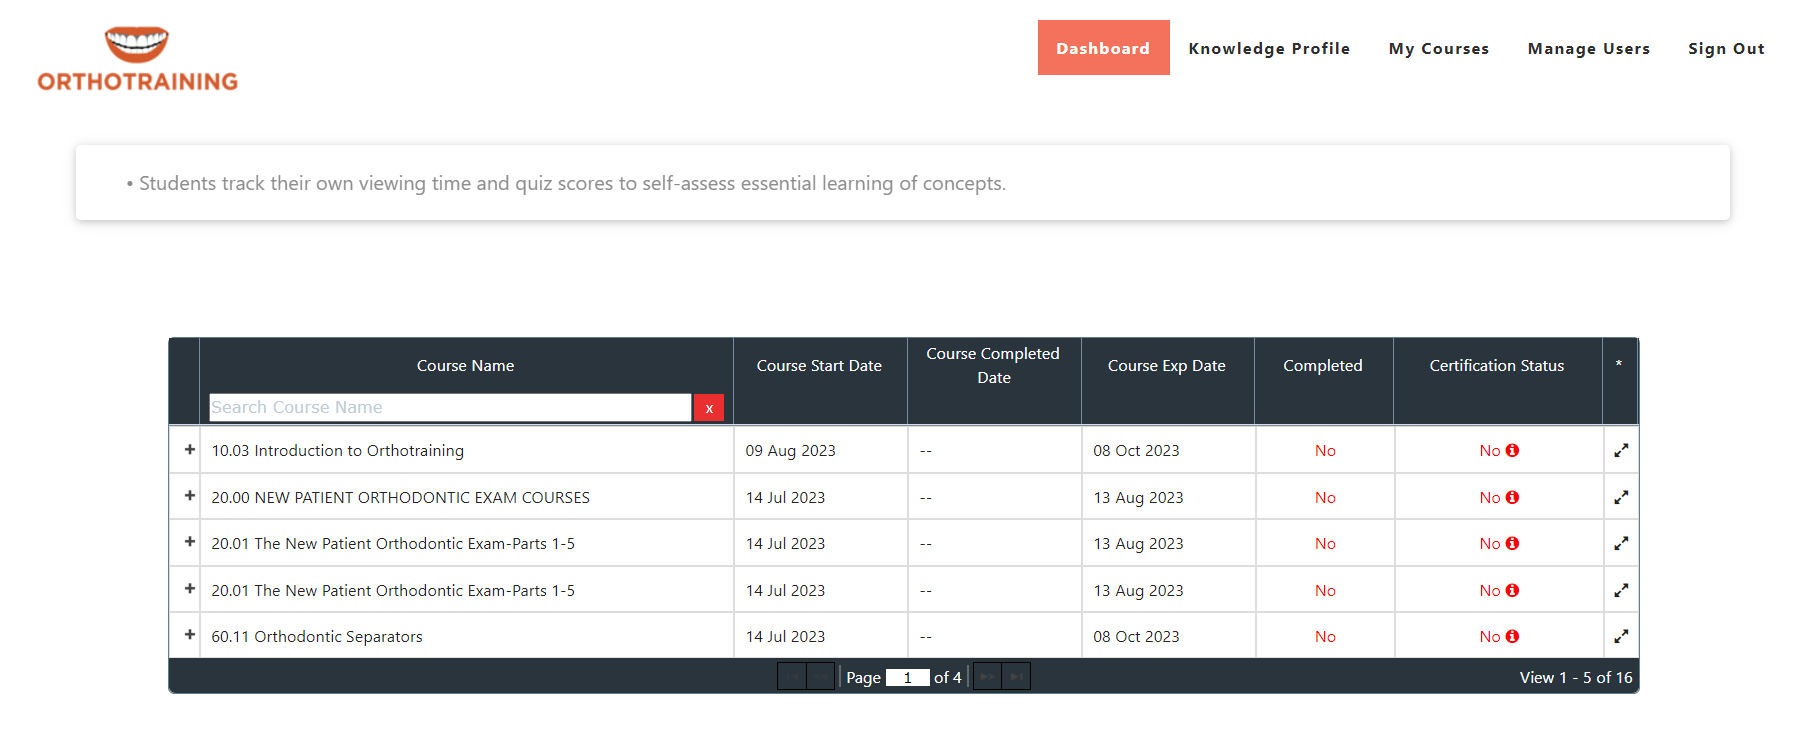
Go to the DashBoard page
- Here, you can view all of your courses status completed or not, course completed date, Certification status.
-
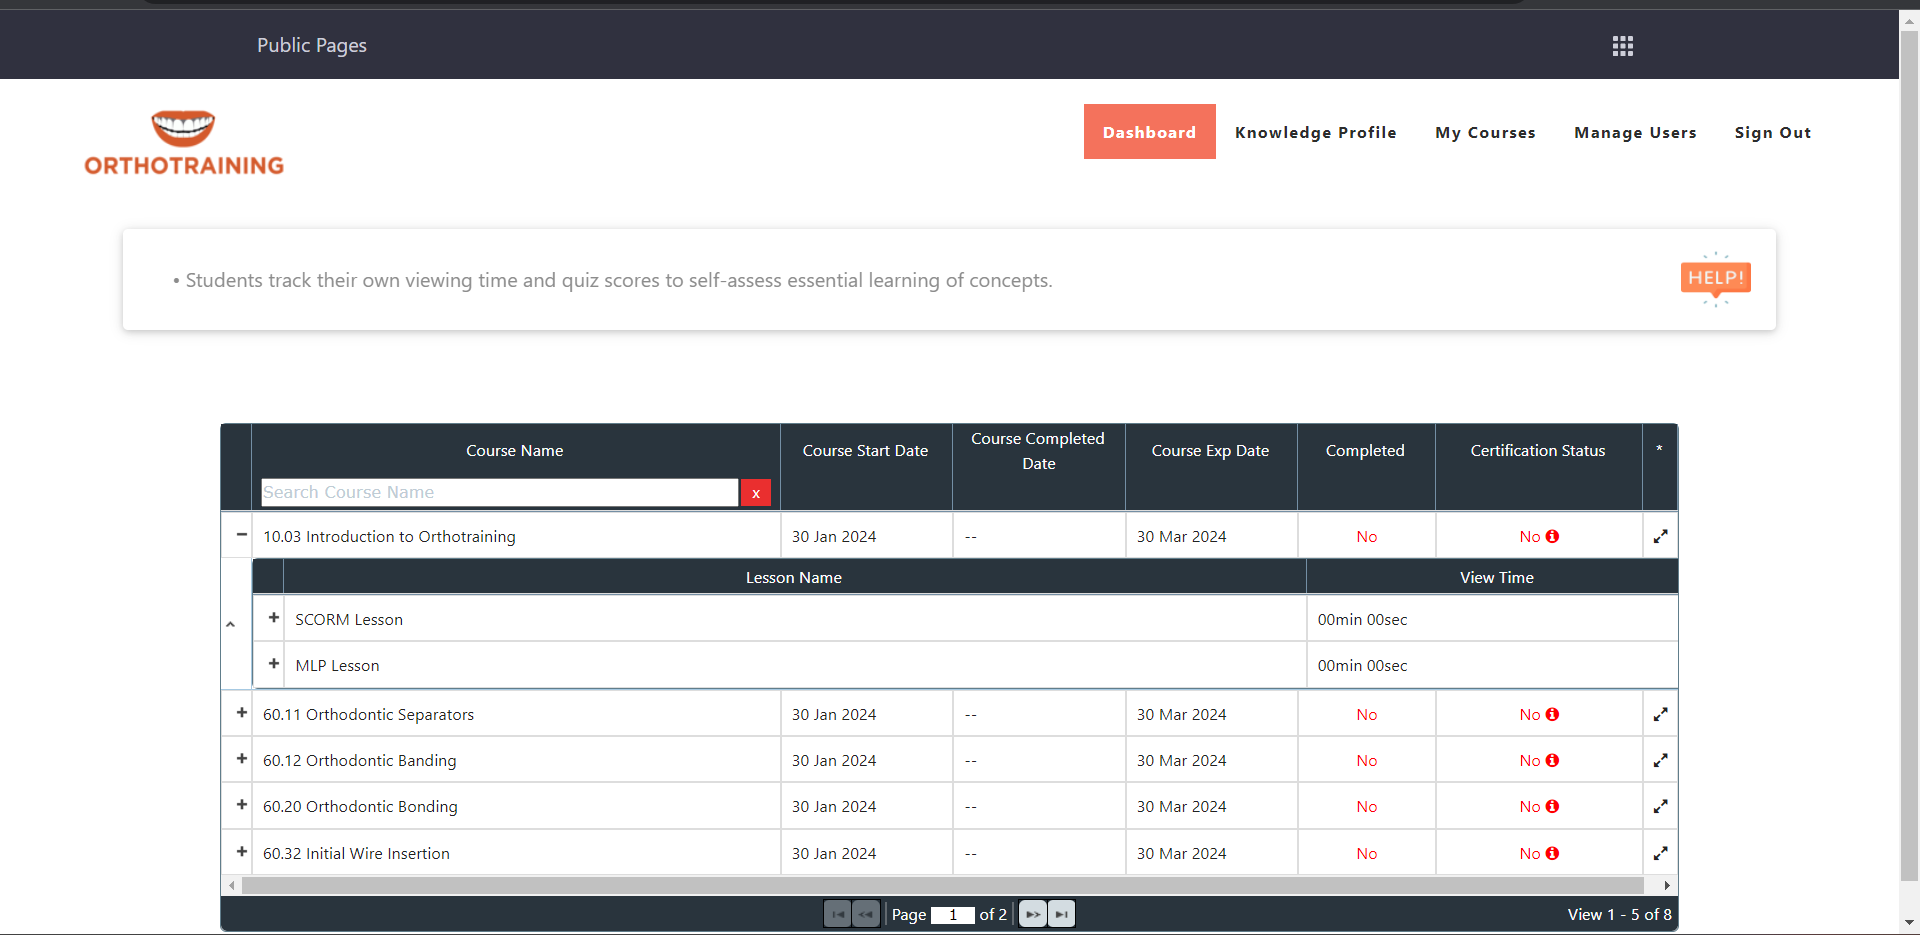
- Click on the "+" icon to view detailed information about the lessons in the course.
-
- After completing the course, you can download the certificate by clicking on the "Print Certificate" link, and it will be downloaded to your computer.
-
How can I download the detailed information as PDF about the course?
-
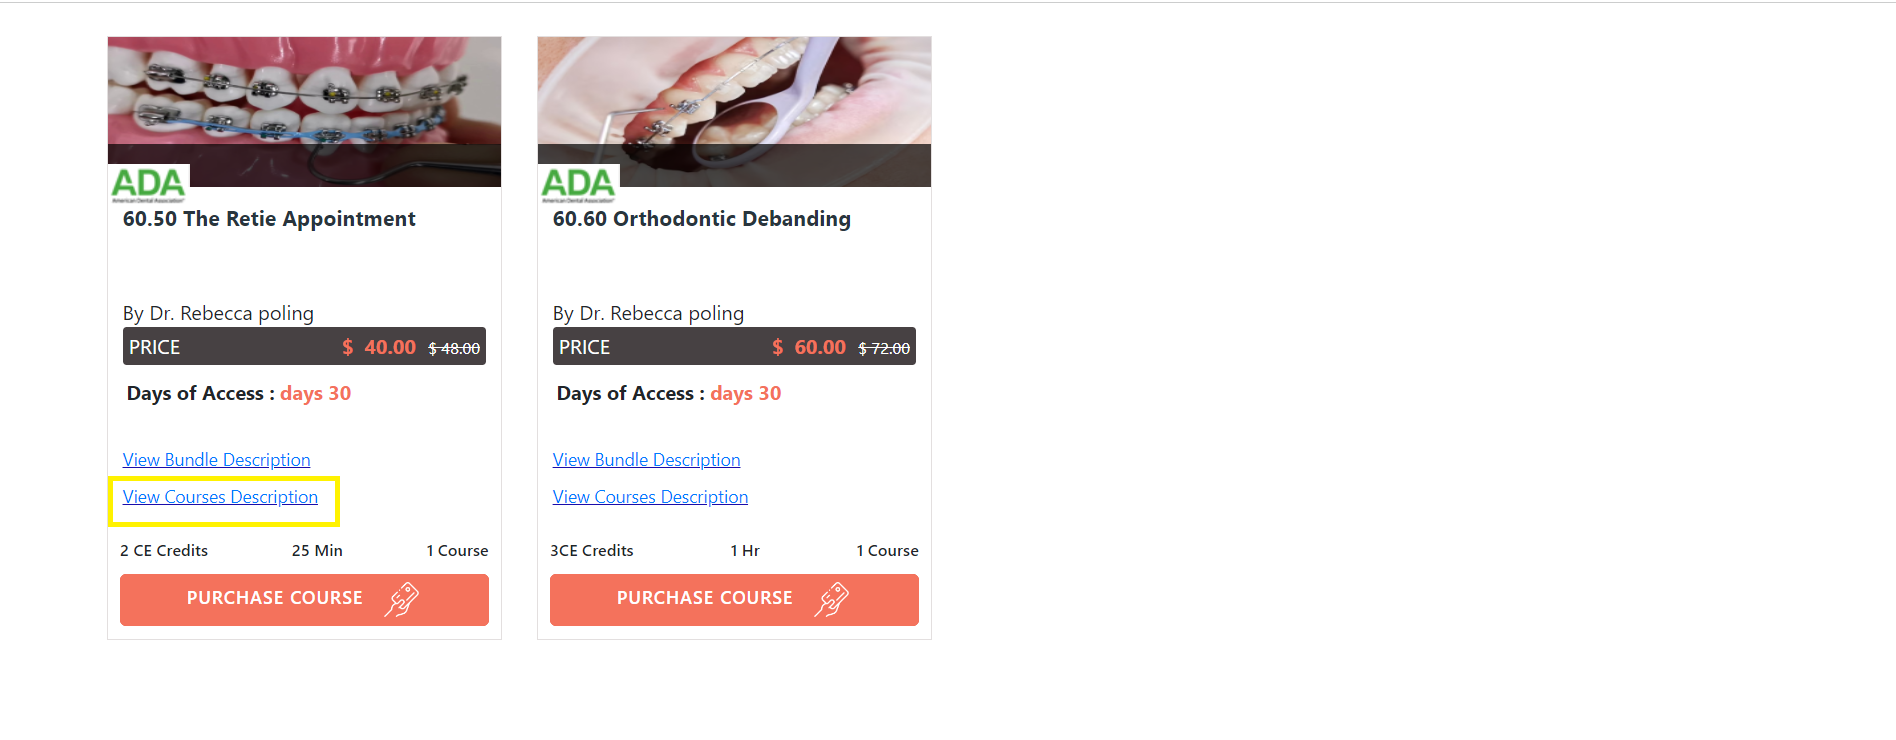
- Go to the Course Bundle page.
- Click on the description links to access additional information about the Course Bundle.
-
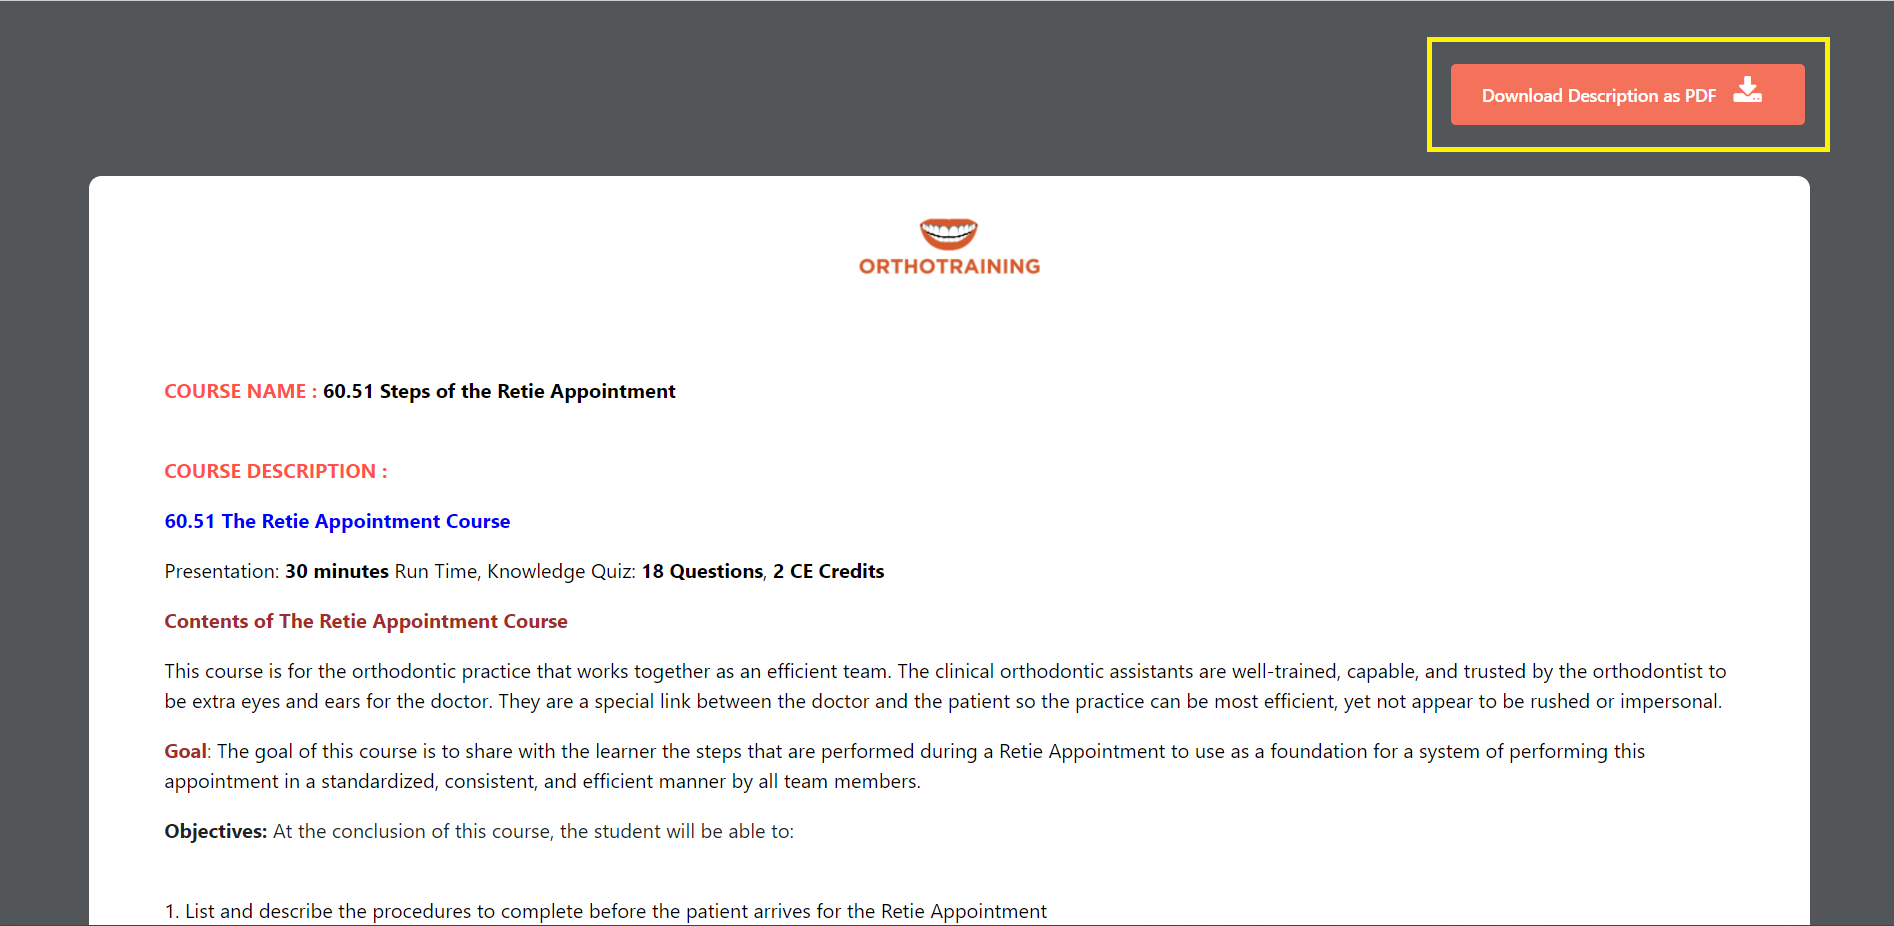
-
- Save the file as a PDF after clicking on the description links.
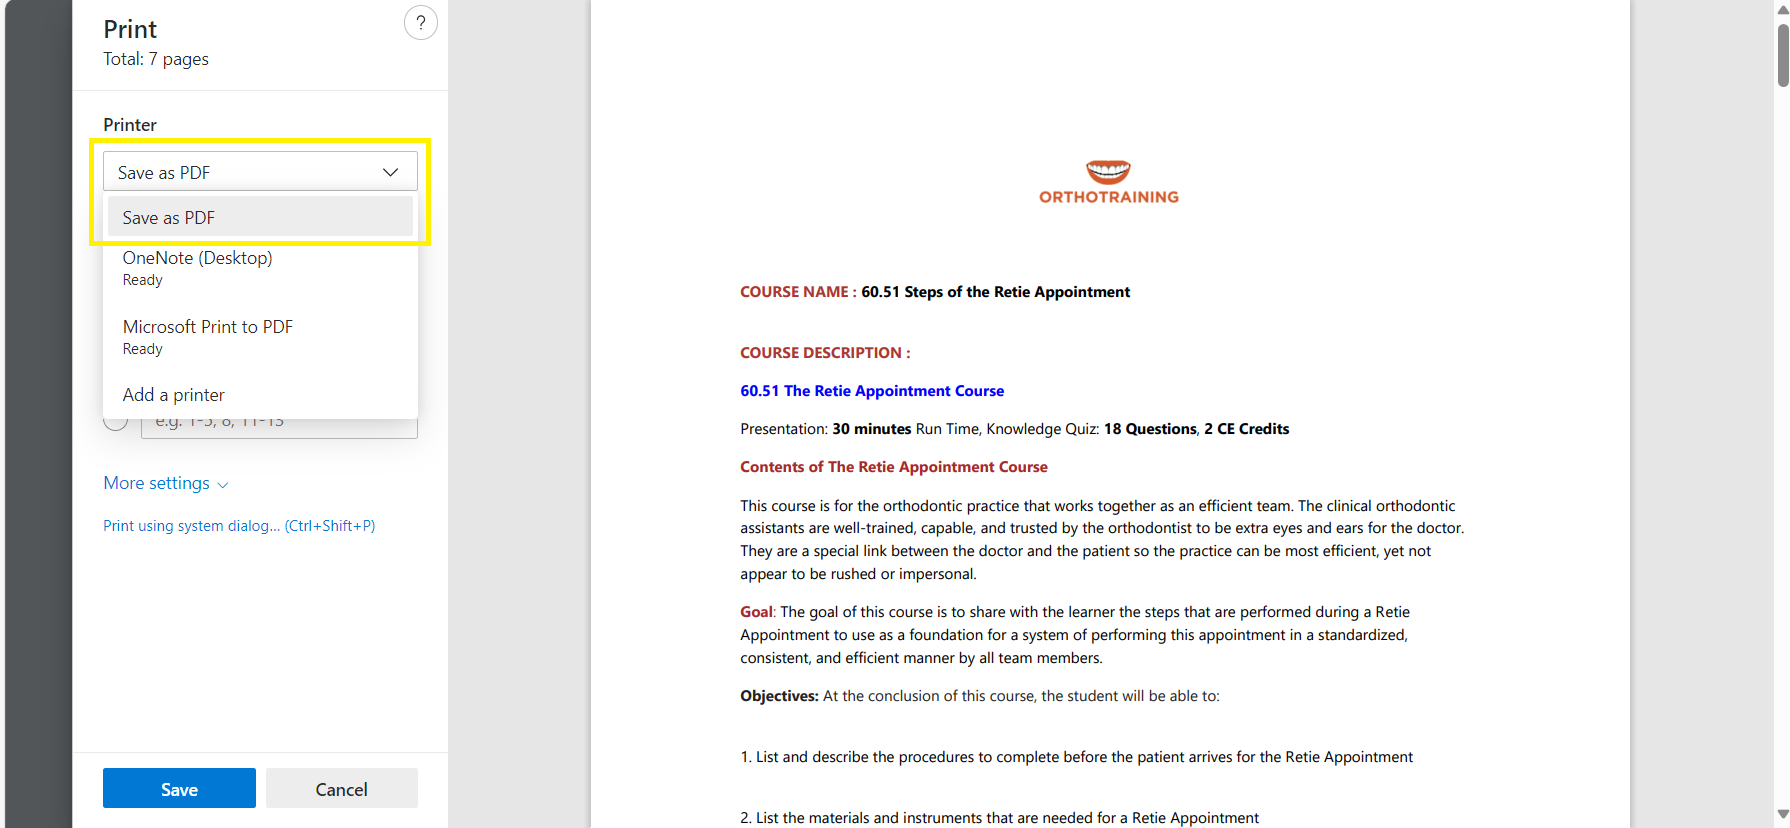
-
How can I attempt the Course Quiz?
-
- MyCourses page is your learning hub, offering two ways to access educational content.
- Individual Courses: Explore courses which are enrolled by faculty.
- Purchased Bundles: Dive into curated learning journeys through pre-packed collections you've bought.
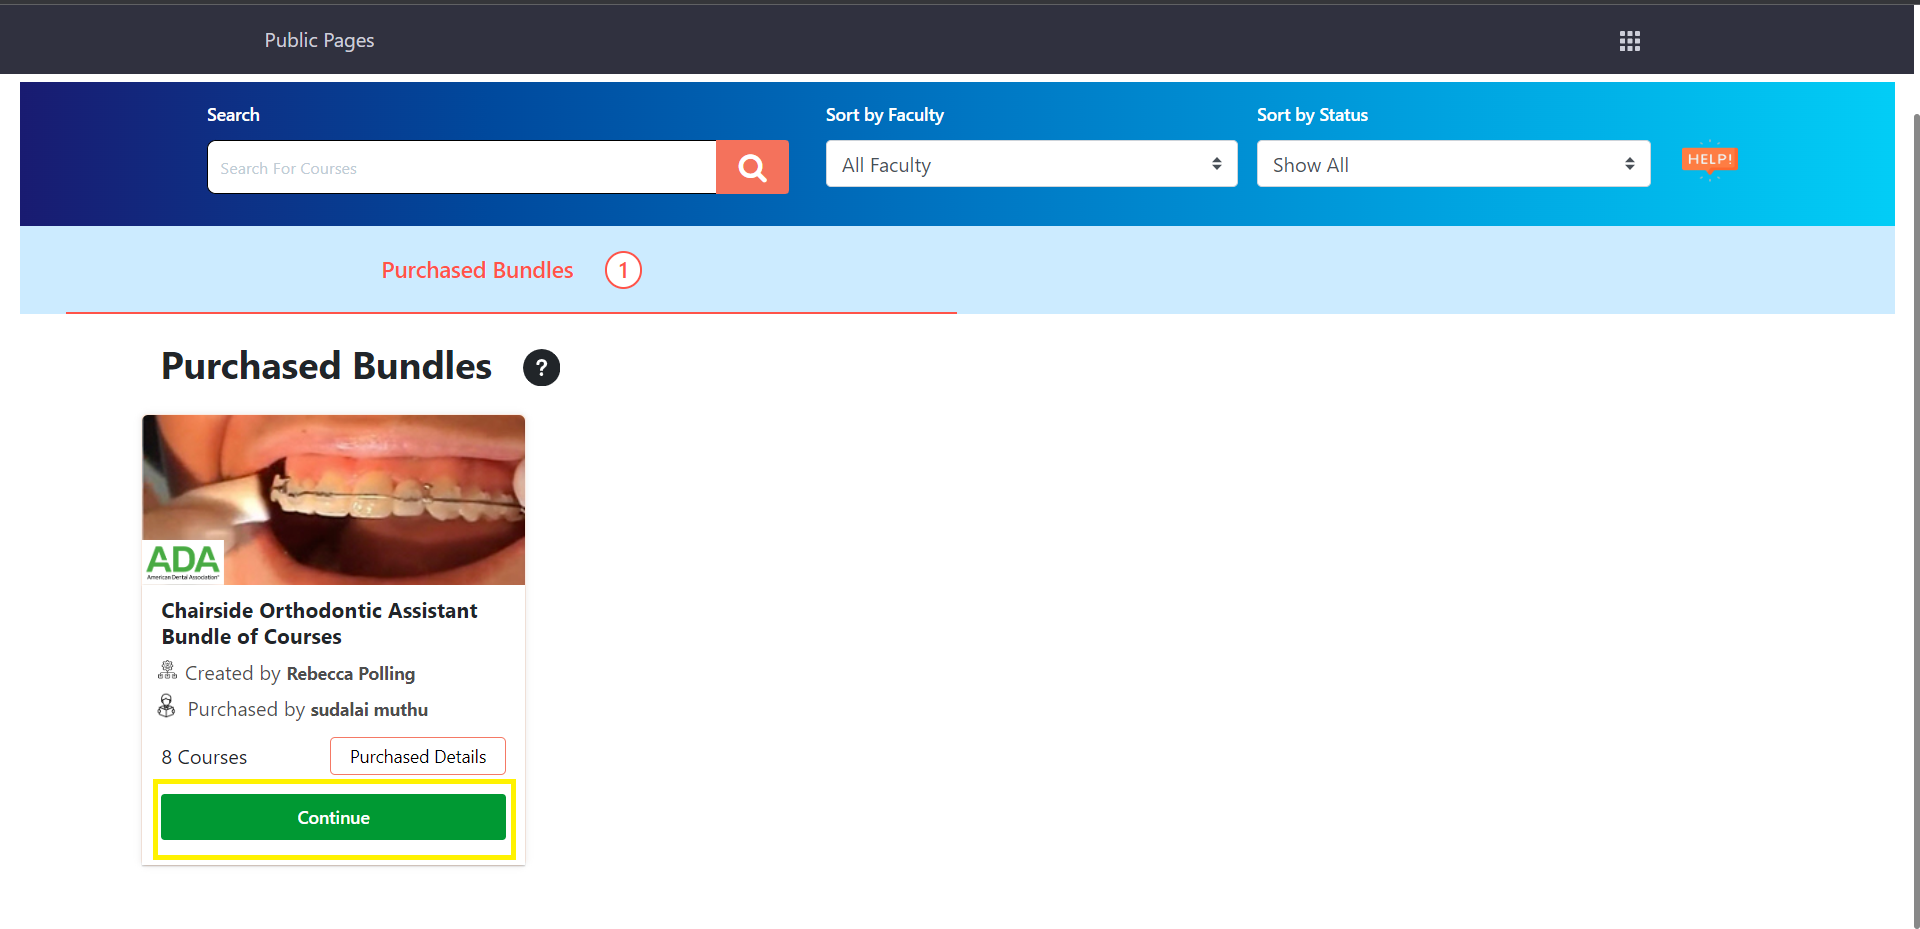
-
- Clicking either "Continue" on your chosen Individual Course or Purchased Bundle takes you to your dedicated Learning Course Page.
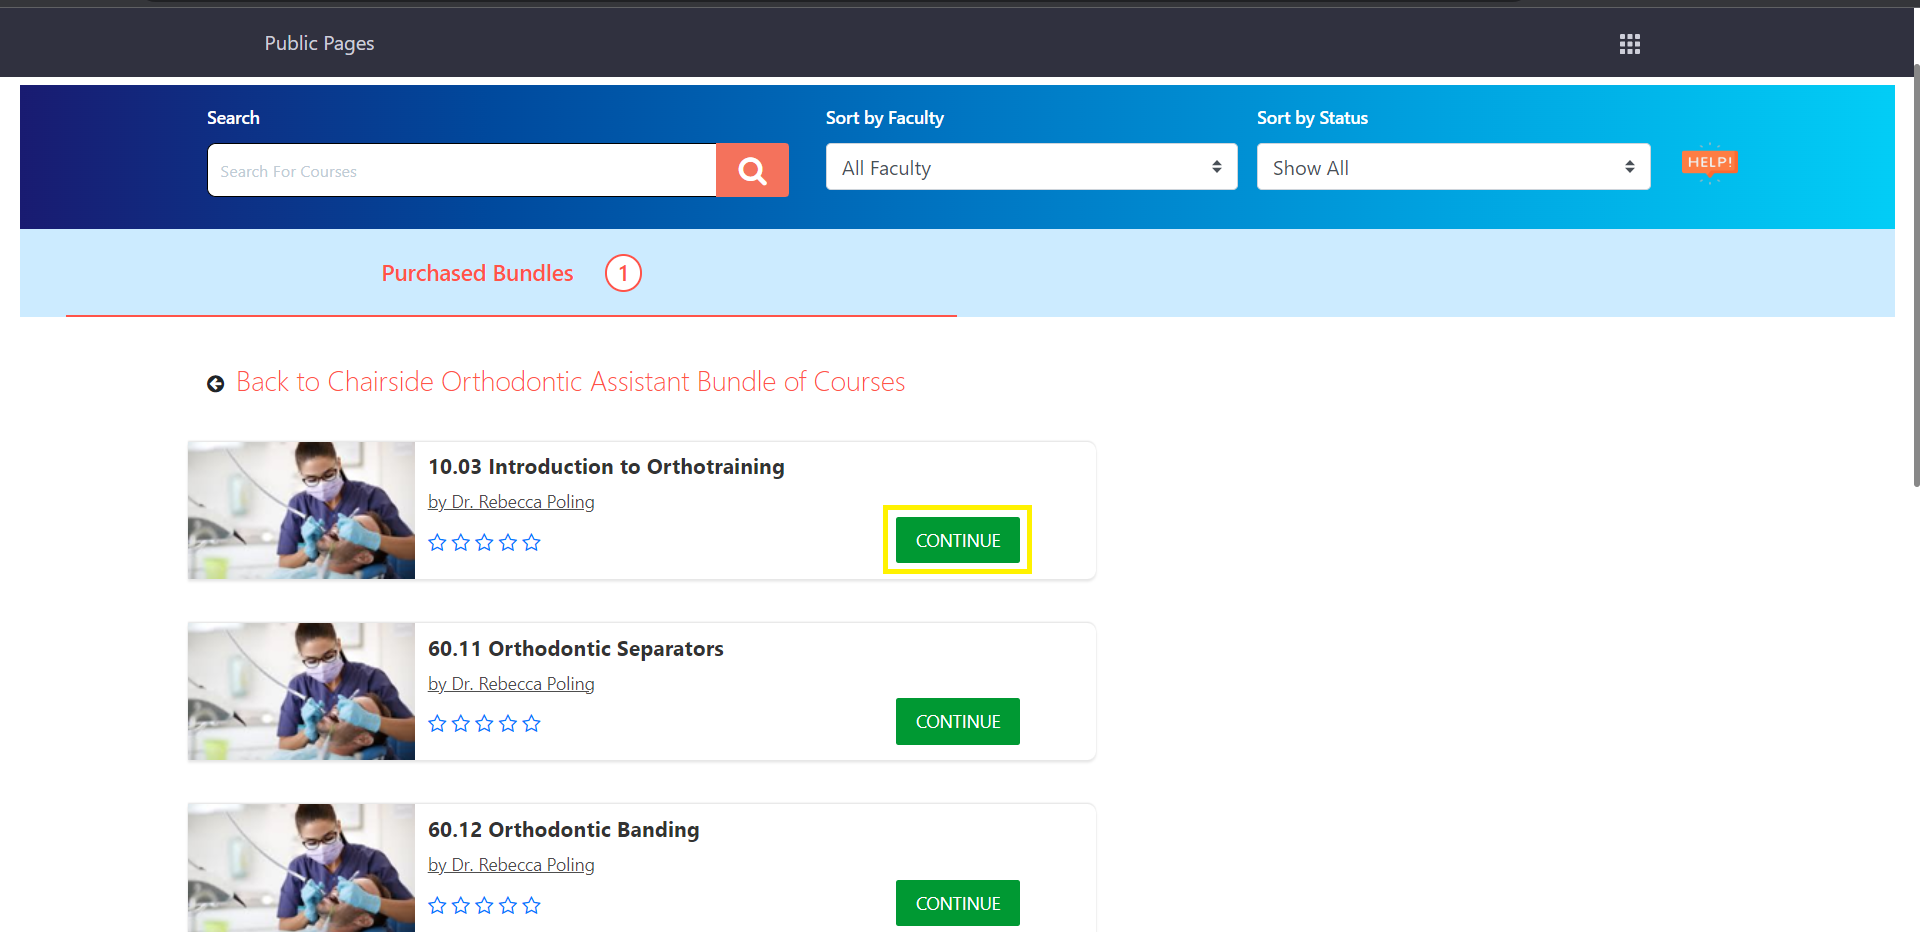
-
- Unlock deeper understanding and boost your mastery of the course. It holds presentations and interactive quiz questions with the feedback option.

-
- These interactive presentations, filled with visuals and compelling explanations, break down complex topics into bite-sized pieces, making them easier to grasp.
- By choosing the Knowledge Quiz, you can attempt the KQ to complete the course. These knowledge quizzes will have only questions without any feedback.

-
Note: The Knowledge Quiz can be accessed only twice. Please take your time to review the material before starting.
-
How can I download my certificate?
-
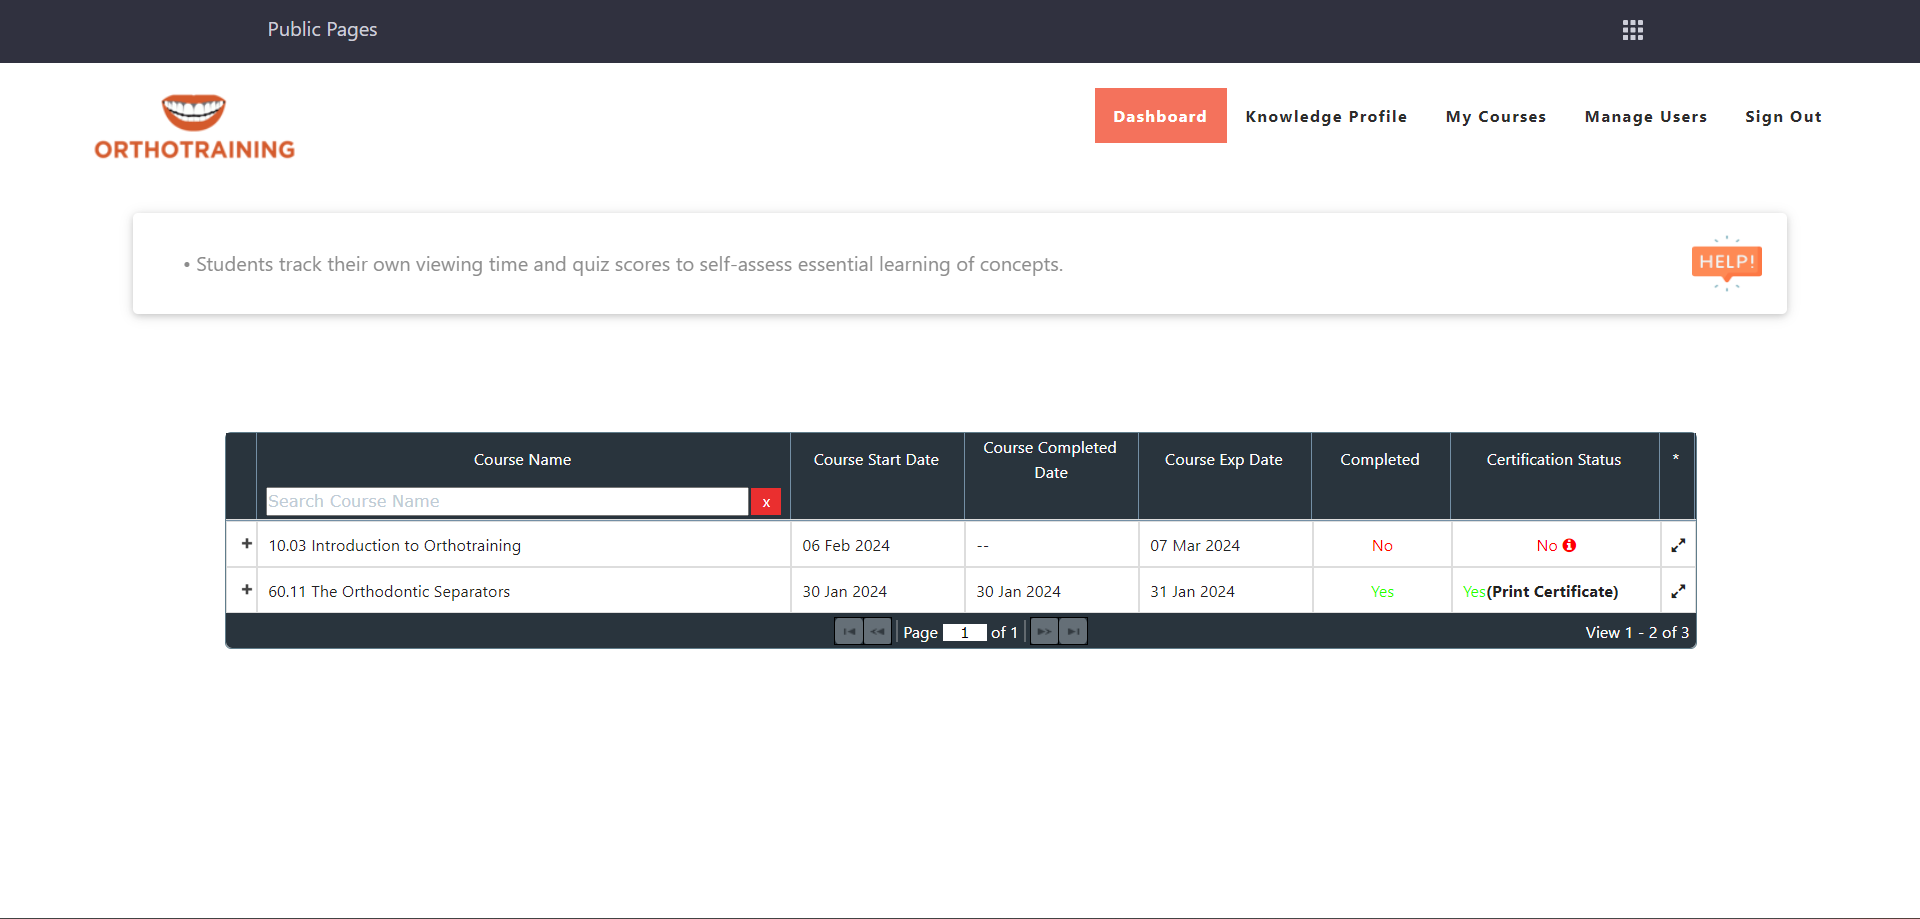
Go to the DashBoard page.
- Here, you can access all of your courses.
-
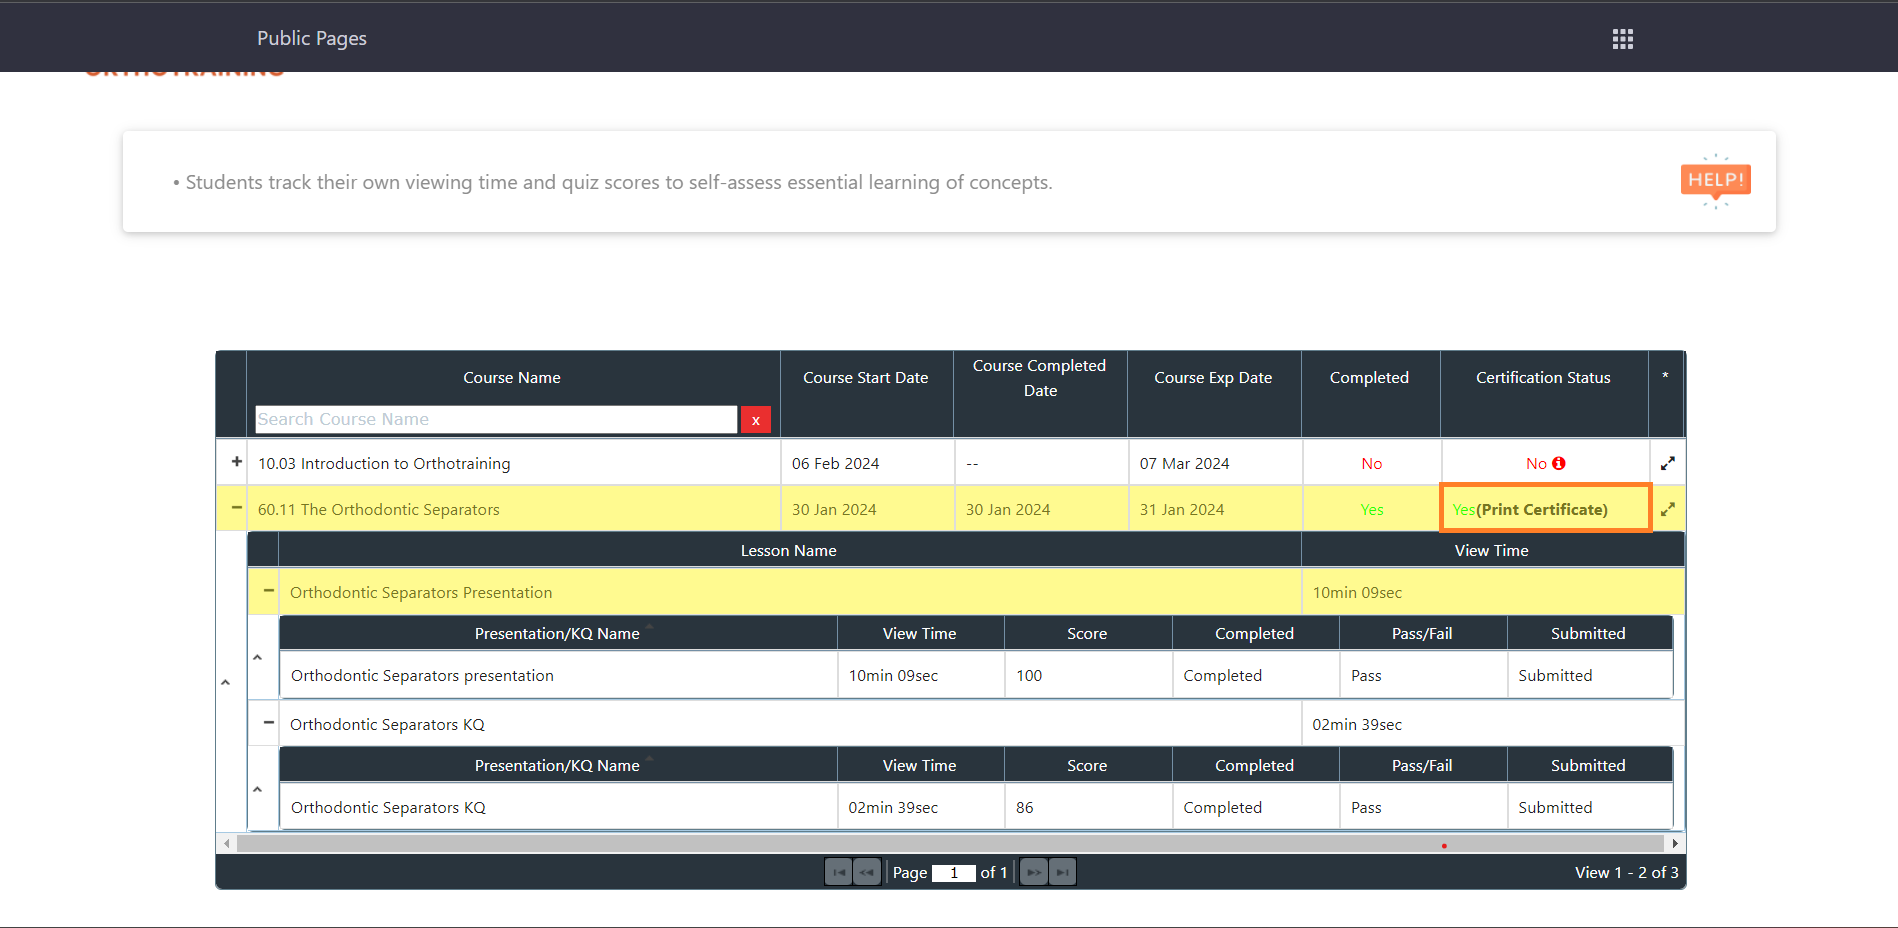
- Click on the "+" icon to view detailed information about the lessons in the course.
- Upon completing the course, you can download the certificate by clicking on the "Print Certificate" link.
-
As a Faculty, what can I do on the site?
- Understand the scope and types of courses that can be developed.
- Easily create, modify, and enhance course content with user-friendly tools.
- Effortlessly edit and update course content to meet evolving needs.li>
- Assign created courses to associated staff members efficiently.
- Publish certificates seamlessly to recognize staff accomplishments.
- Access a comprehensive view of associated employees' performance.
How can I enroll in the website?
-
Open the URL in Your Browser:
- Launch your web browser and enter the provided URL in the address bar.
-
Navigate to the Create Account Page:
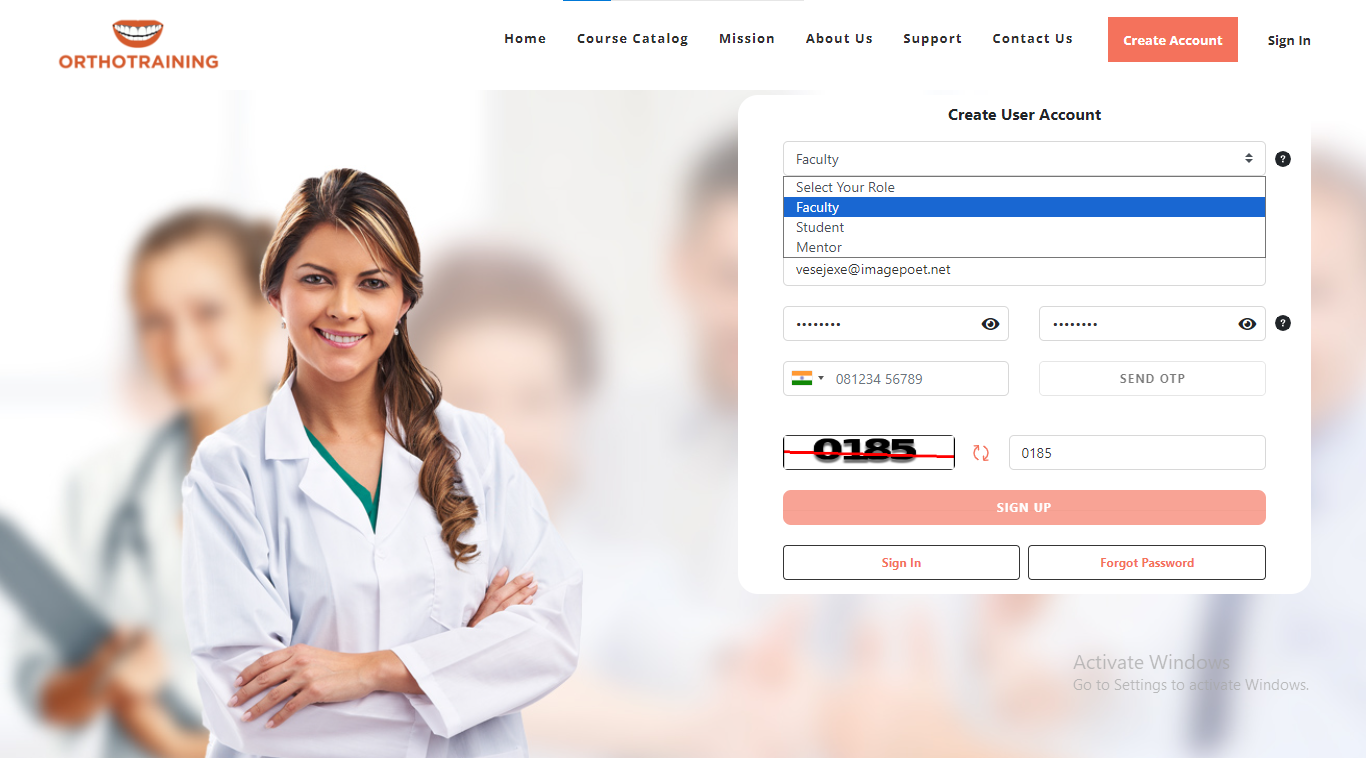
- Once on the website, locate the menu list and click on the "Create Account" page.
-
Choose Your Role as a Faculty:
- On the Create Account page, find the "Select your role" field.
- Open the dropdown menu and select "Faculty" as your role.
-
Fill in Your Details:
- Below the role selection, you'll find a form. Provide the necessary details as requested. This may include your name, email, password, and any other required information.
-
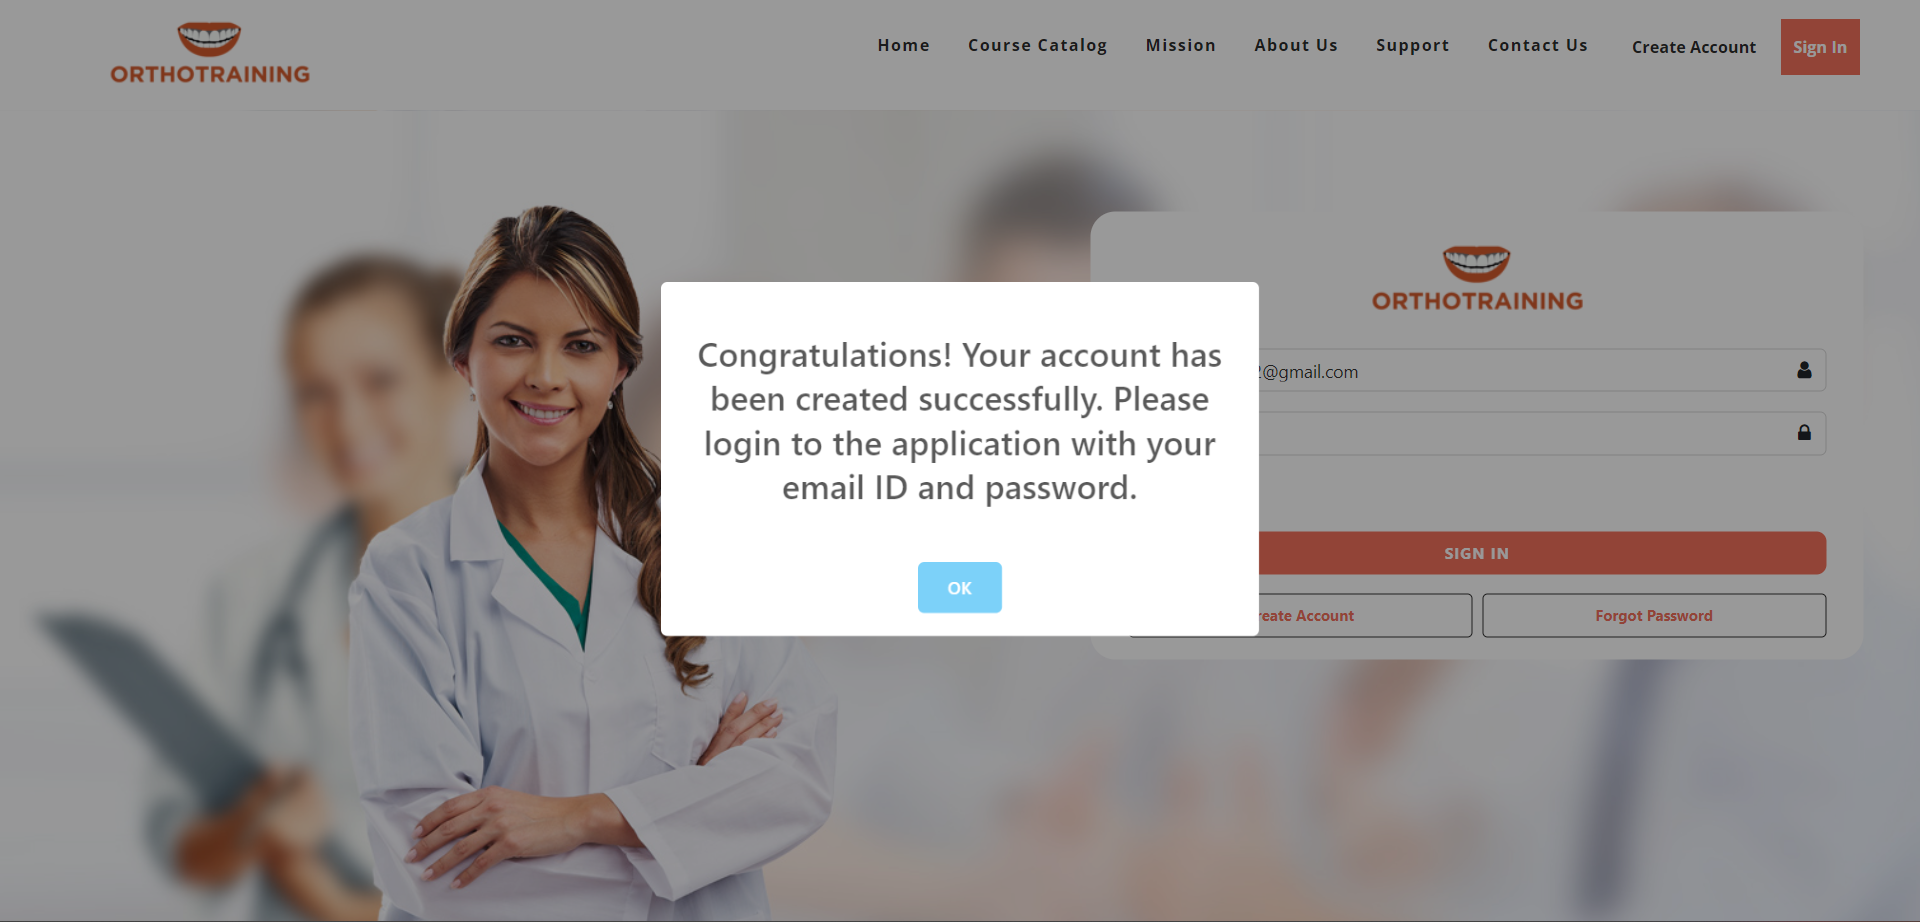
Click on the "SIGN UP" Button:
- After filling in the form, locate and click on the "SIGN UP" button.
-
Check Your Email for Login Details:
- You will receive an email with login details to access the website.
- Open your email inbox and look for the message related to your account creation.
-
How do I Login to the website?
-
Open the URL in Your Browser:
- Launch your preferred web browser and enter the provided URL in the address bar. Hit 'Enter' to access the website.
-
Navigate to the Sign In Page:
- Once on the website, locate and click on the "Sign In" button. This action will redirect you to the Sign In page.

-
Provide Your Credentials:
- On the Sign In page, you'll find a form requesting your Email ID and Password. Enter your registered Email ID and Password into the designated fields.
-
Click SIGN IN:
- After entering your credentials, click on the "SIGN IN" button. This action will validate your information and, if correct, lead you to your account.
-
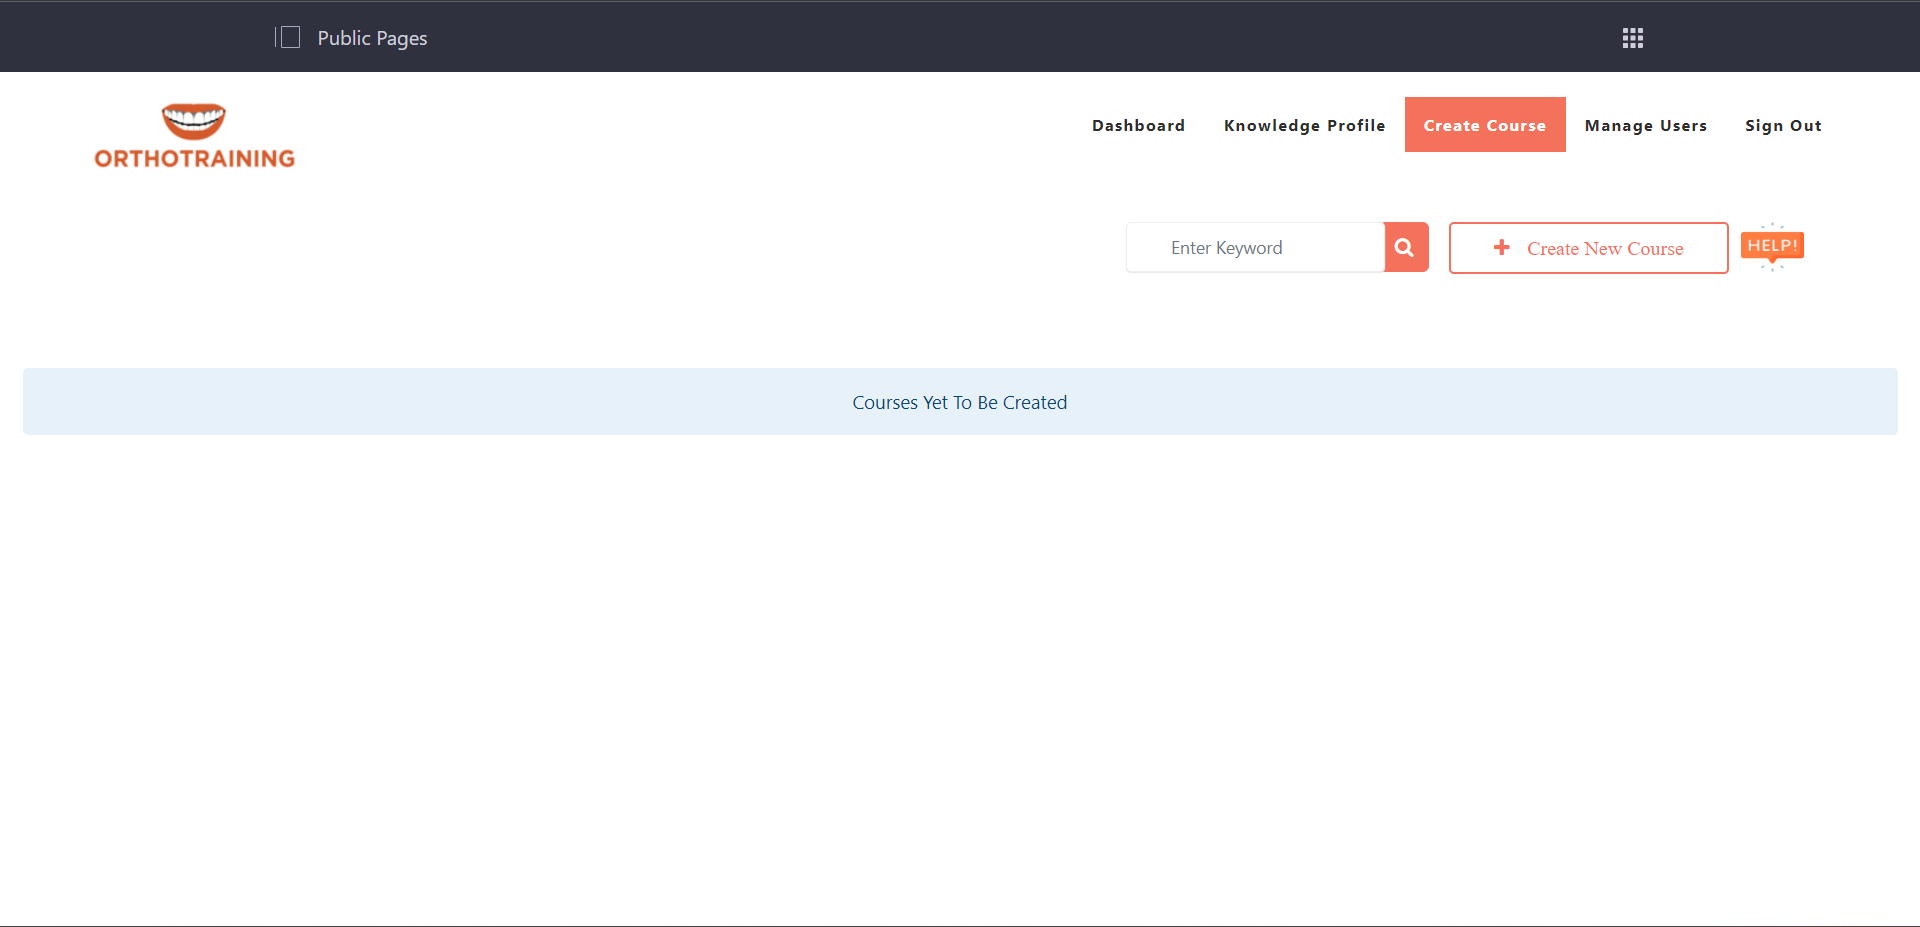
- You are navigated to the page where you can create the courses
-
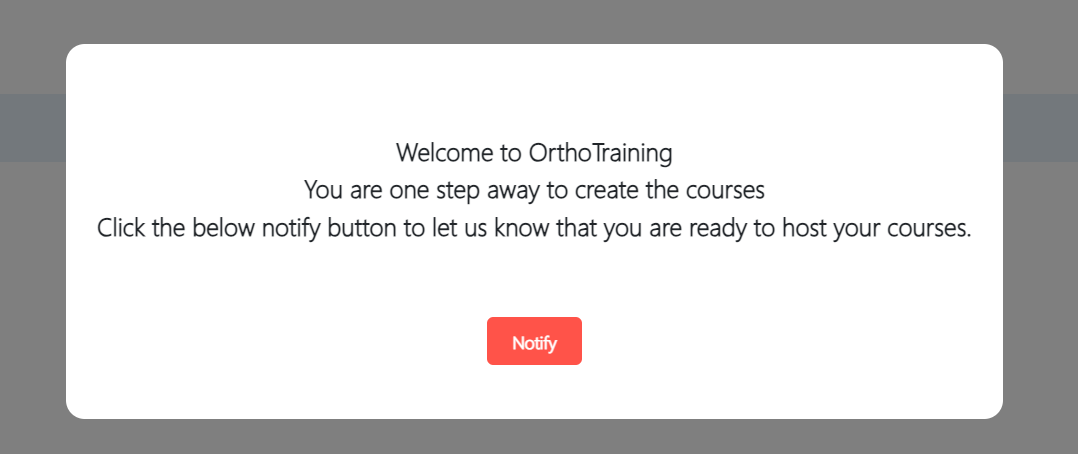
- Please request the Admin to create the courses. To do so, click on the "Create New Course" button.
-
-
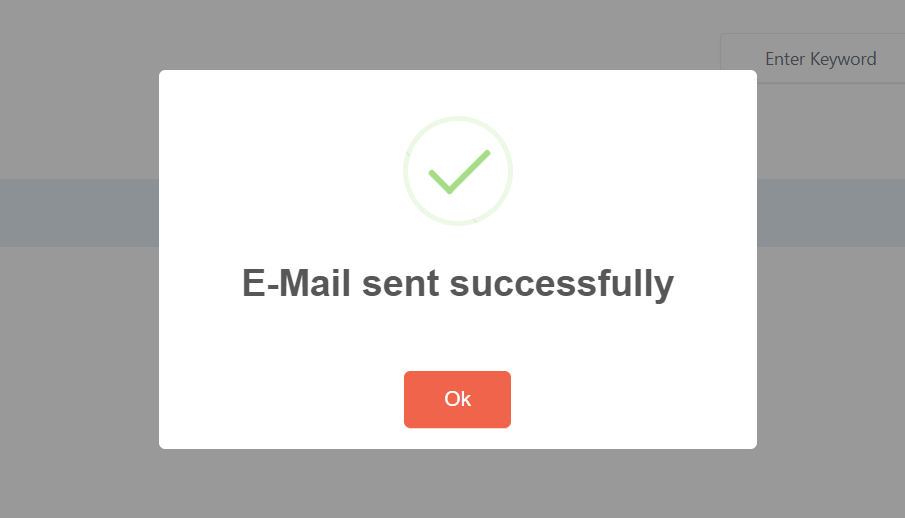
- Upon your request, the Admin or Practice owner will map course attributes to your profile.
- You will receive email notification with the necessary information once the Admin completes the course attribute assignment.
-
How do I create a course?
-
- Based on your request email, Admin or Practice owner give access to create the courses for the particular course categories.
- Once the admin or Practice owner configured the course categories in the course categories page, you are ready to proceed with the course creation.
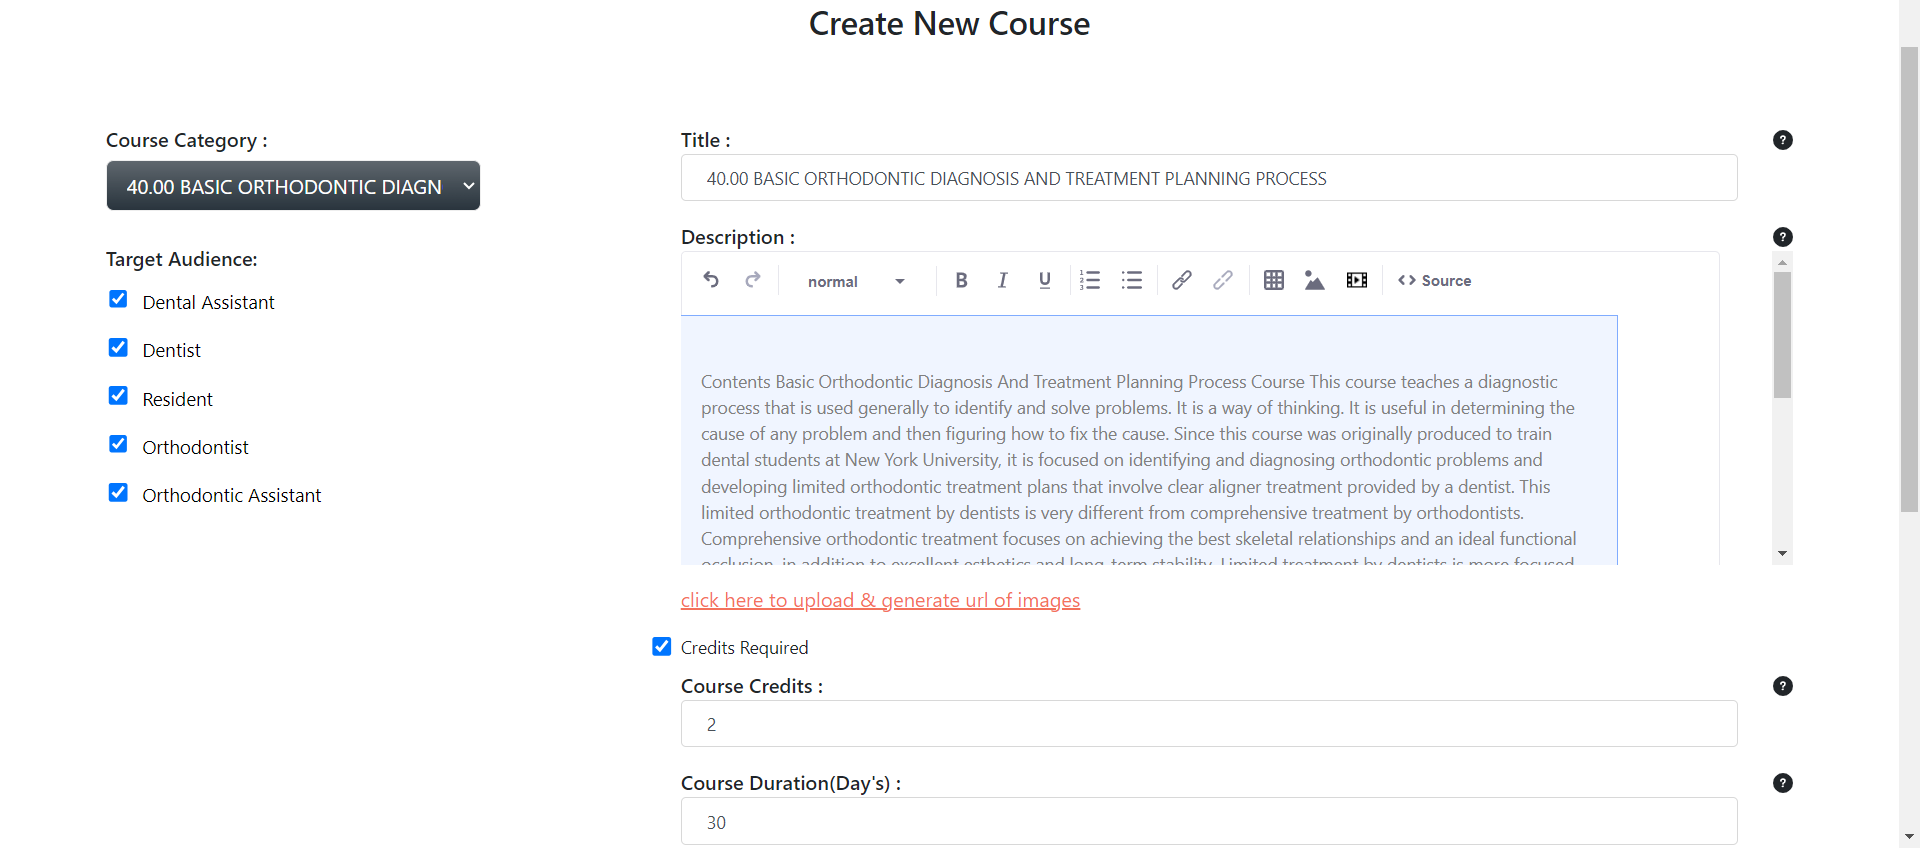
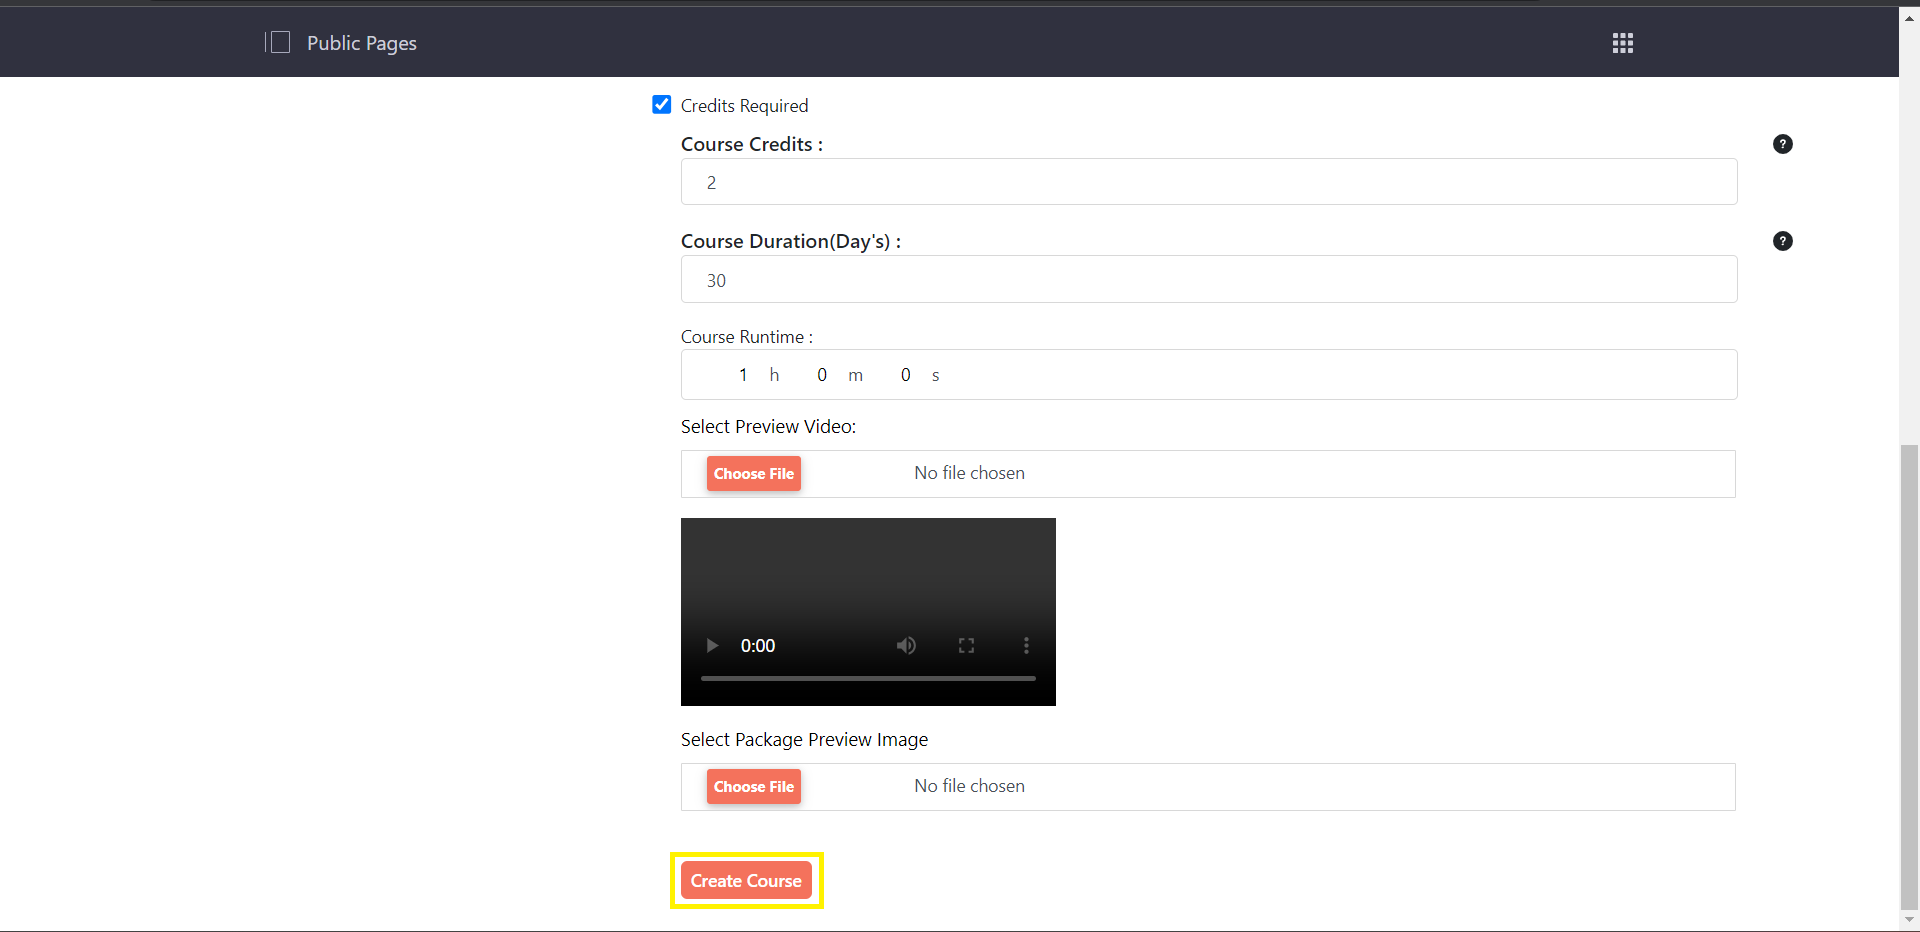
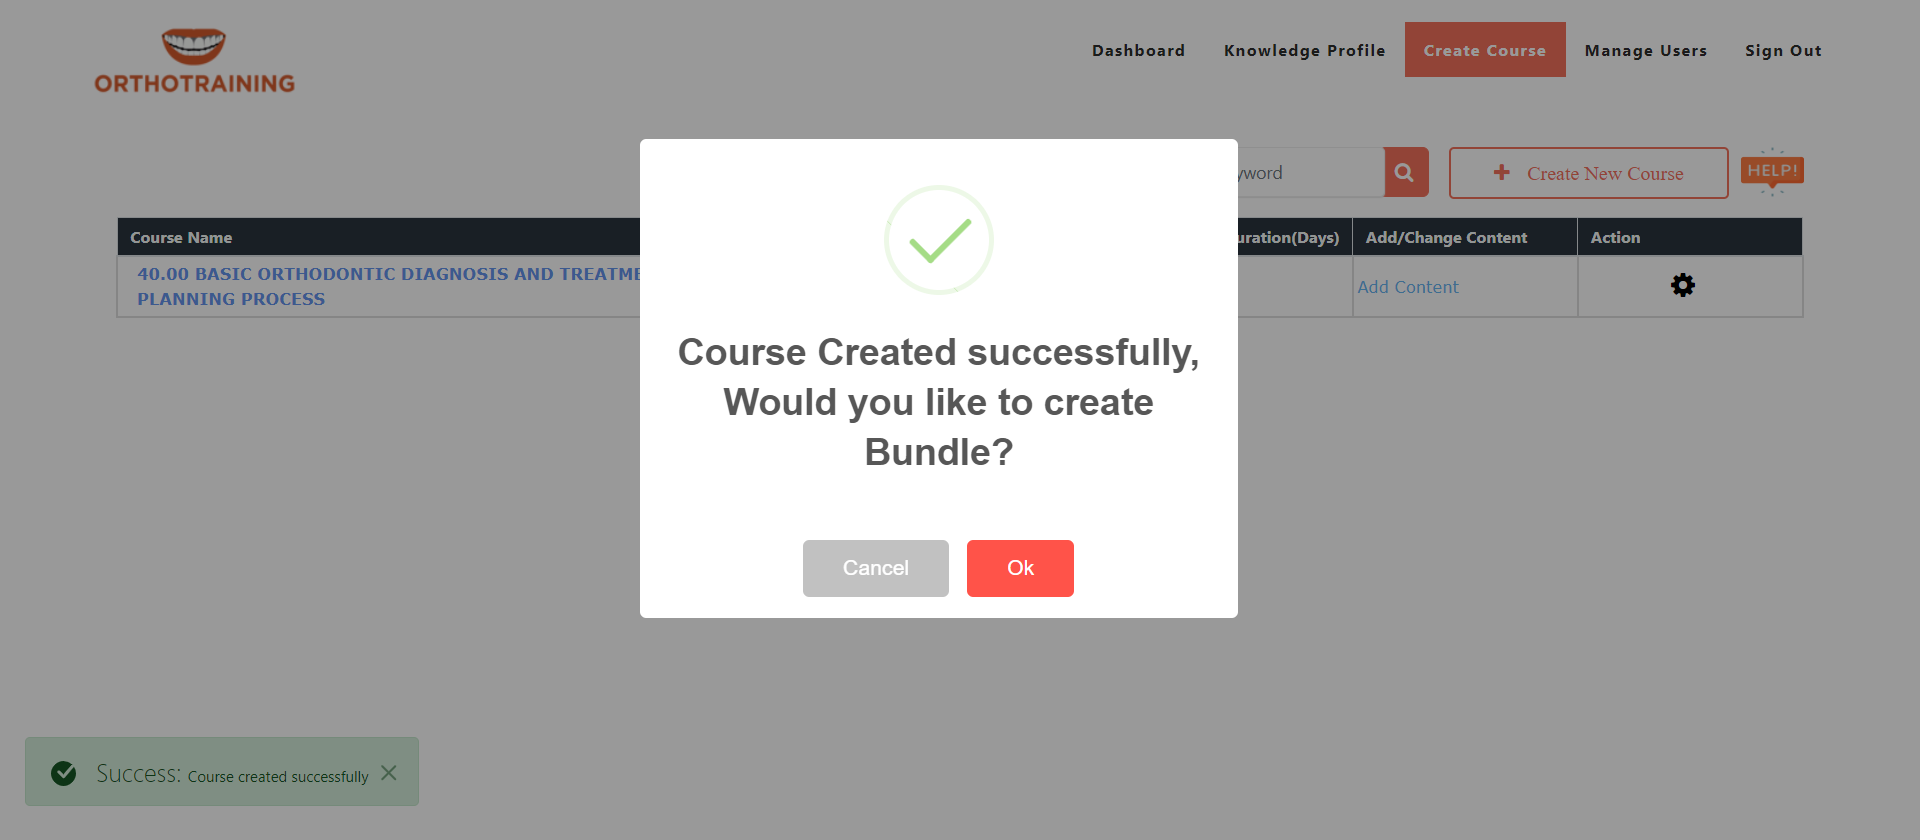
- Enter the Course Name, Description, Credits, Number of Days, and upload the course image & Video.
-
-
-
- You can edit the course details even after its creation by clicking on the "Edit" option.
-
How can I create the Bundle?
-
Go to Control Panel
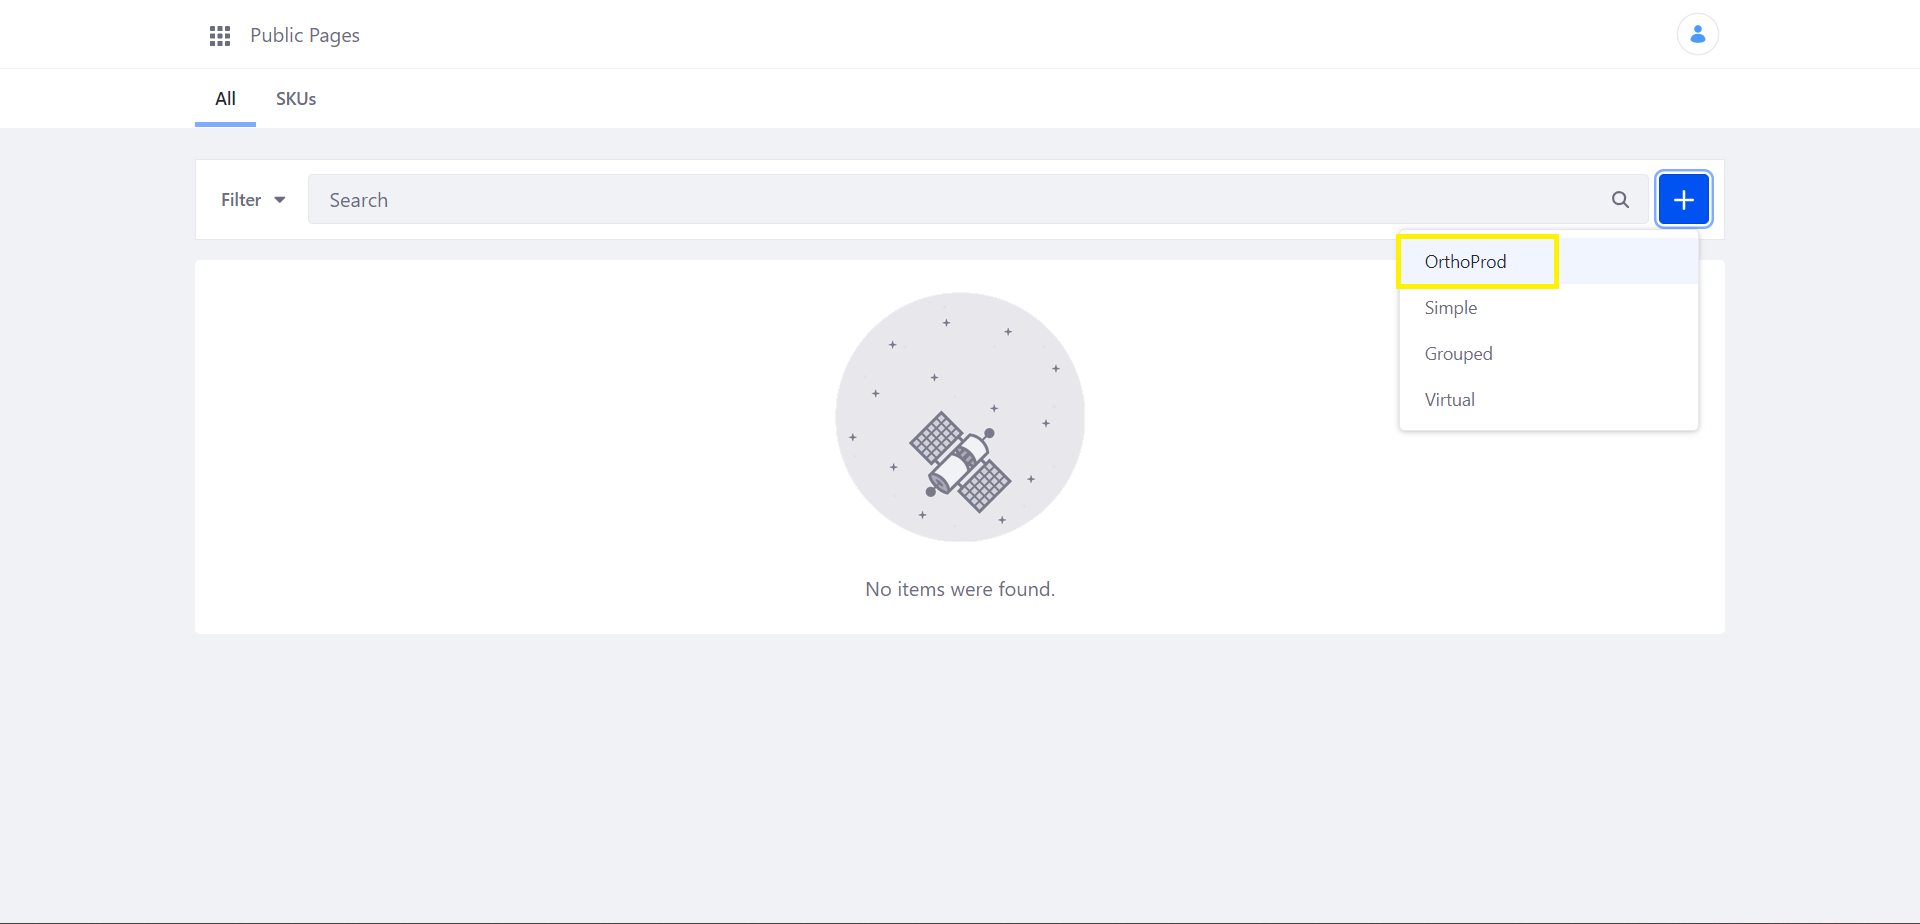
- Click on create product/Bundle
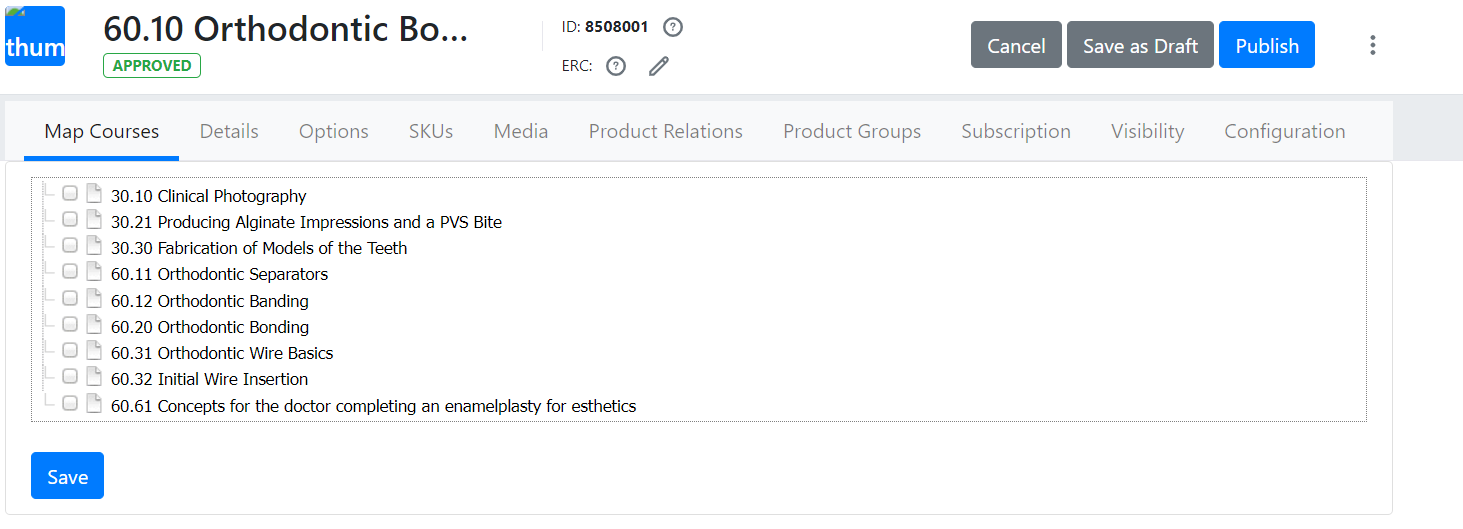
- Map the created course(s) for the bundle/product
-
-
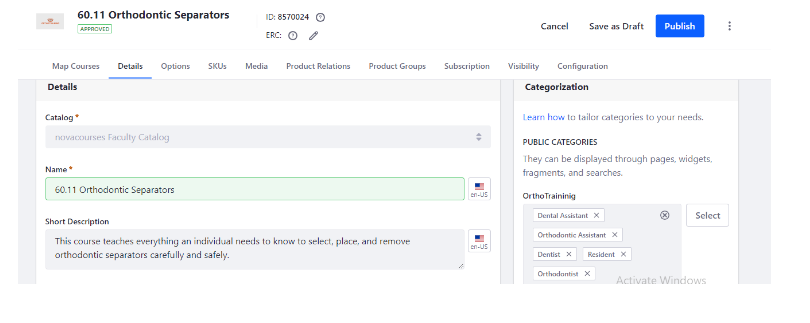
- Provide the Bundle description, Credits & Runtime details
-

-
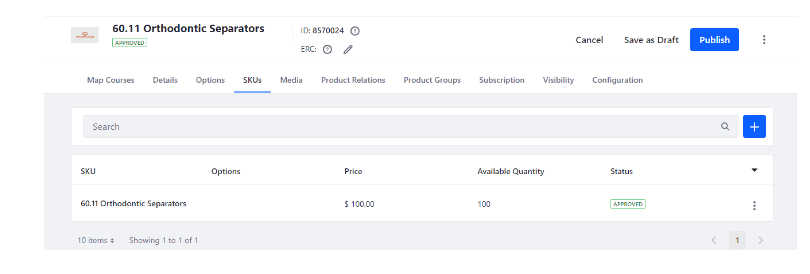
- Create the SKUs for the Product/Bundle
-

-
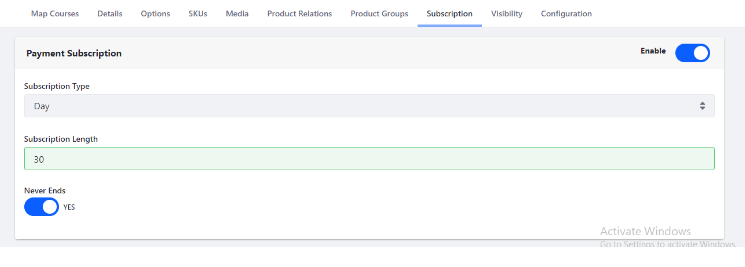
- Enable the subscription for the Product/Bundle
-
- By providing these details to the product, proceed to publish it.
- Created product/bundle will be available to the students.
-
How do I create Lessons and Assignments
-
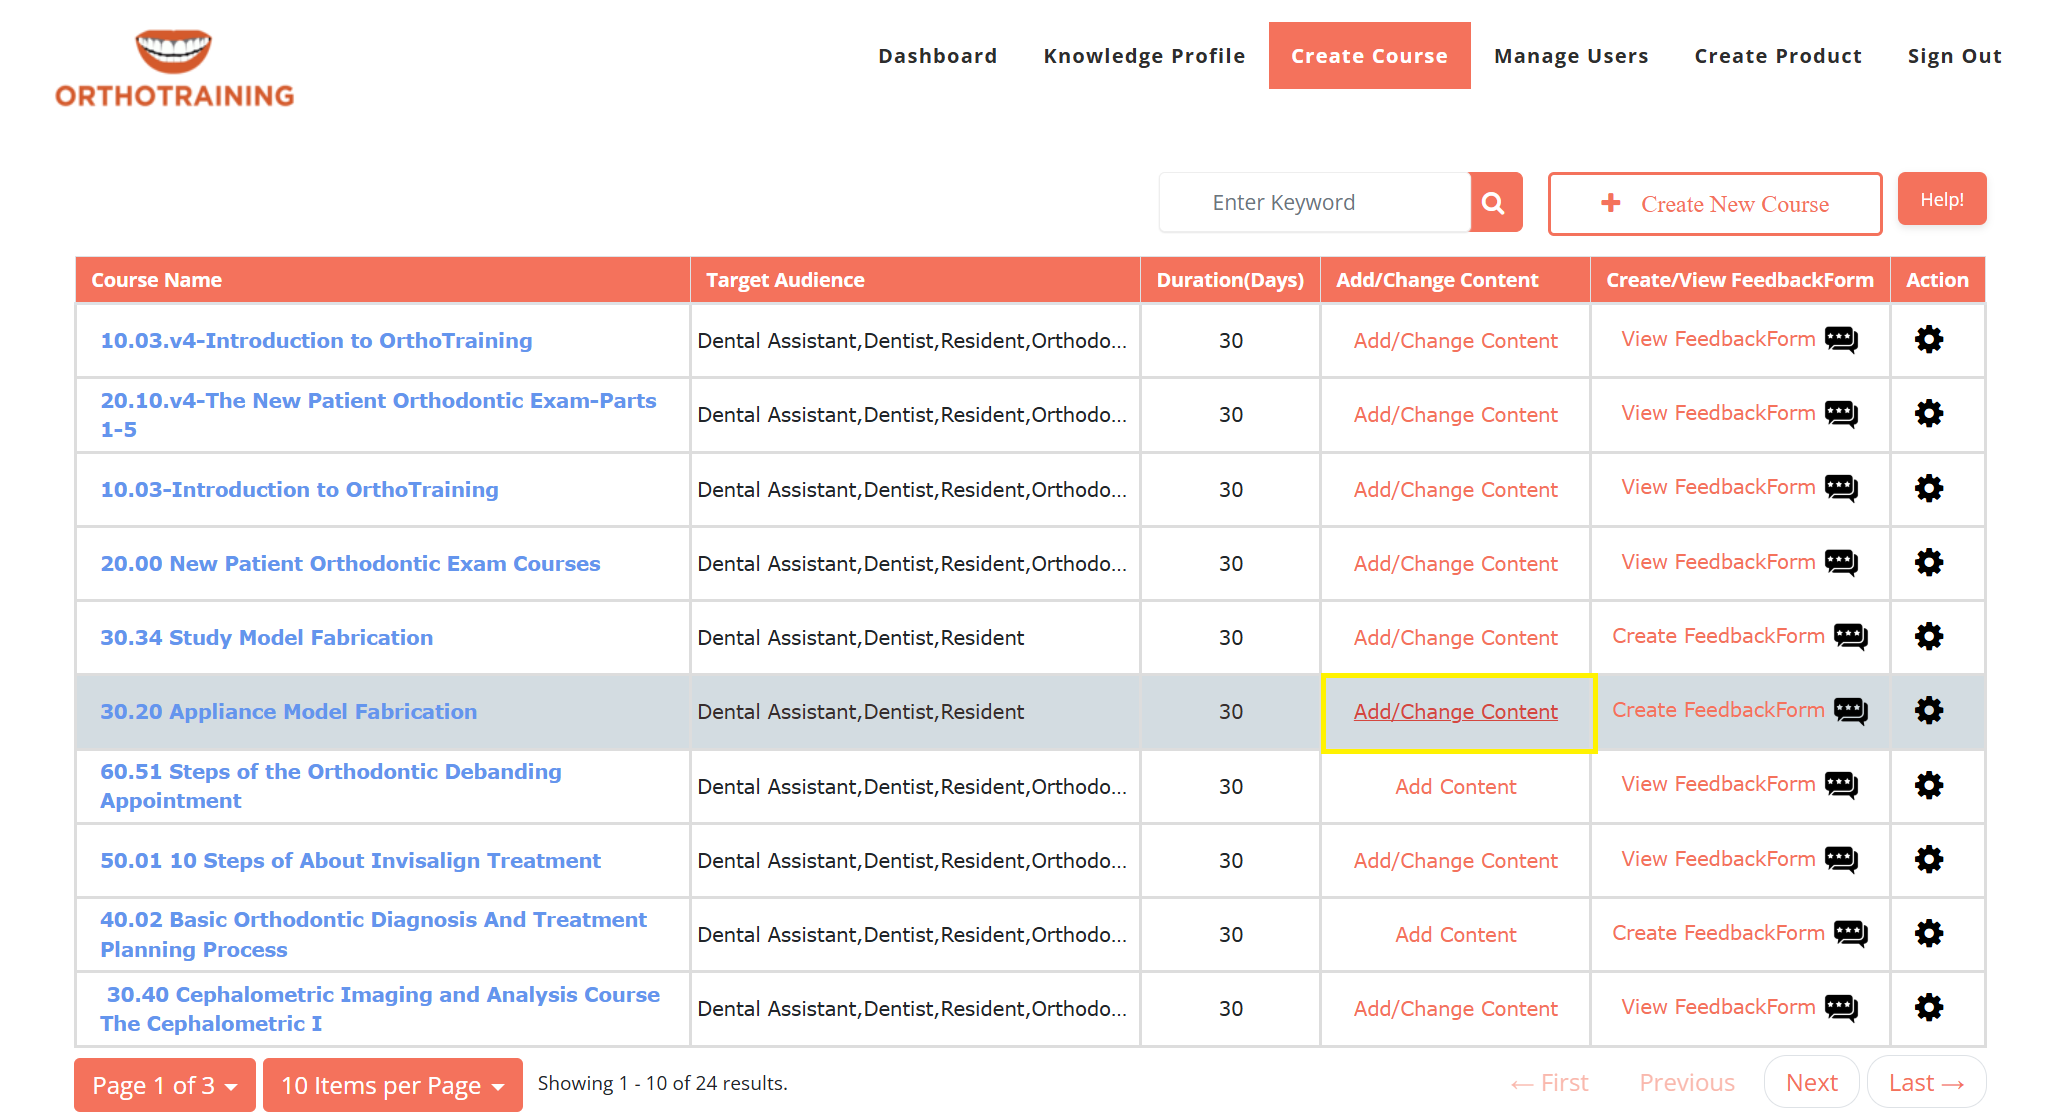
- Go to Teaching Course page by clicking on Add Content link.
-
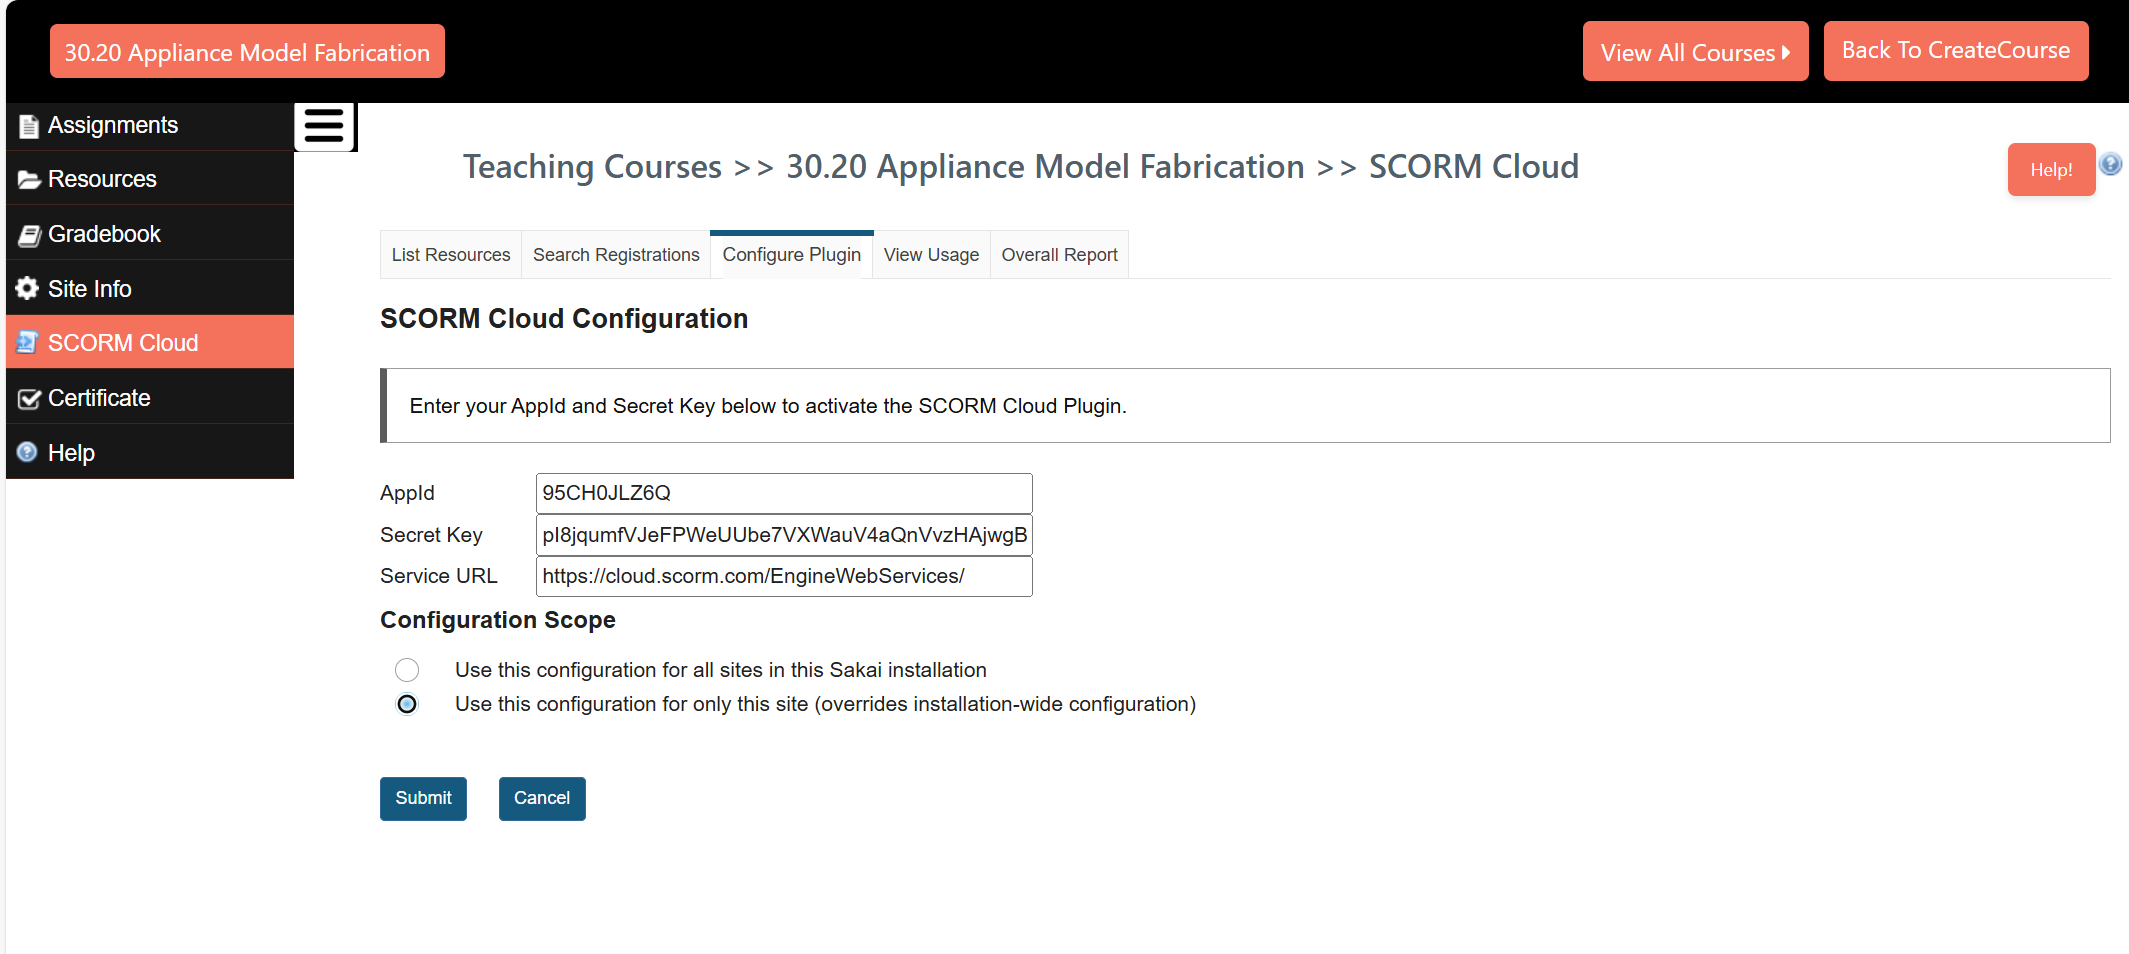
- Click on SCORM CLOUD and place AppId and Secret Key in Configure Plugin section.
-
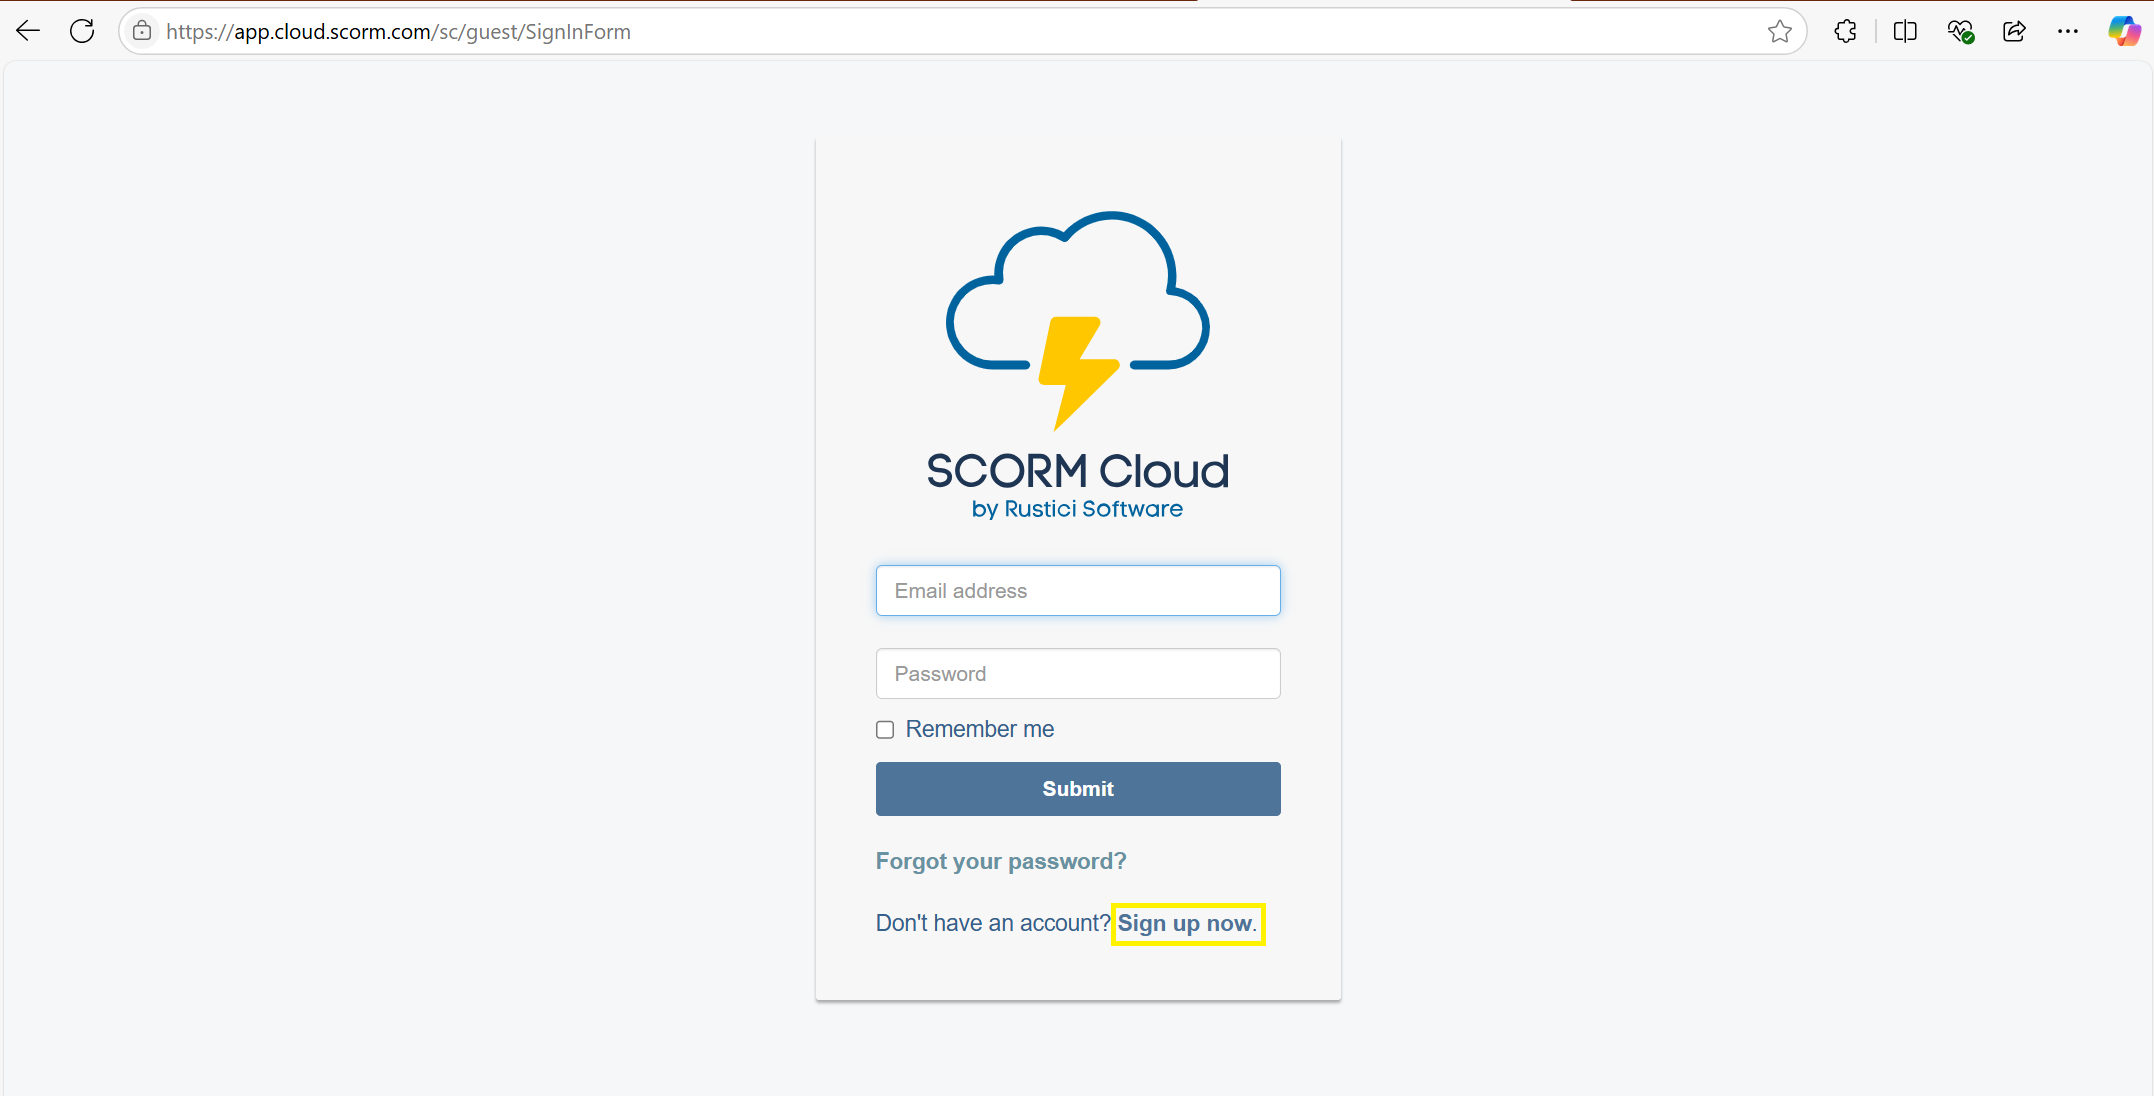
- To collect AppId and Secret Key, you need to create your Scorm Cloud account. Follow below steps:
- Visit Official Scorm Cloud website and click on Sign up.
-
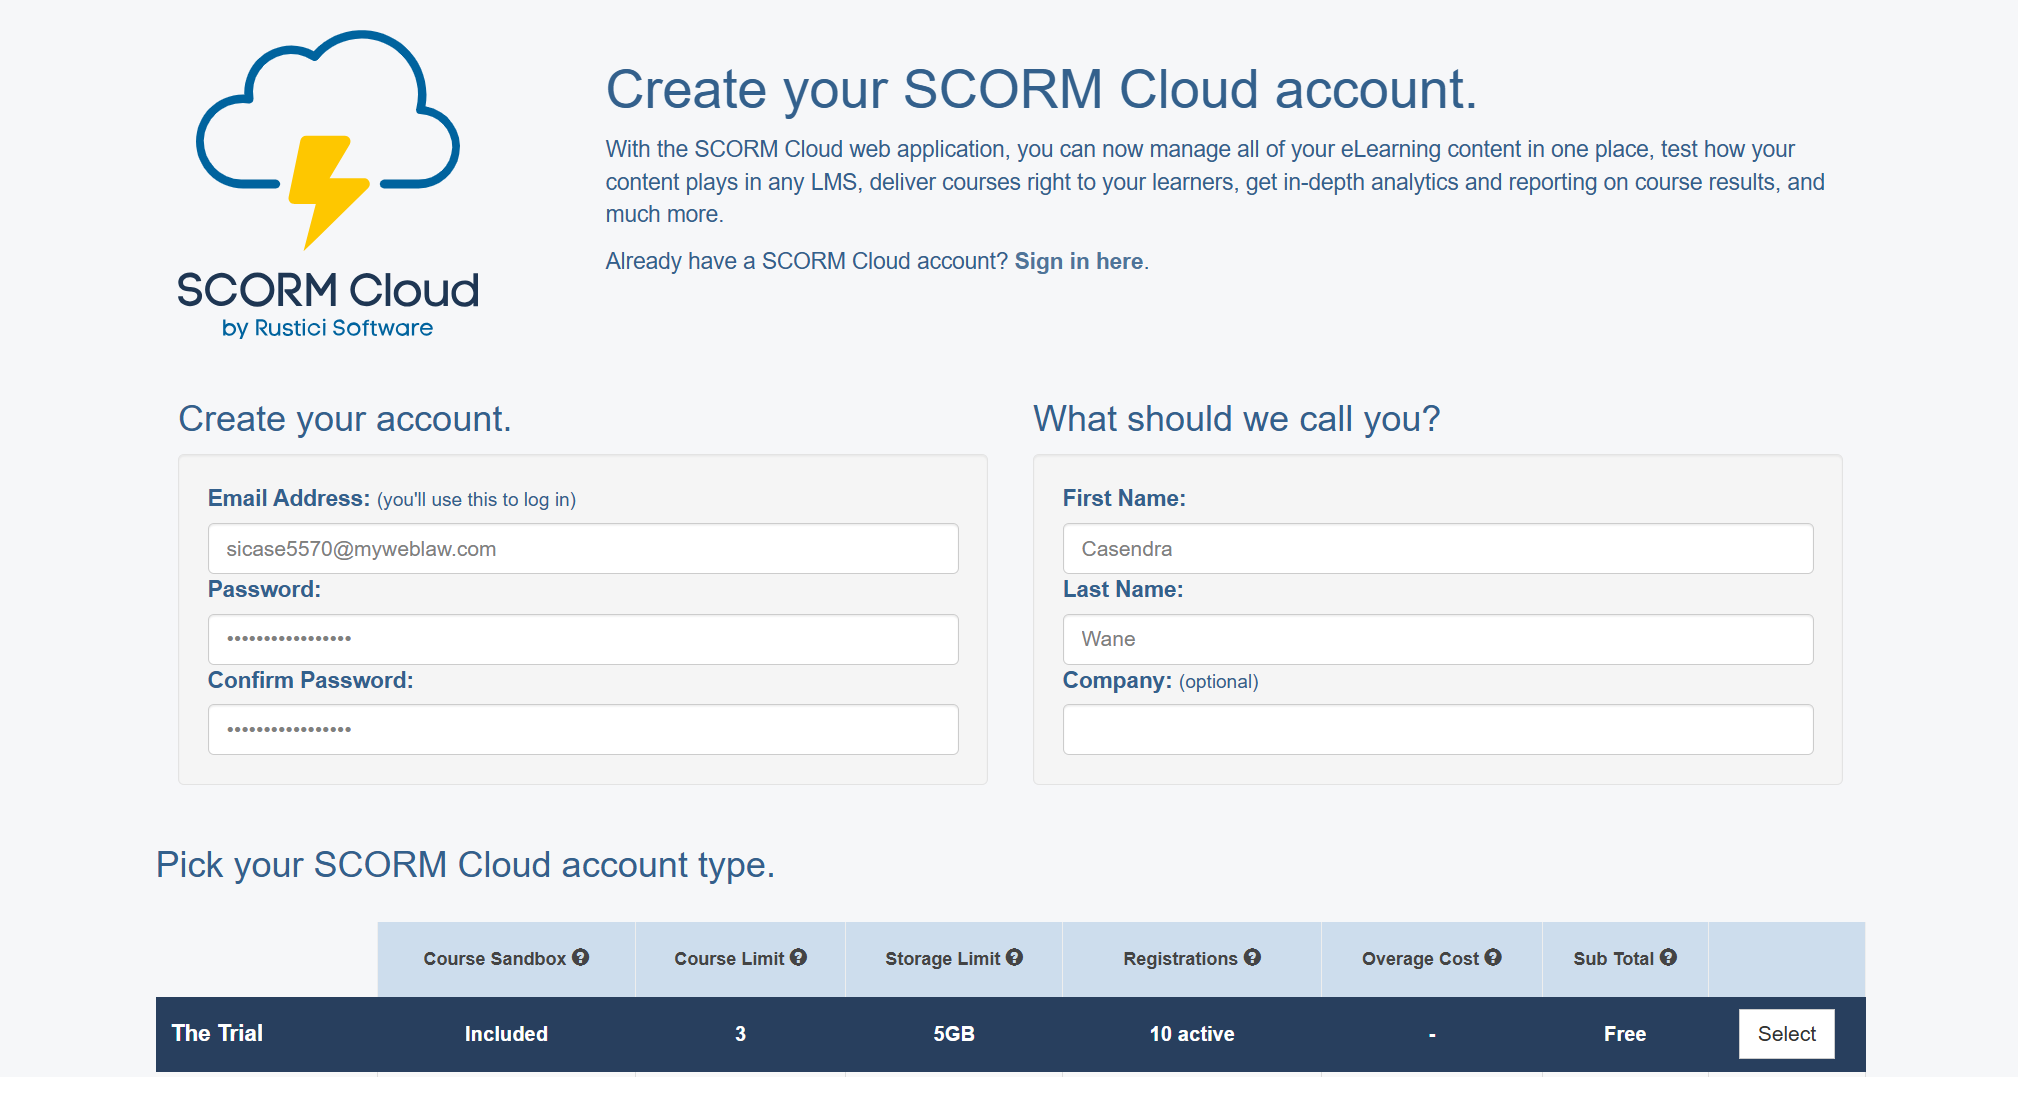
- Provide your Name, Email address and Password to create your free ScormCloud account.
-
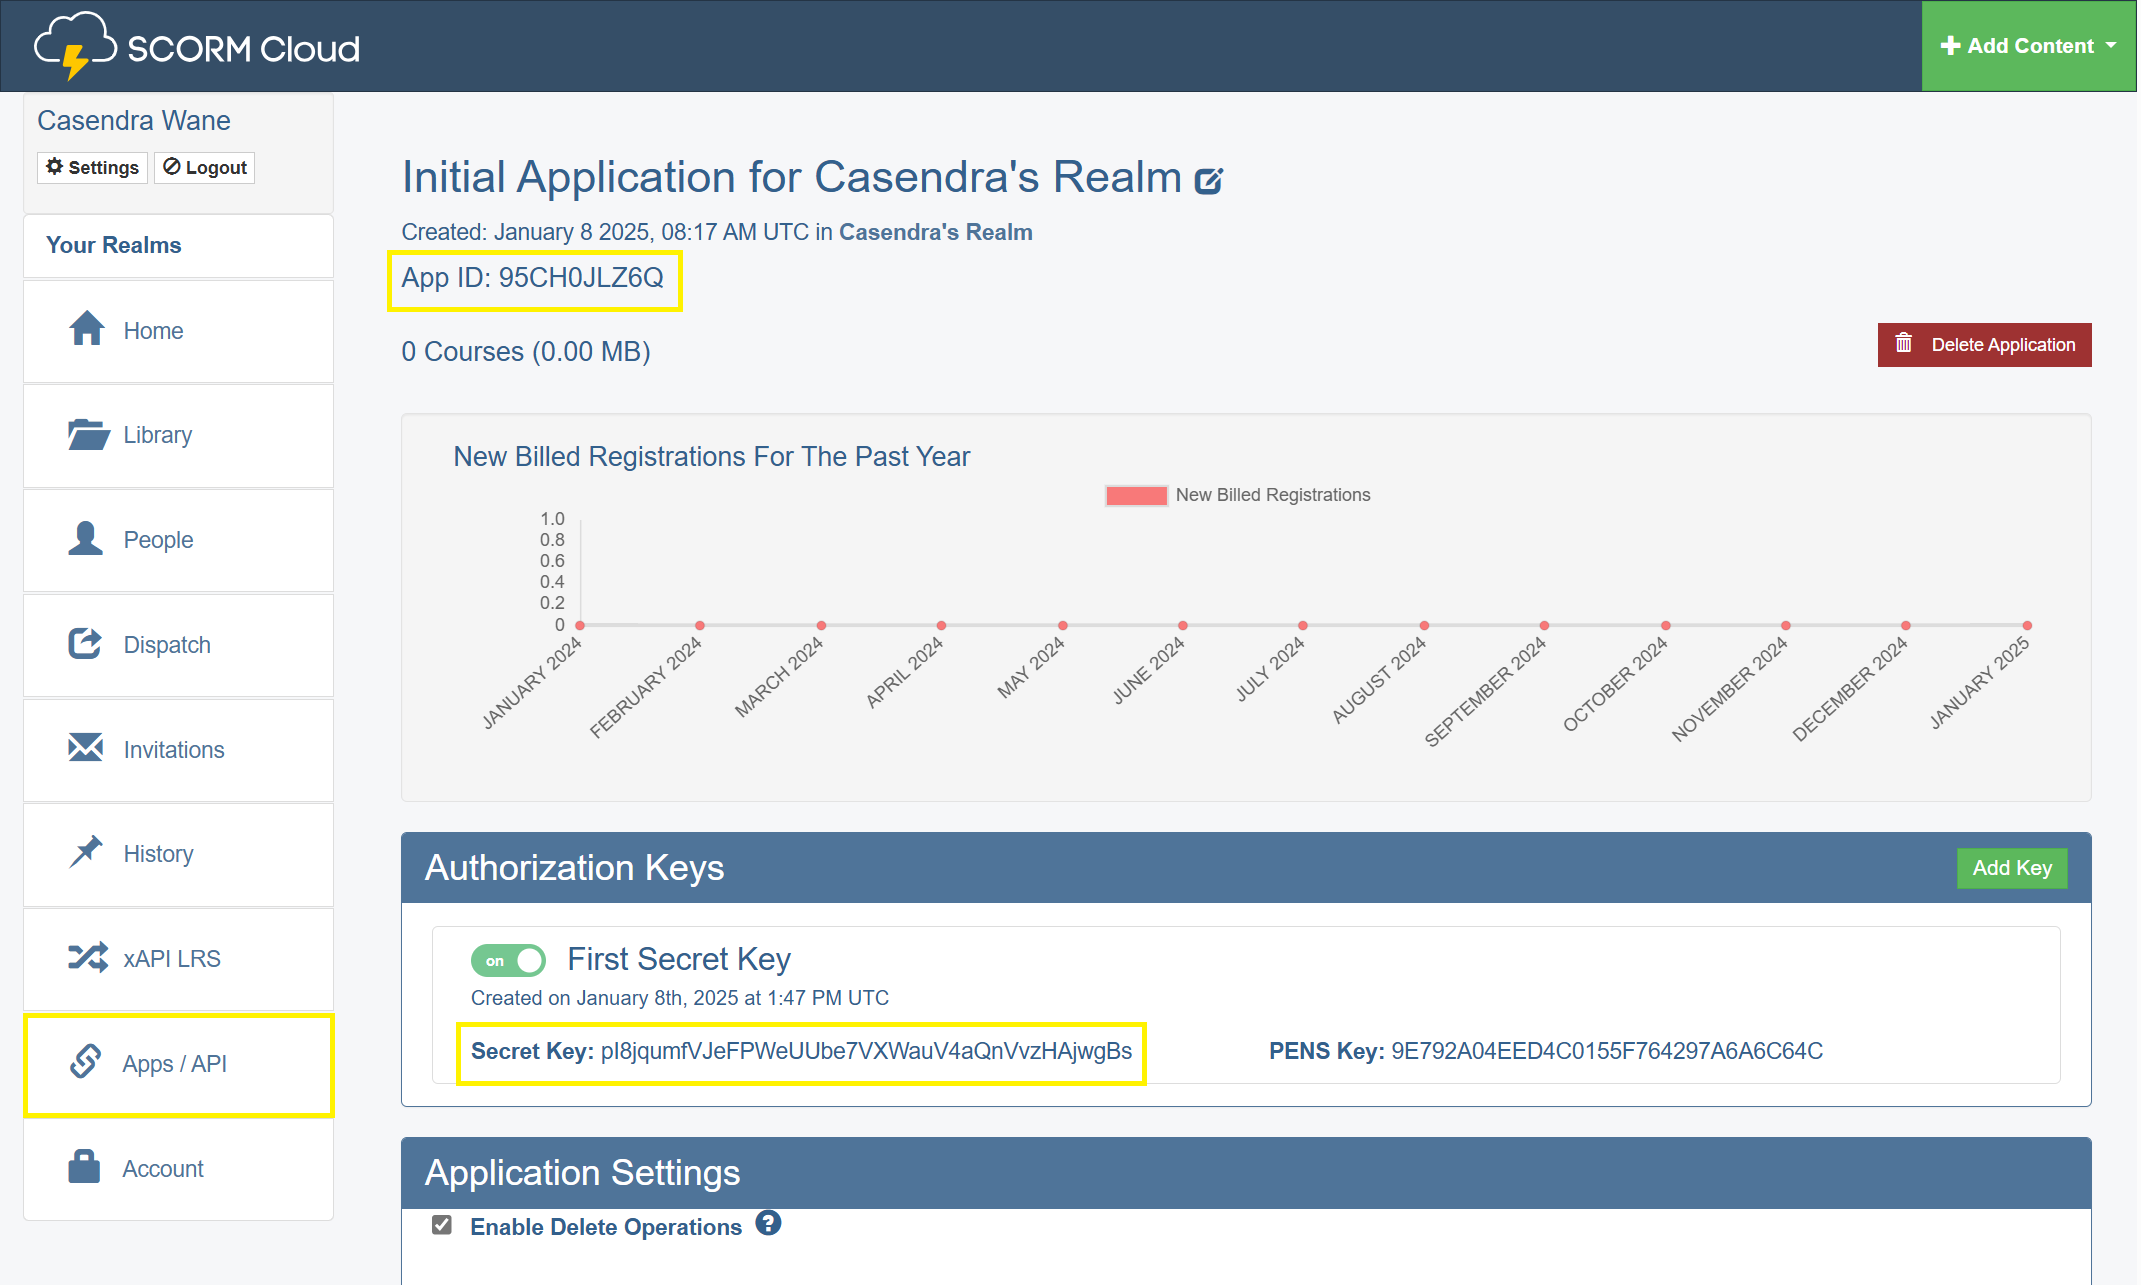
- From Apps / API section, collect AppId and Secret Key details and place in Configure Plugin section as shown above.
-
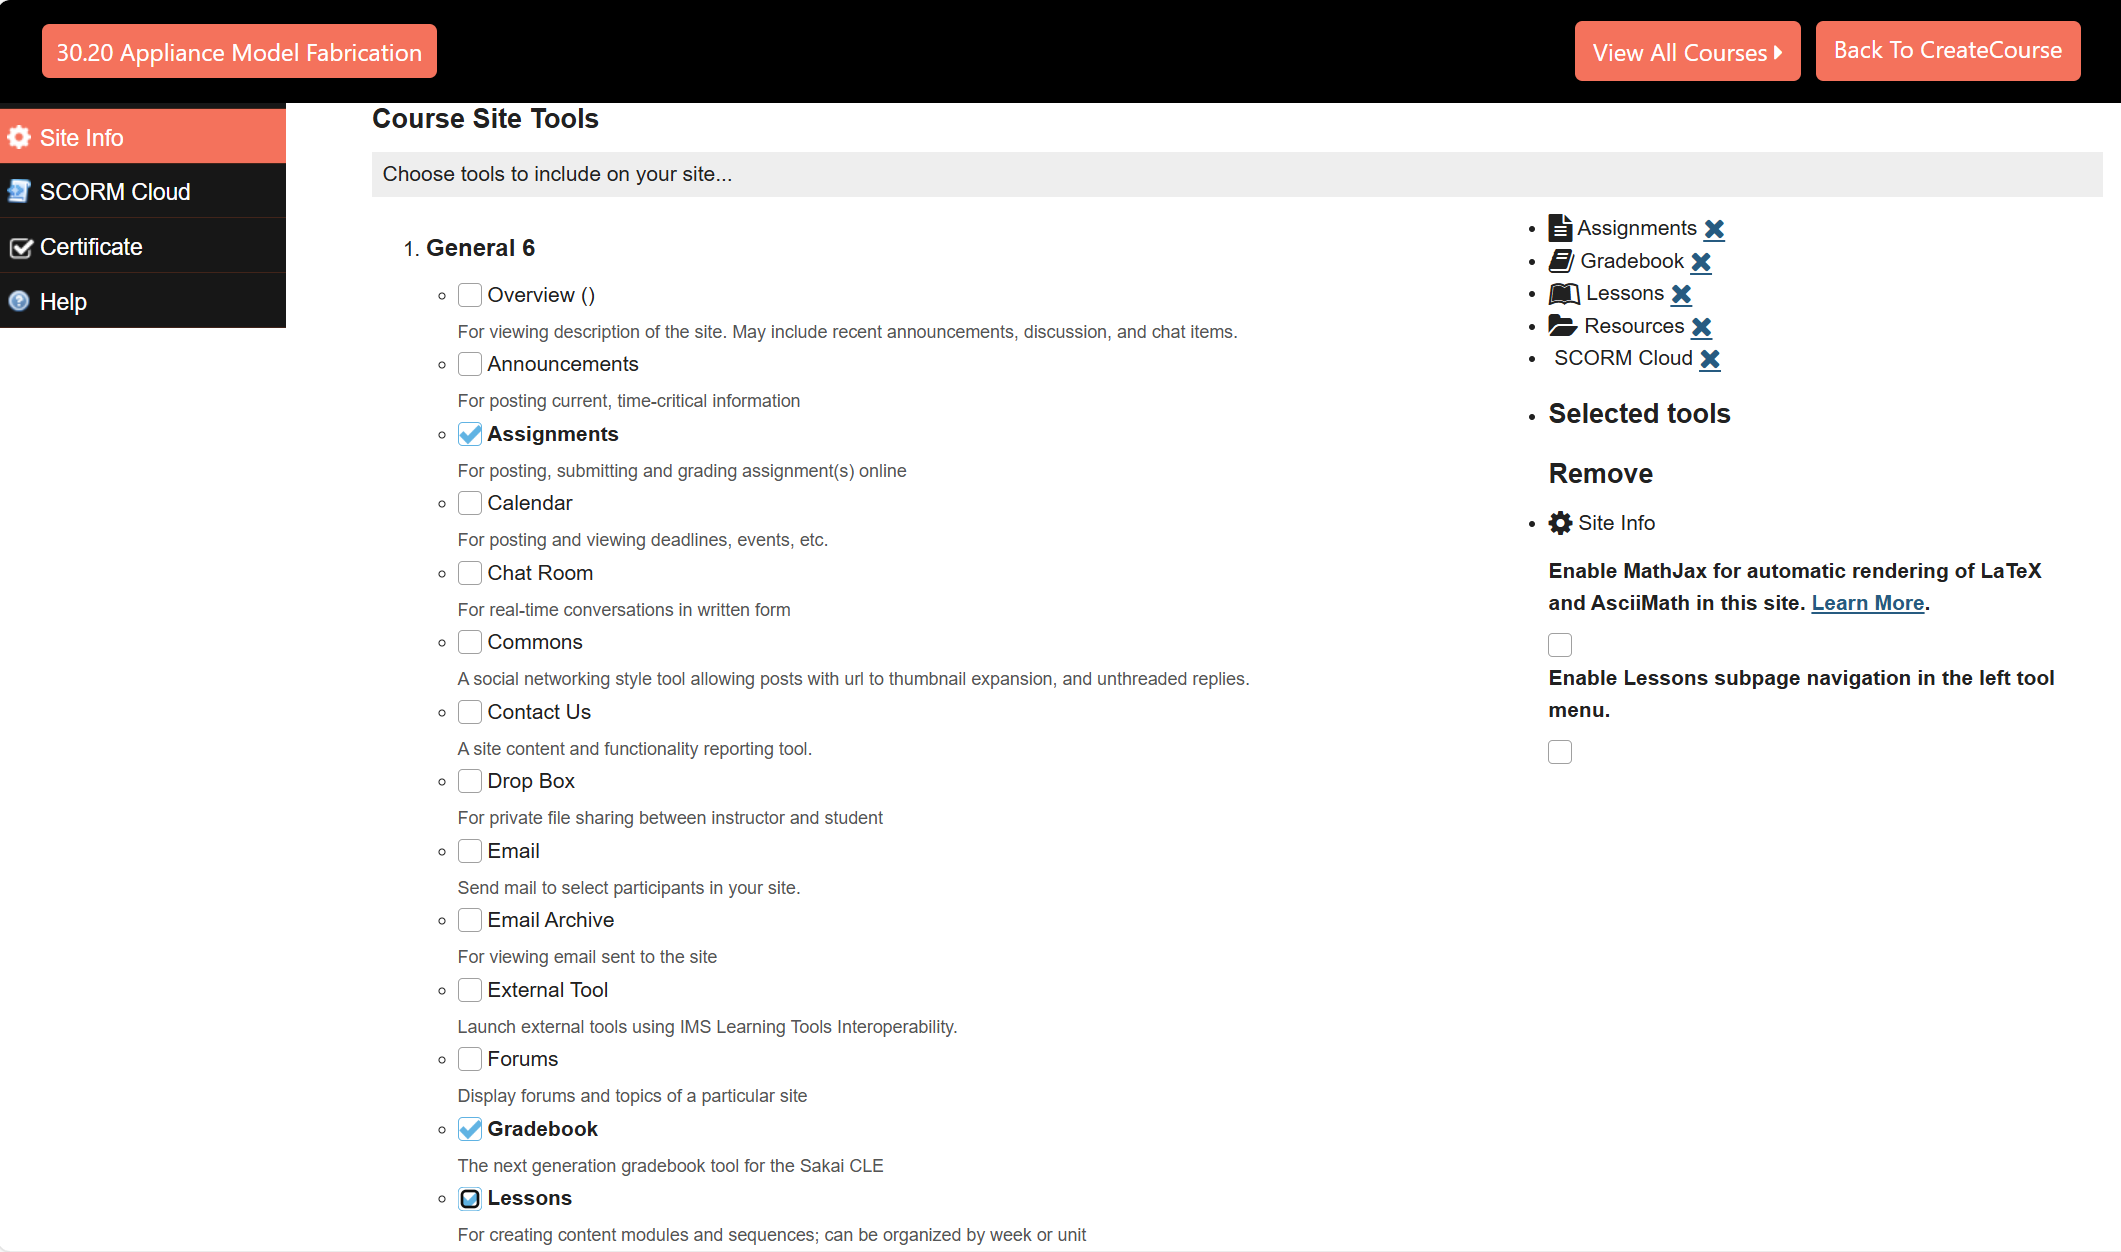
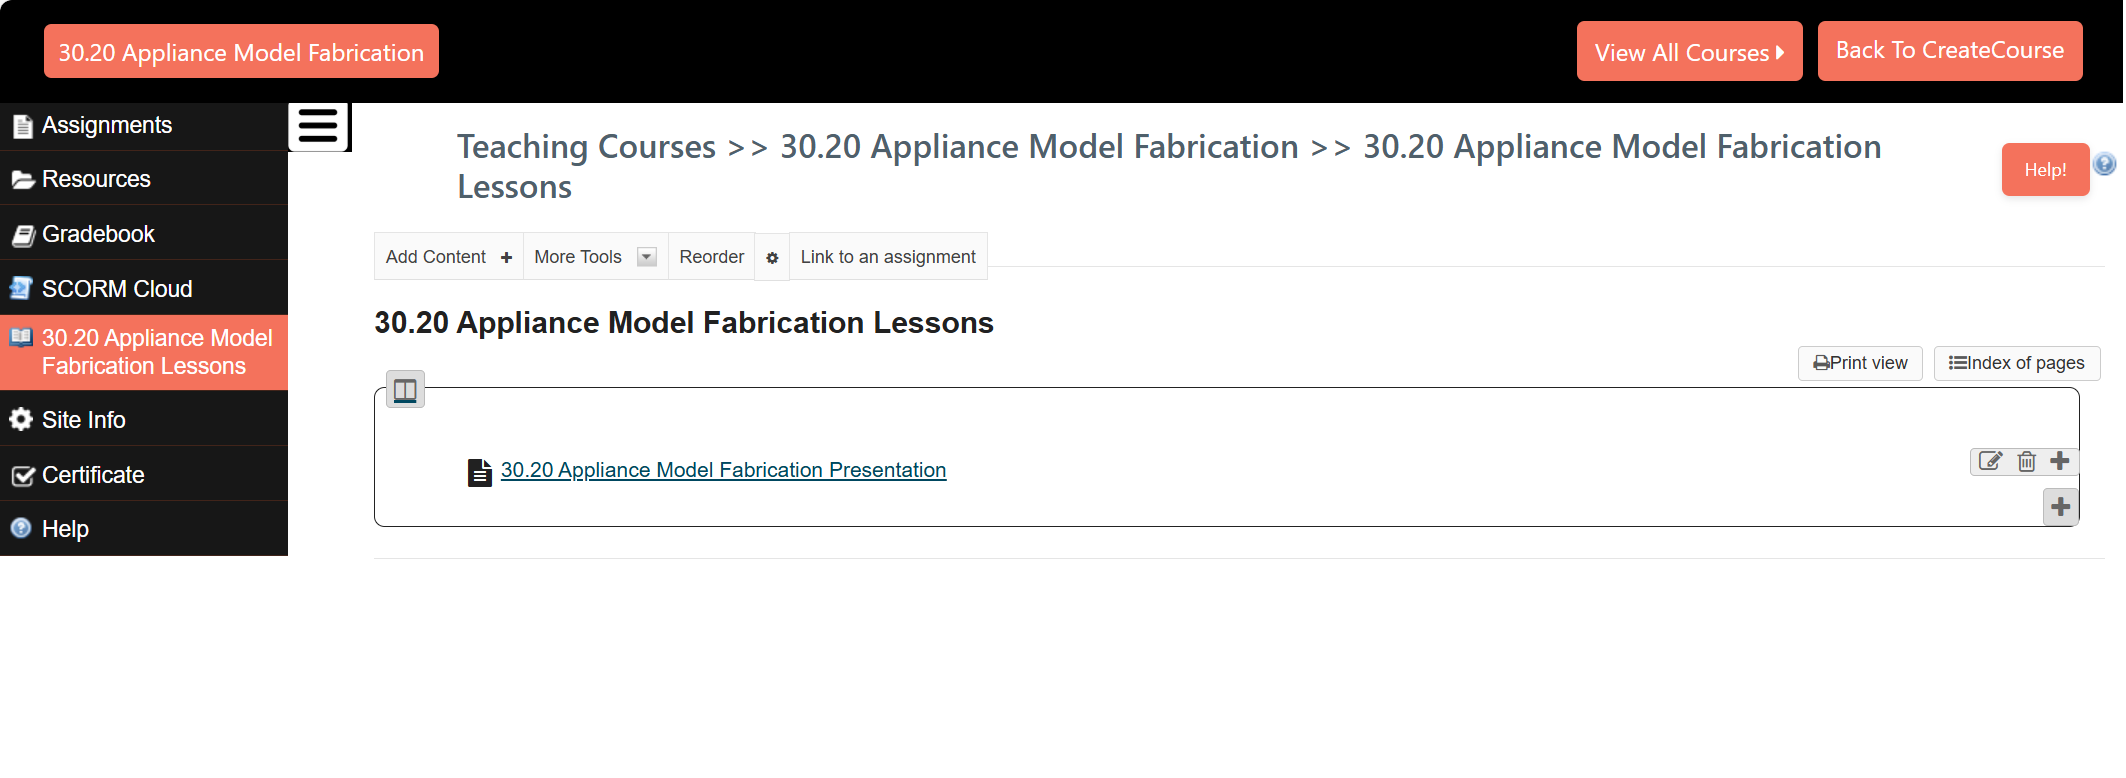
- To create a lesson, go to Site Info, select Lessons, and then click the Continue button.
-
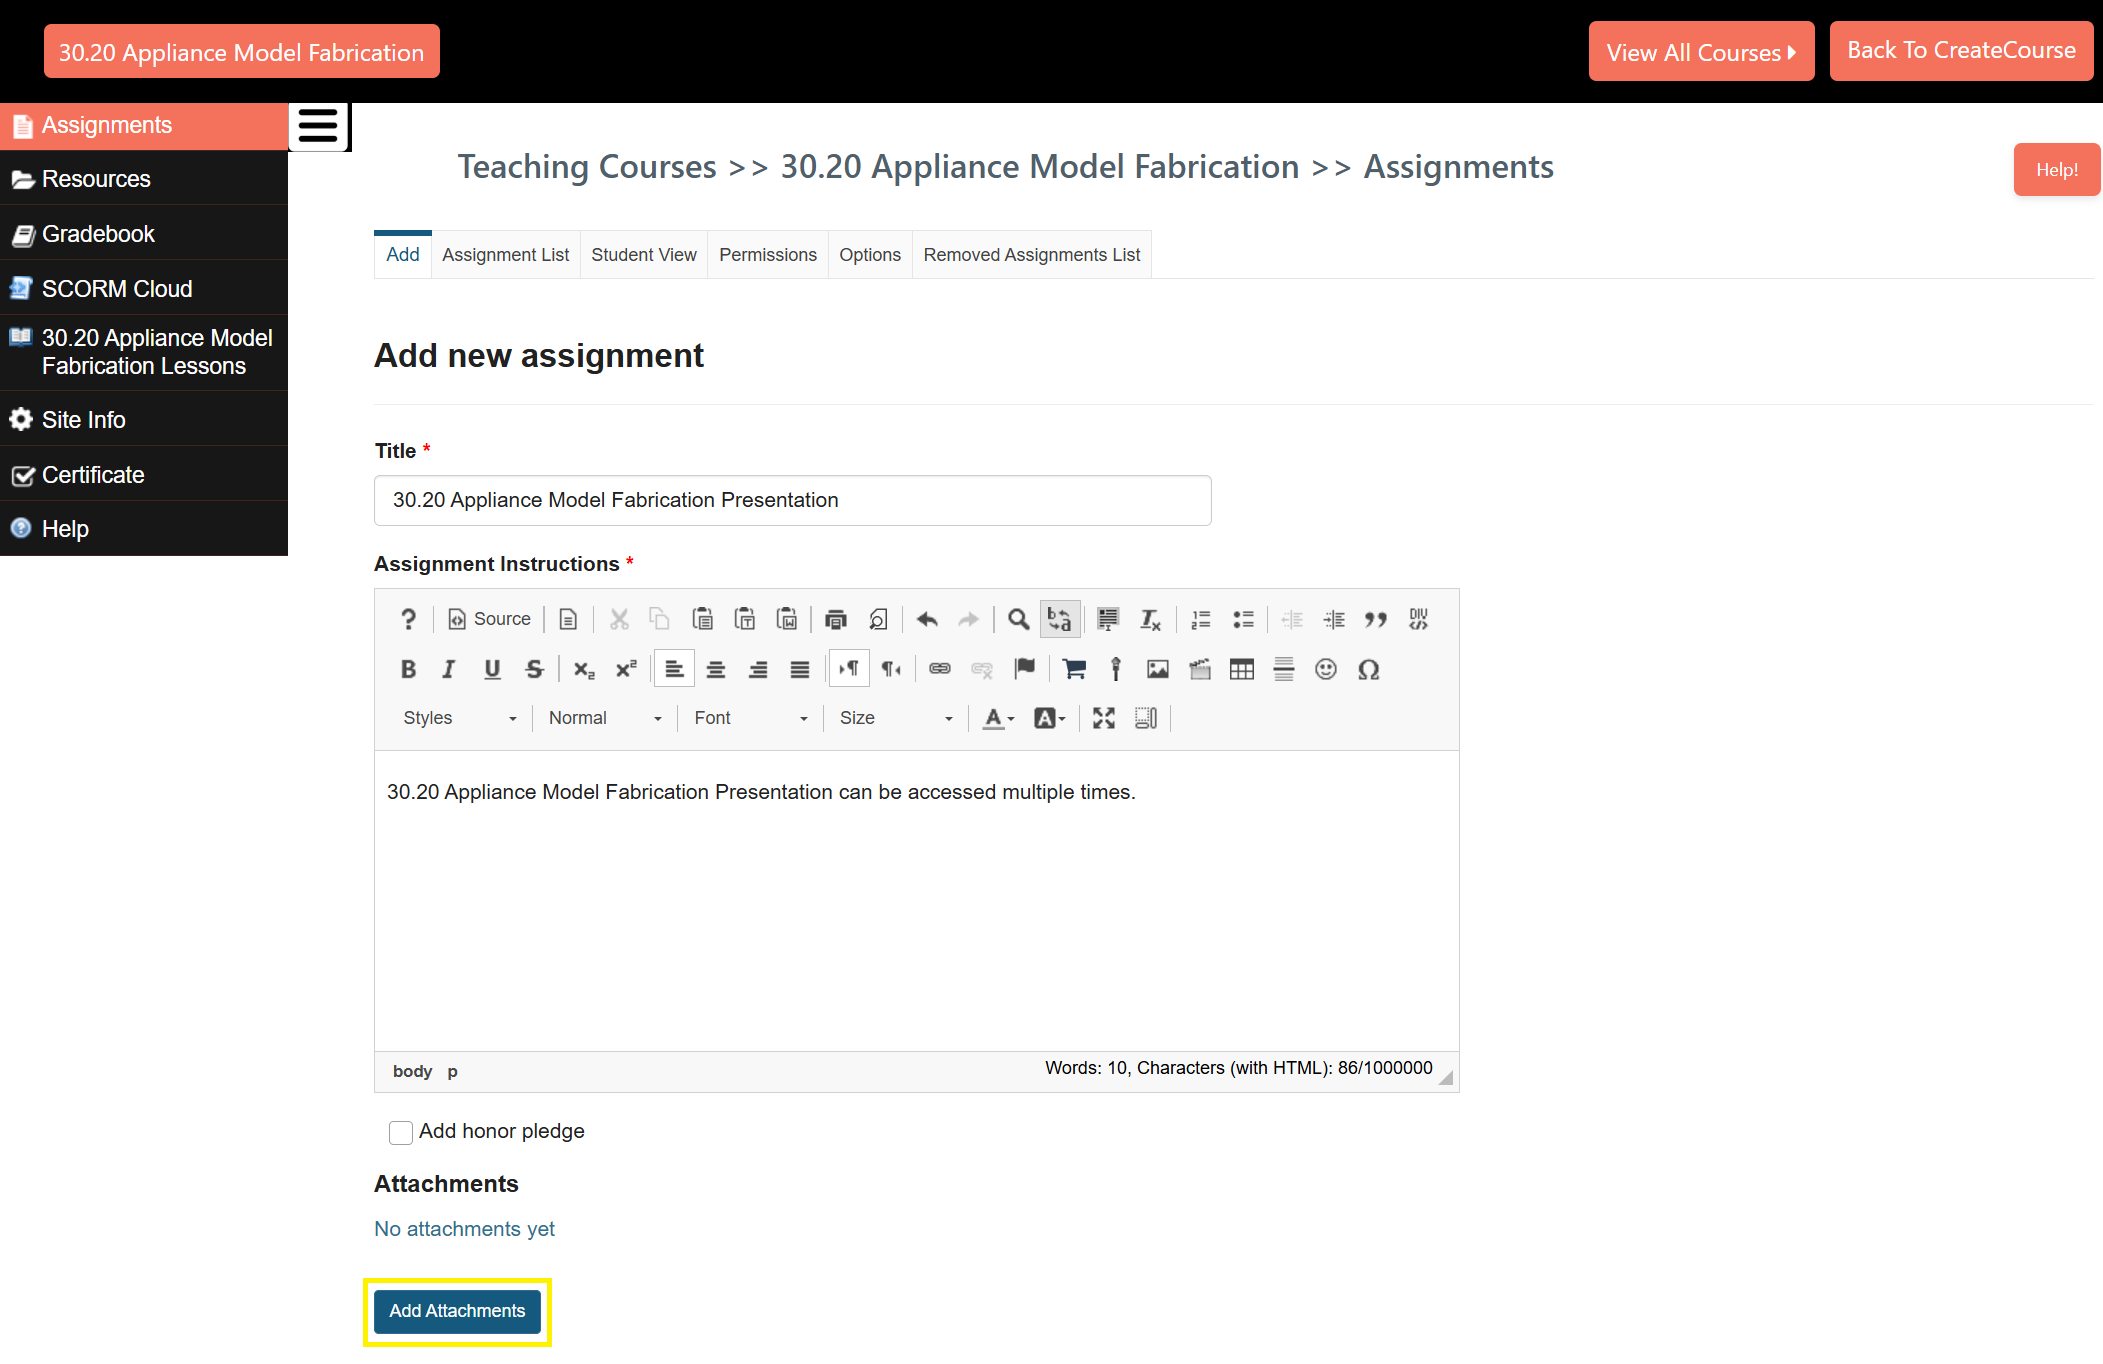
- To create an Assignment, go to Assignments, provide Title, Description, and then click the Add Attachments button.
-
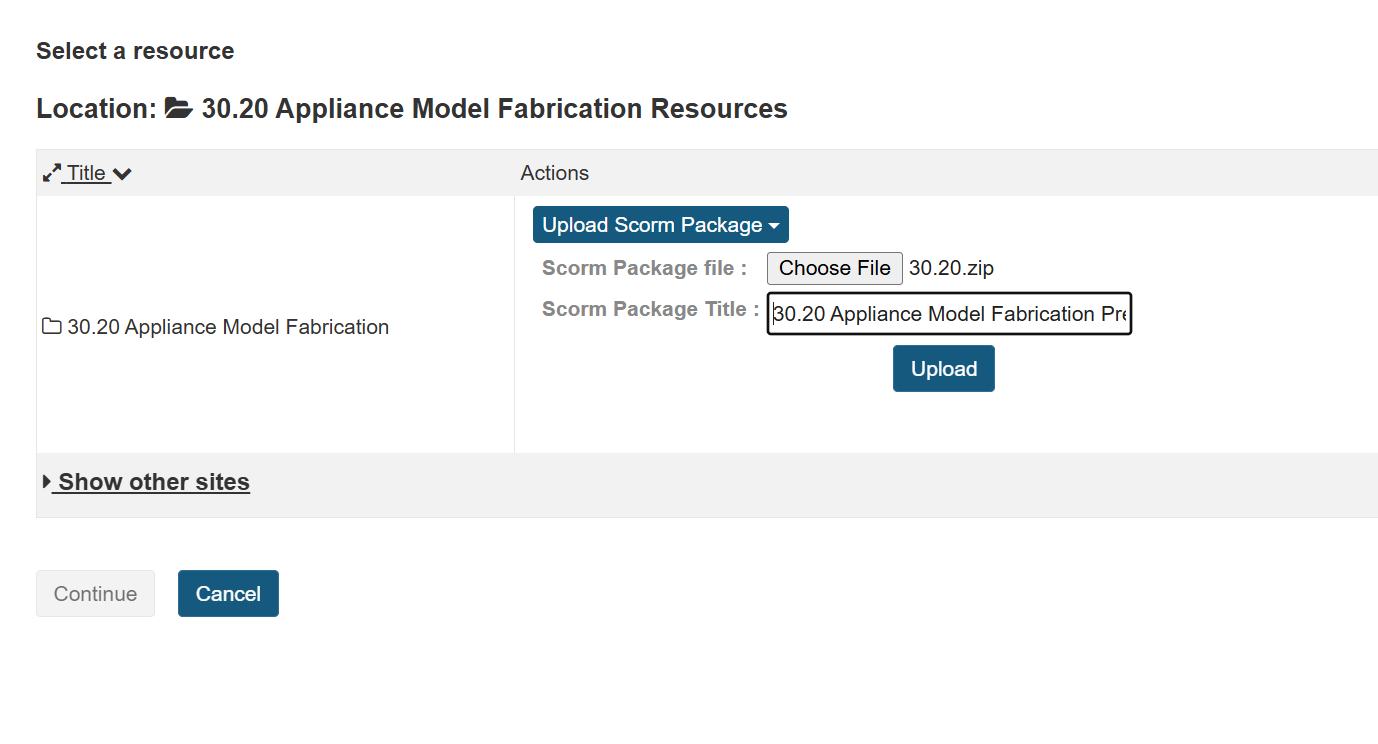
- Upload your Scorm Package zip file, provide the Package Title and click the Upload button.
-
-
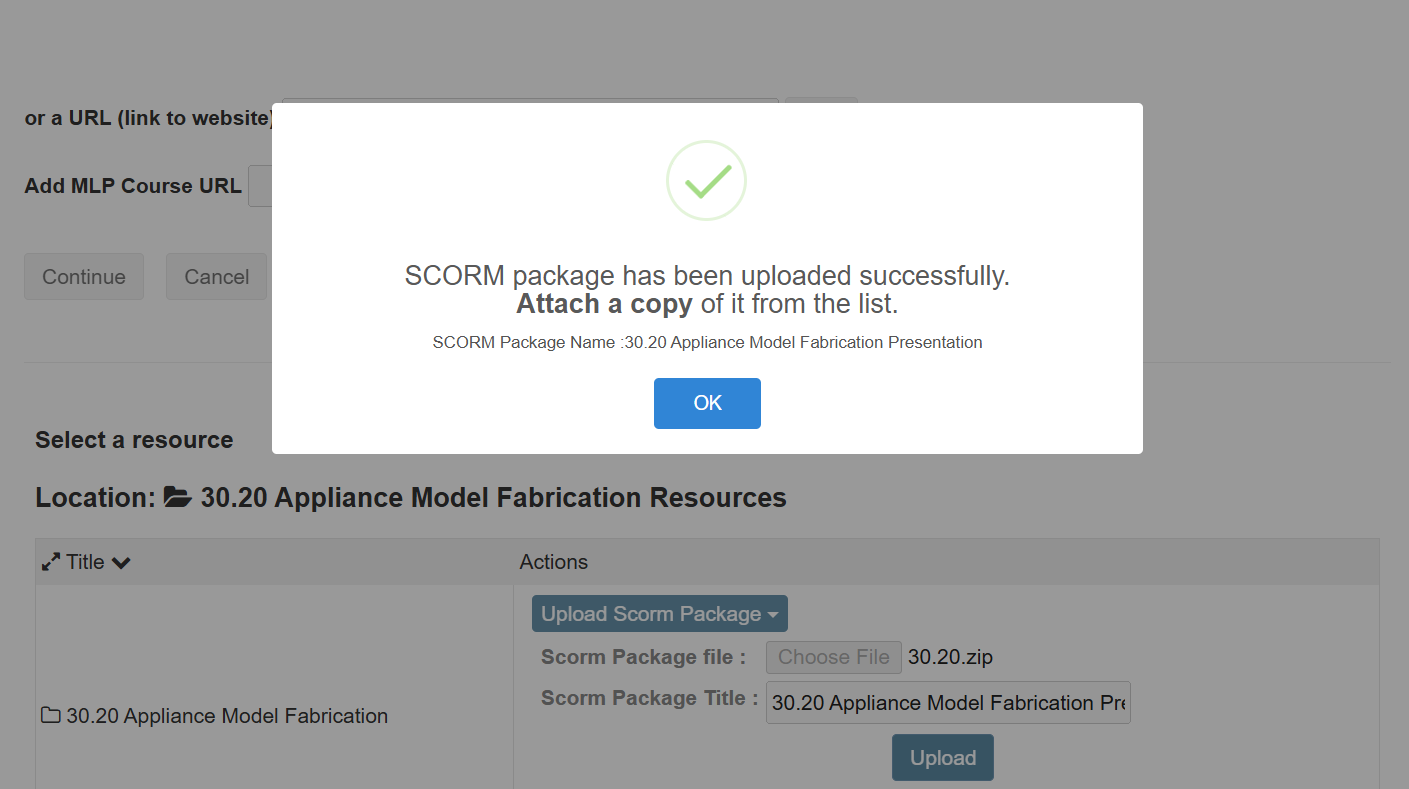
- Click on the "Attach a copy" link, then click the Continue button.

-
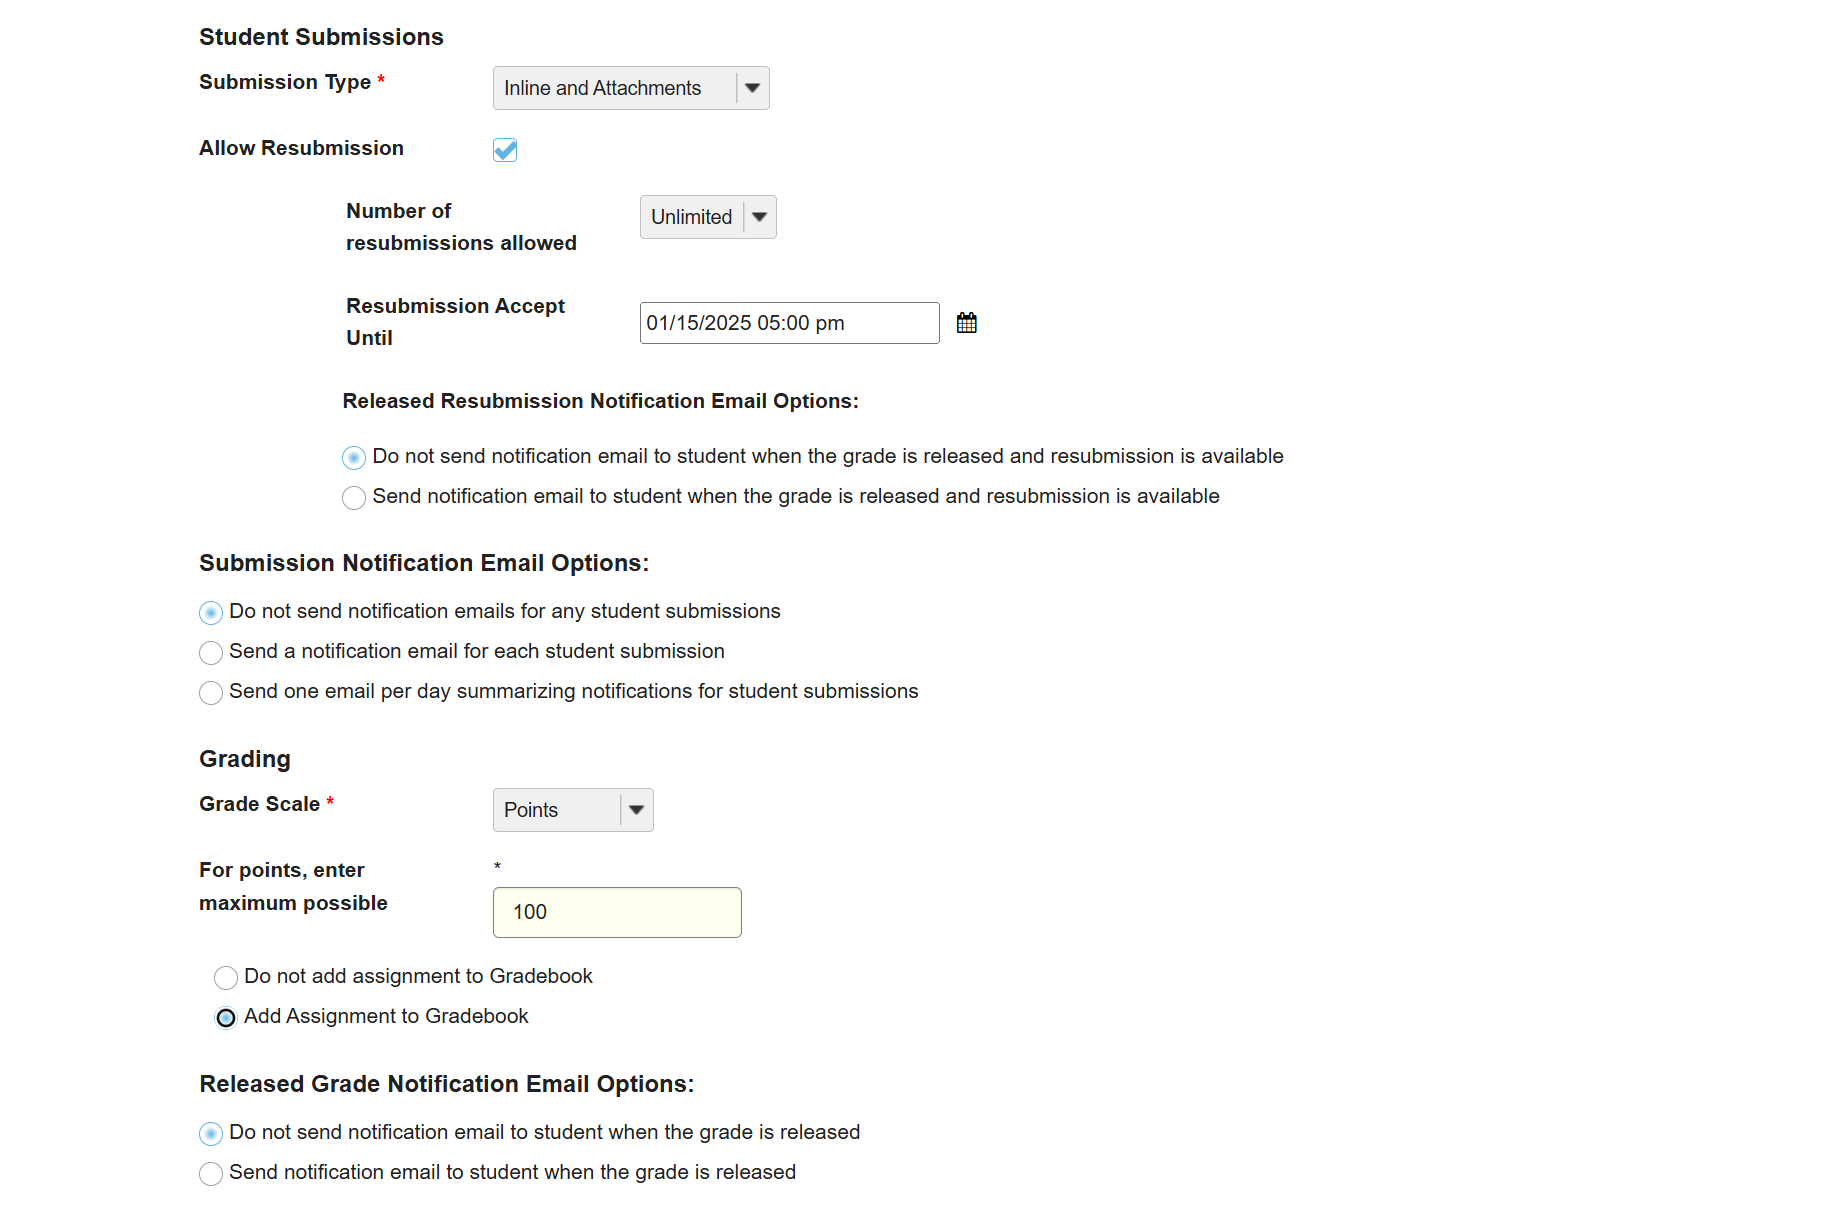
- Allow the number of resubmissions, select "Points" as the grade scale, and choose "Add Assignment to Gradebook." Then, click on Post.
-
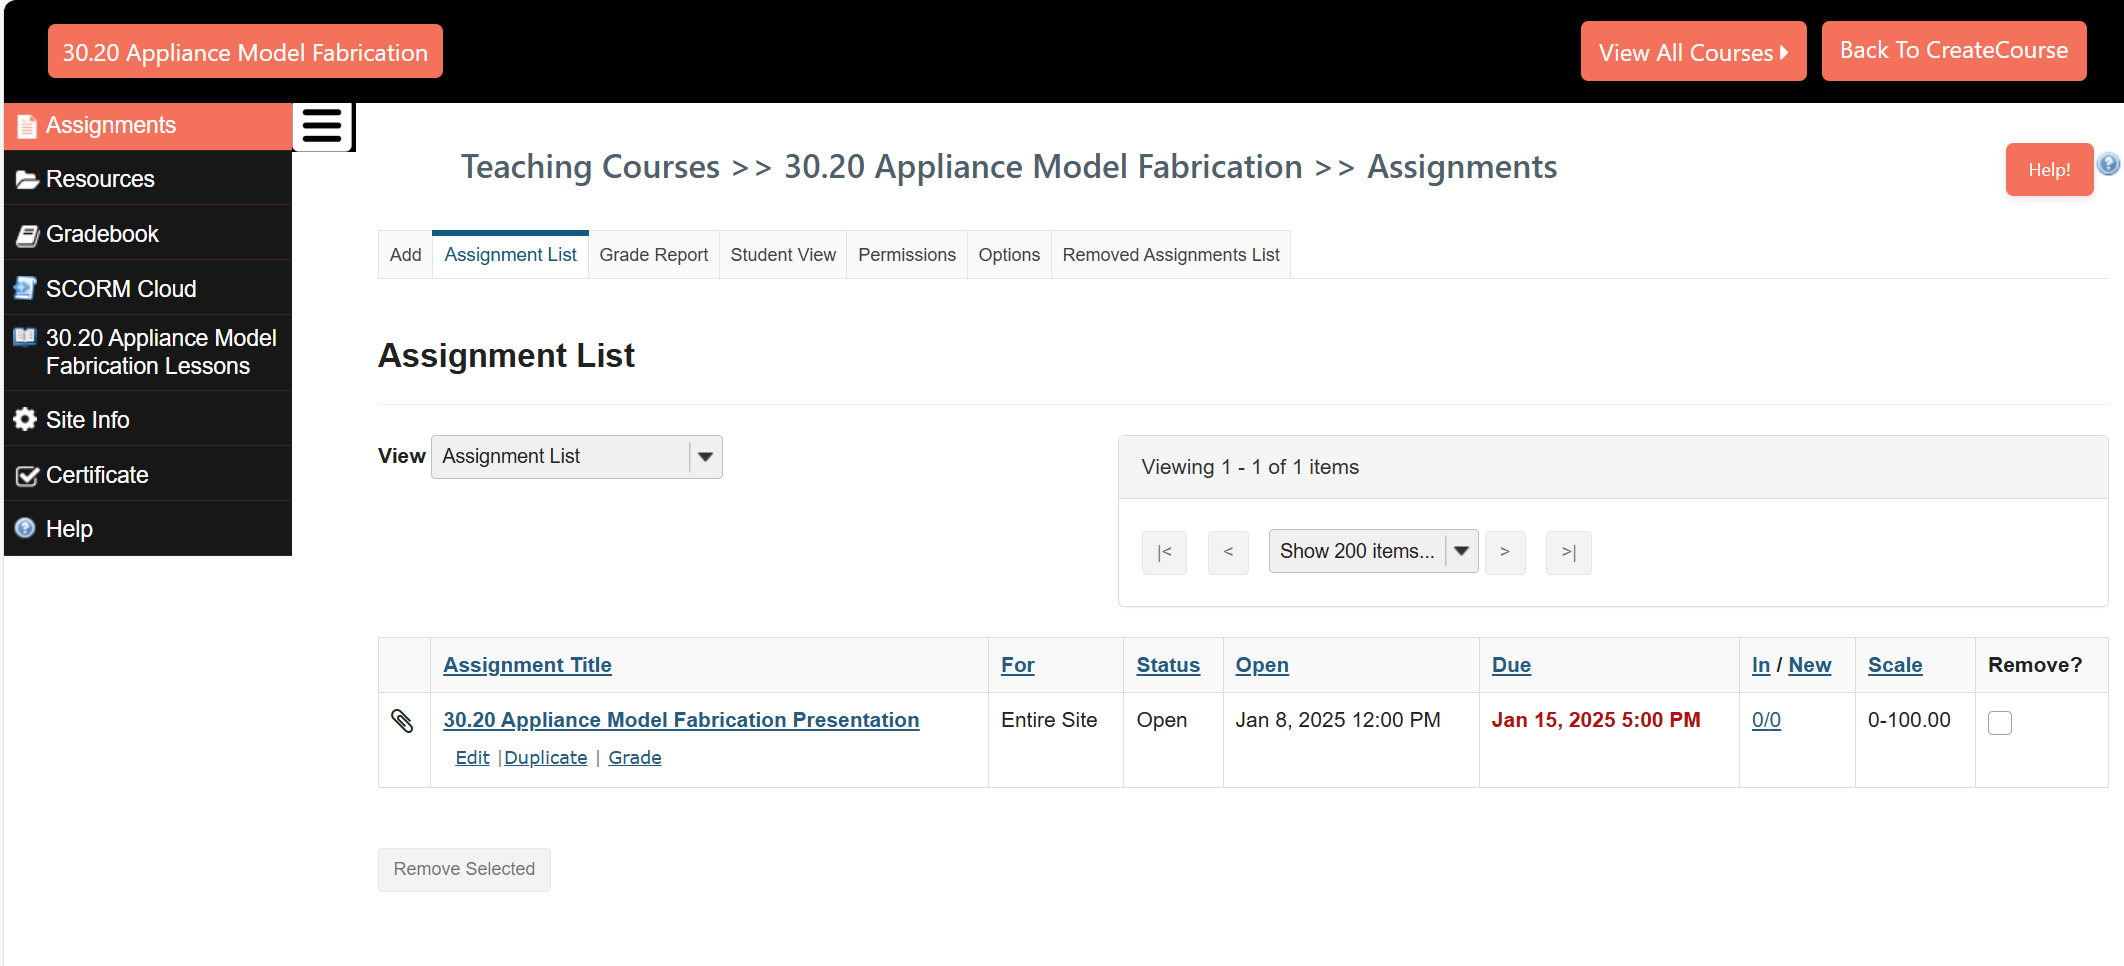
- The assignment has successfully created.
-
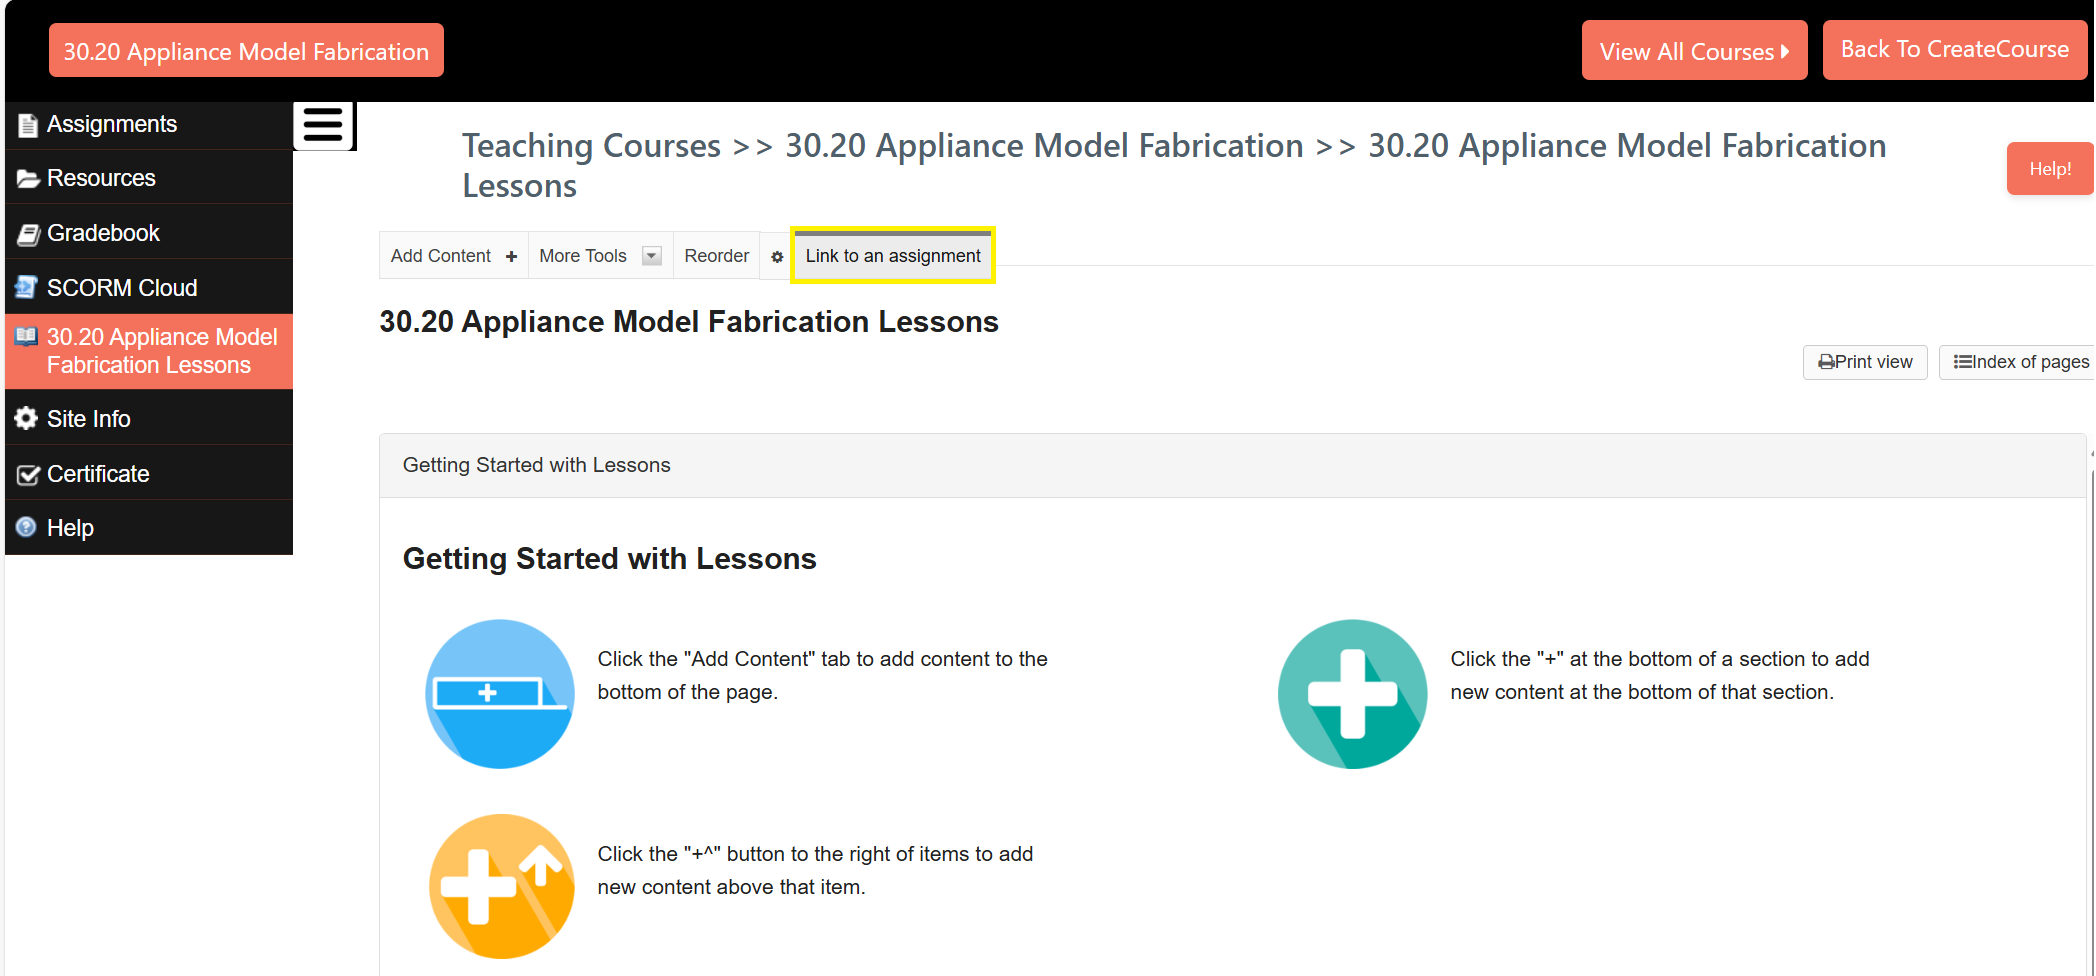
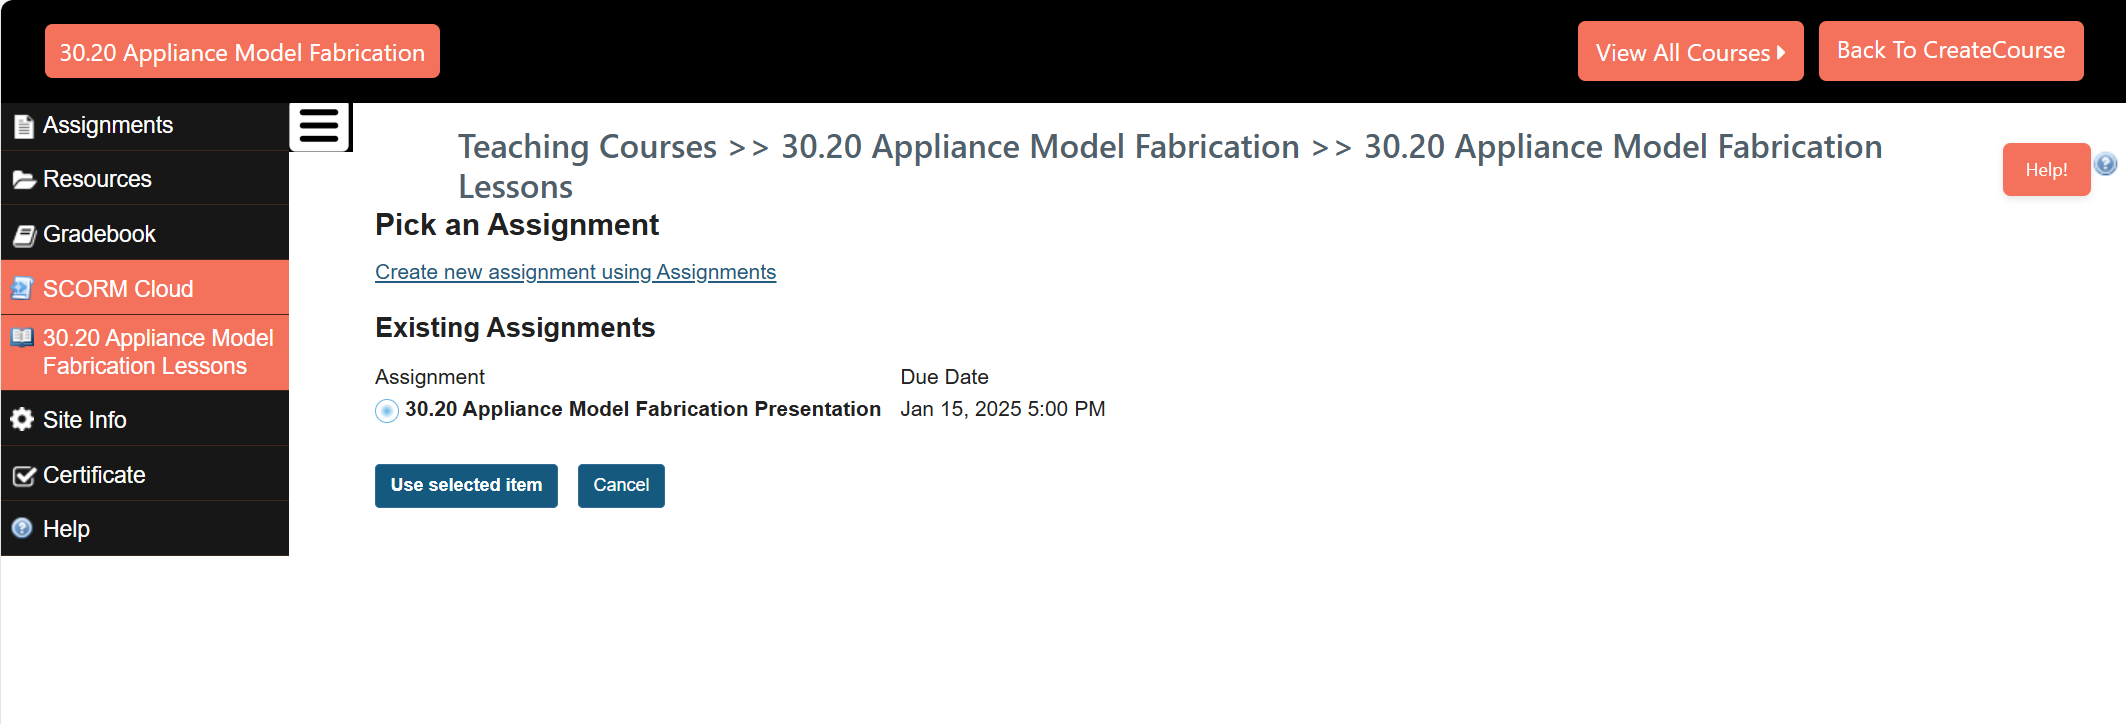
- To link the assignment to the lesson, go to the lesson, click on "Link to an Assignment," and then click on "Use Selected Items."
-
-
- Now the student can access the lesson and complete the assignment.
-
How to know who is accessing my courses?
-
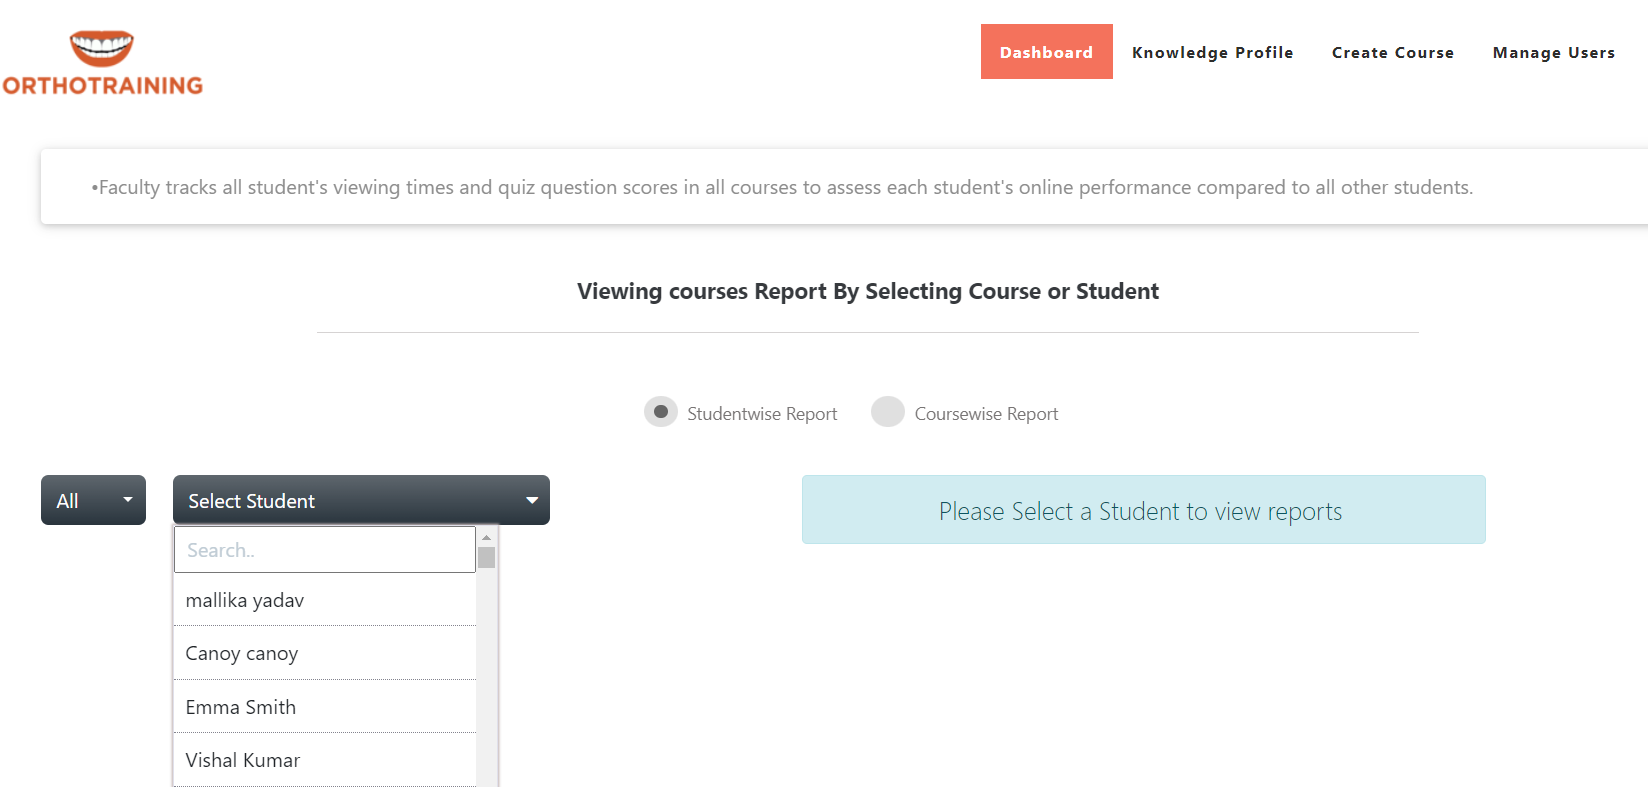
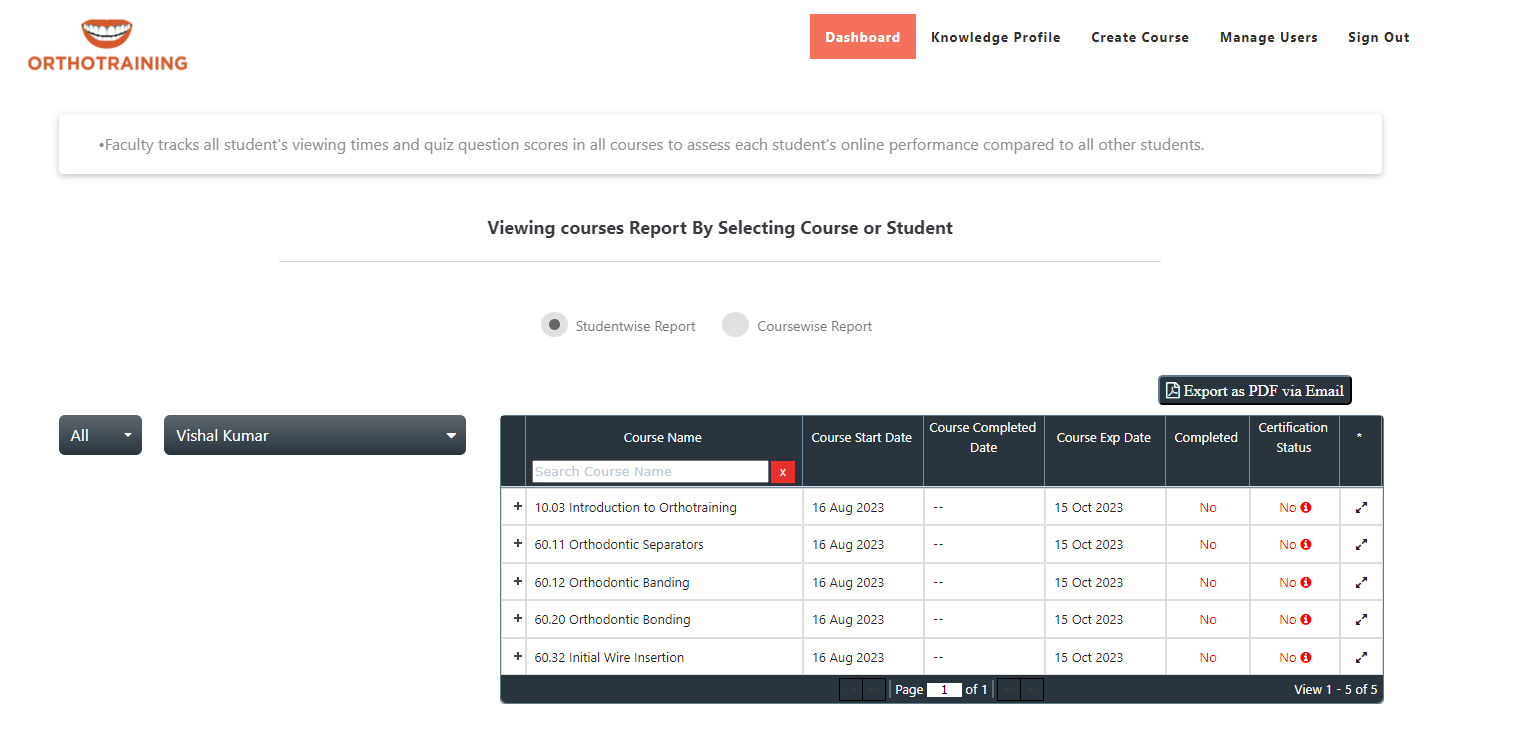
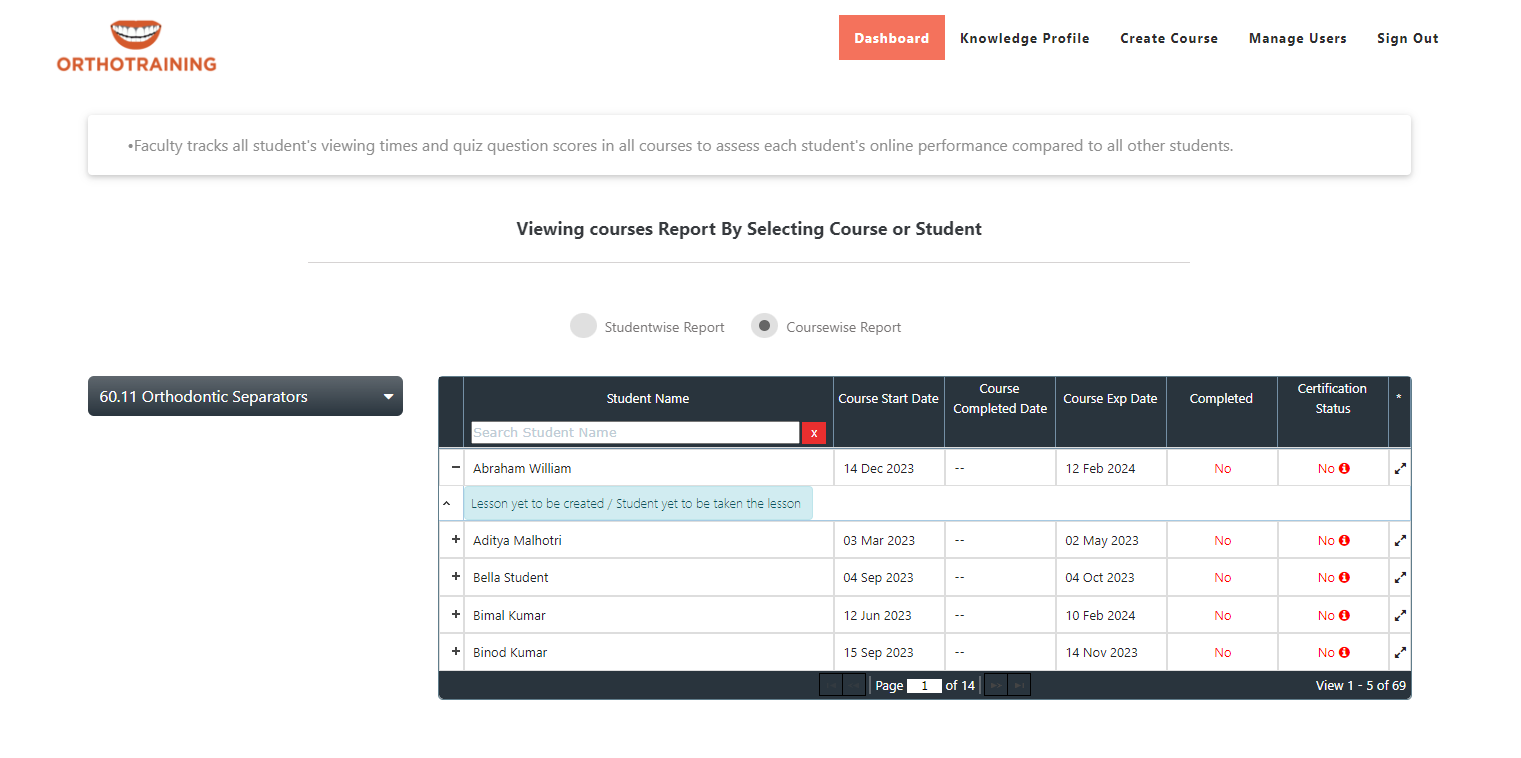
- Select the Studentwise Report option to view individual student reports.
- Choose the student from the dropdown menu under the "Select Student" option.
-
-
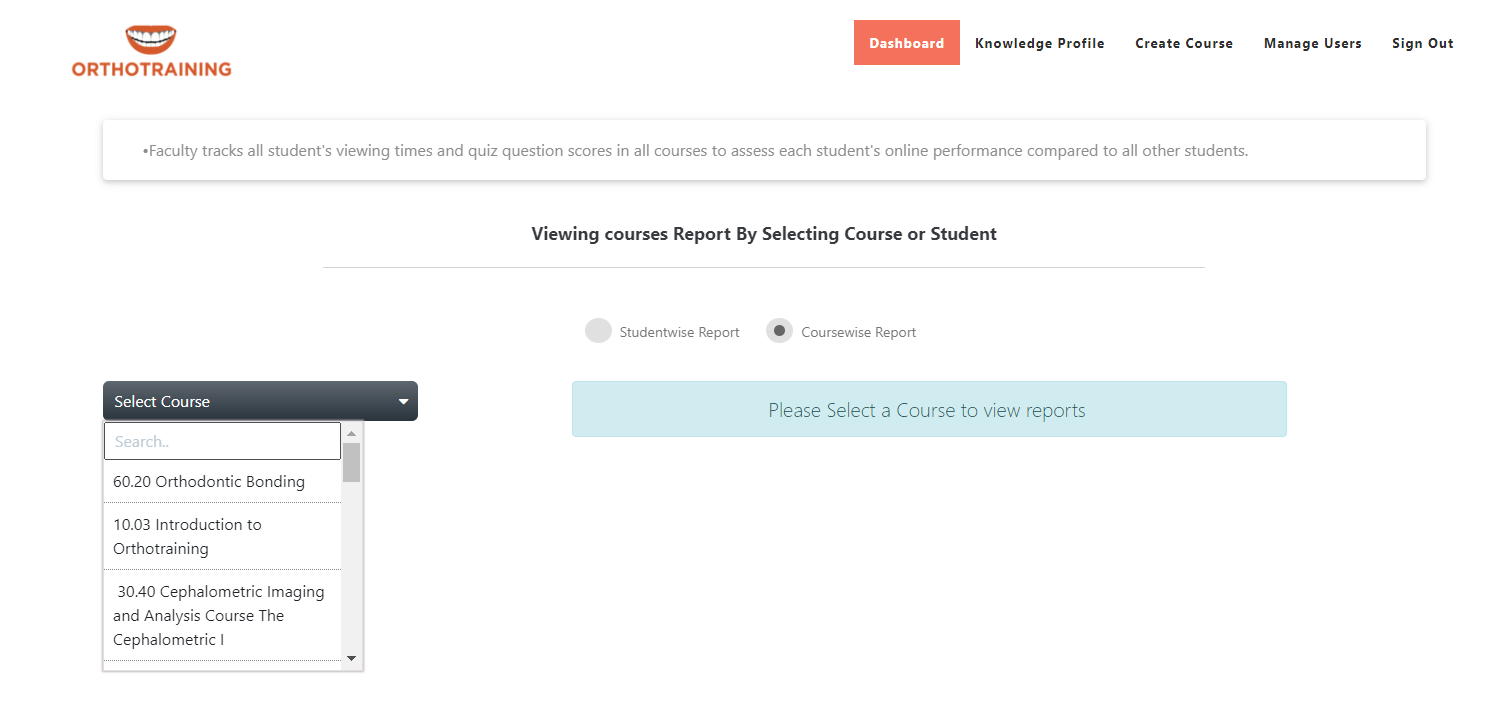
- Choose the Coursewise Report option to know which students are accessing a particular course.
- Choose the course from the dropdown menu under the "Select Course" option.
-
-
- In this way, you can monitor both studentwise reports and coursewise reports.
-
How can I assign the Course Categories to the students?
-
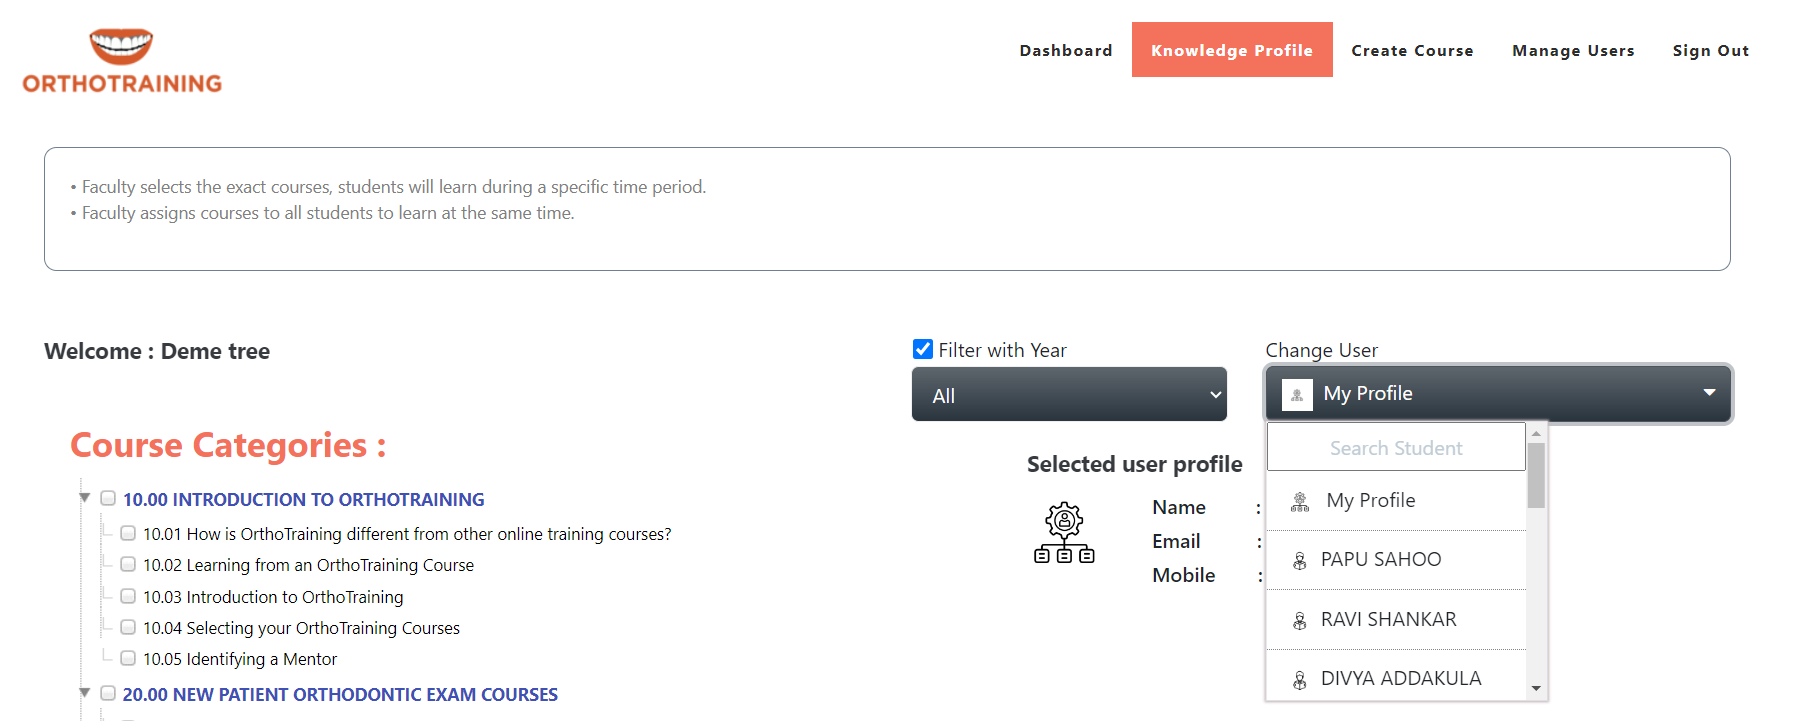
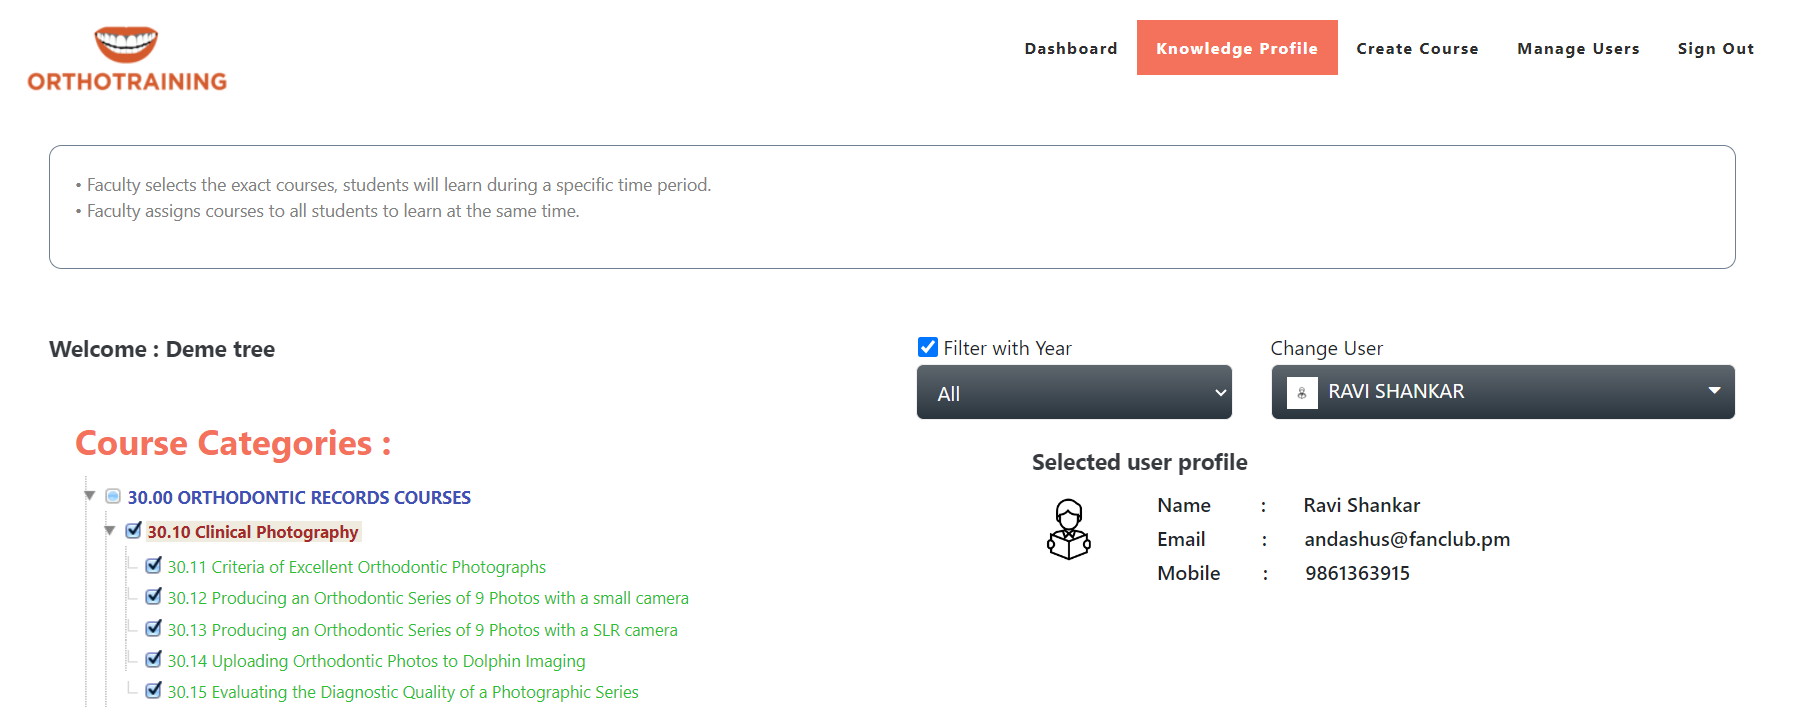
- To assign course attributes to a student, choose the student, select the desired attributes, and save the changes.
-
-
- Once the changes are made, the selected attributes will be mapped to the student.
- You can determine which students have specific course attributes by selecting users in a particular year through the option to choose the desired year.
-
As a Mentor
- You possess the capability to efficiently enroll students into the website, either individually or in groups.
- Additionally, you are authorized to facilitate course purchases on behalf of students, utilizing a secure payment gateway.
- Through the comprehensive dashboard, you can meticulously monitor and evaluate the performance of enrolled students.
- Furthermore, you are equipped to engage in effective communication with students to provide further assistance and guidance pertaining to the courses they are undertaking.
How can I enroll in the website?
-
Open the URL in Your Browser:
- Launch your web browser and enter the provided URL in the address bar.
-
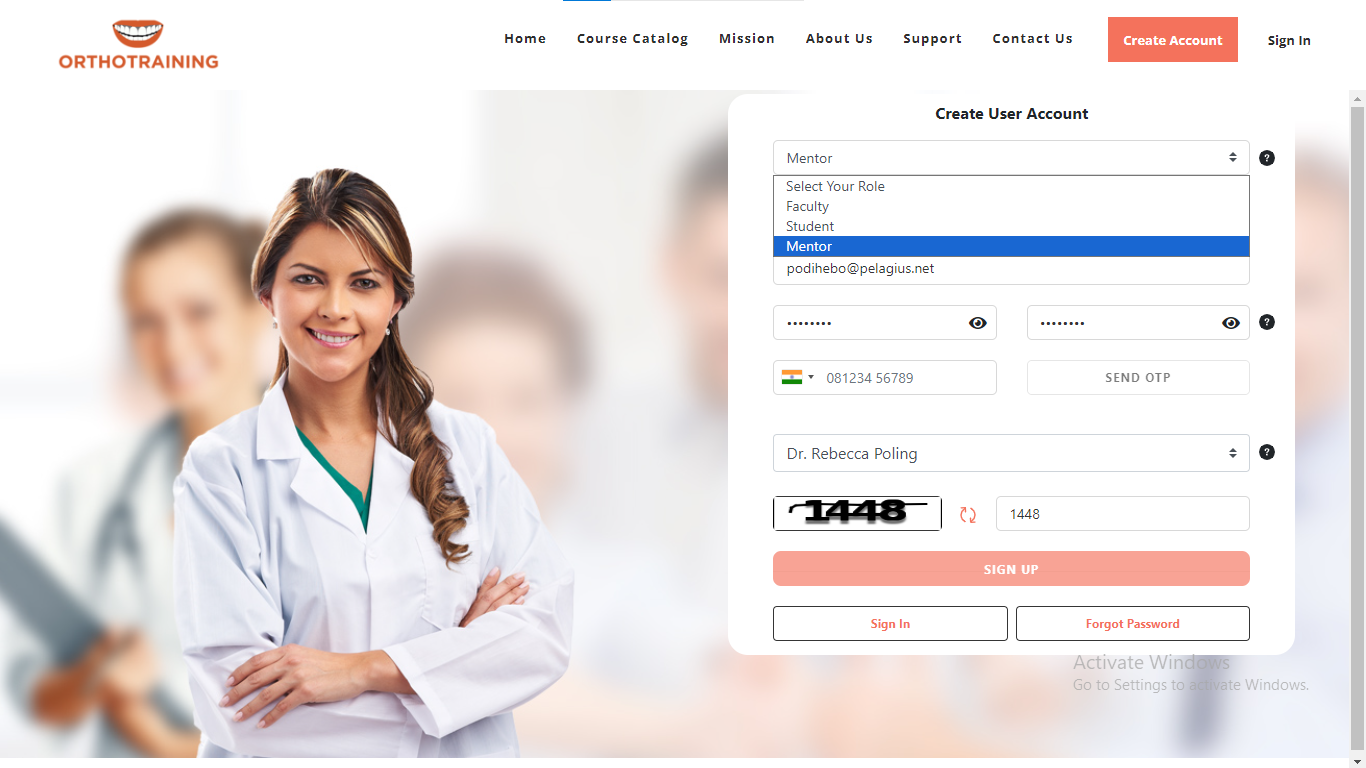
Navigate to the Create Account Page:
- Once on the website, locate the menu list and click on the "Create Account" page.
-
Choose Your Role as a Mentor:
- On the Create Account page, find the "Select your role" field.
- Open the dropdown menu and select "Mentor" as your role.
-
Fill in Your Details:
- Below the role selection, you'll find a form. Provide the necessary details as requested. This may include your name, email, password, and any other required information.
-
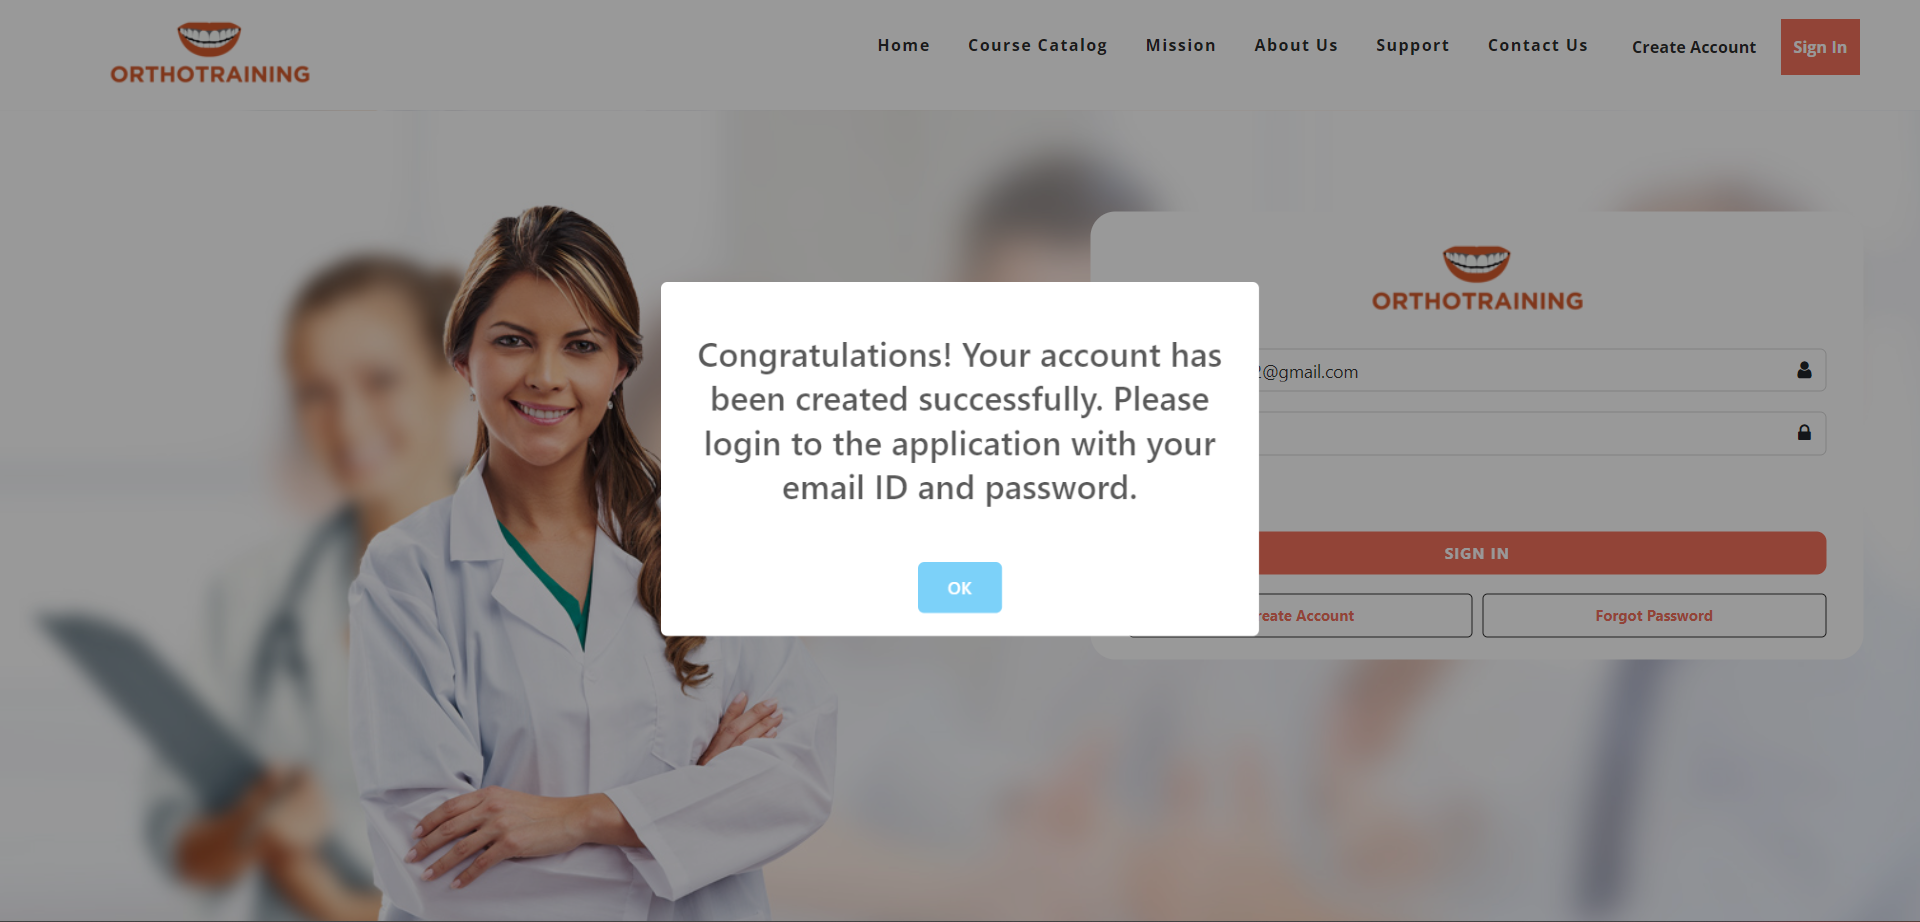
Click on the "SIGN UP" Button:
- After filling in the form, locate and click on the "SIGN UP" button.
-
Check Your Email for Login Details:
- You will receive an email with login details to access the website.
- Open your email inbox and look for the message related to your account creation.
-
How do I Login to the website?
-
Open the URL in Your Browser
- Launch your preferred web browser and enter the provided URL in the address bar. Hit 'Enter' to access the website.
-
Navigate to the Sign In Page
- Once on the website, locate and click on the "Sign In" button. This action will redirect you to the Sign In page.

-
Provide Your Credentials
- On the Sign In page, you'll find a form requesting your Email ID and Password. Enter your registered Email ID and Password into the designated fields.
-
Click SIGN IN
- After entering your credentials, click on the "SIGN IN" button. This action will validate your information and, if correct, lead you to your account.
- You are navigated to the page where you can manage the user.
-
How to create a student account?
-
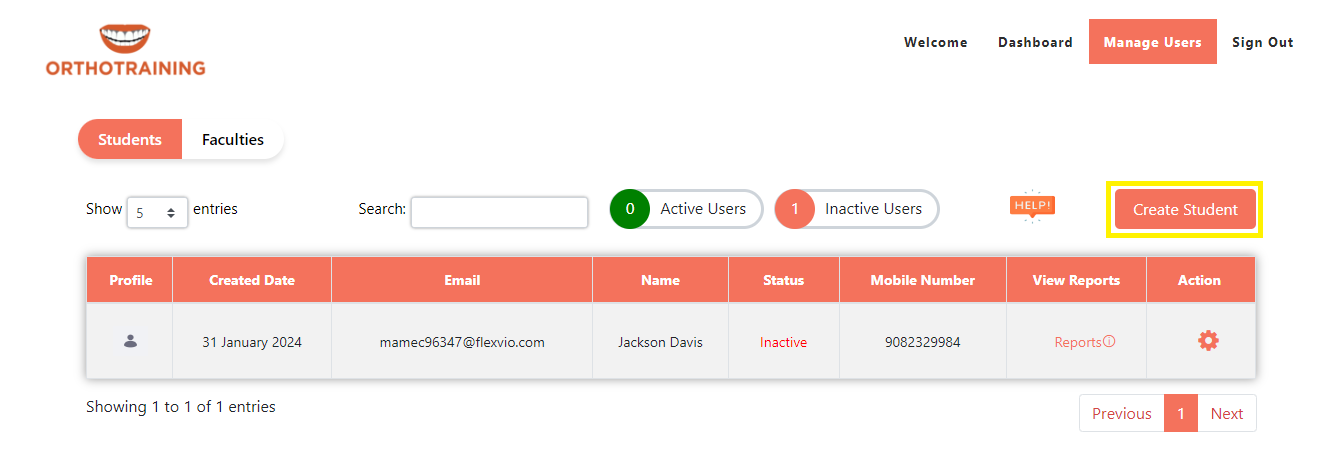
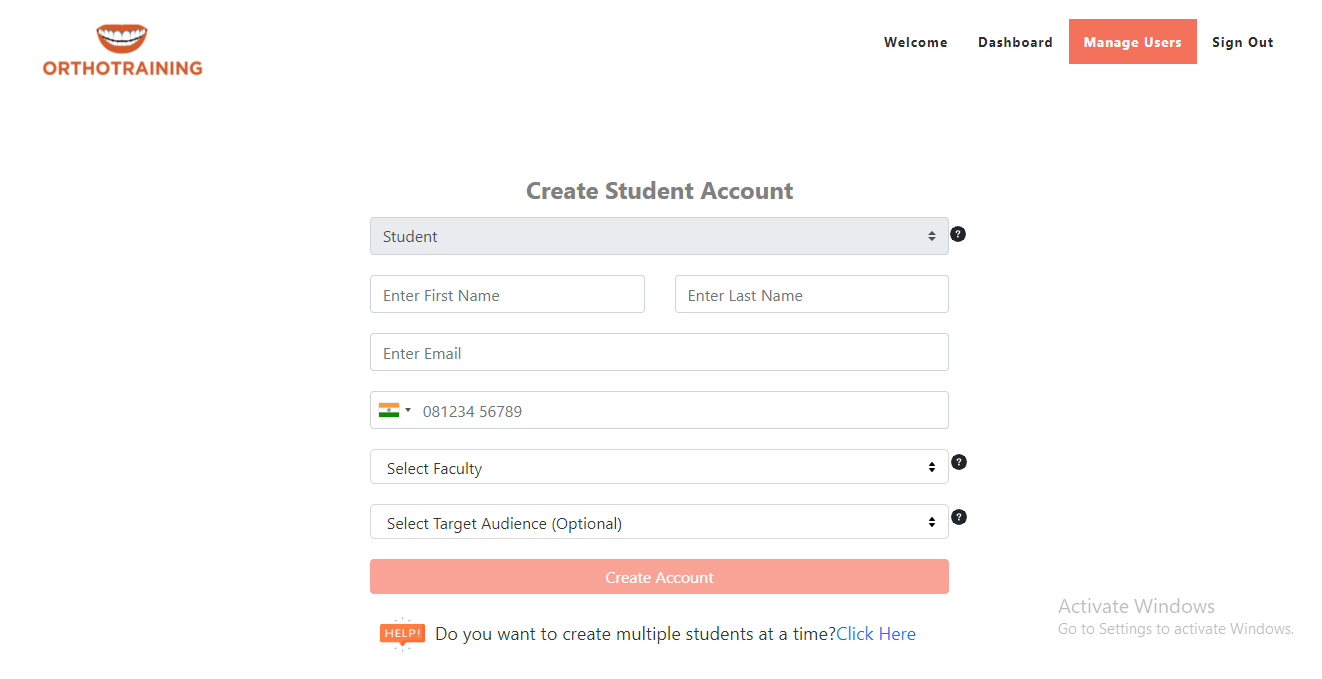
- Hit the Manage User page to create student users efficiently.
- Within the student tab section, locate the "Create Student" button, and use it to create new student profiles.
-
-
- In the faculty tab section, you can find the faculties who are associated with you.
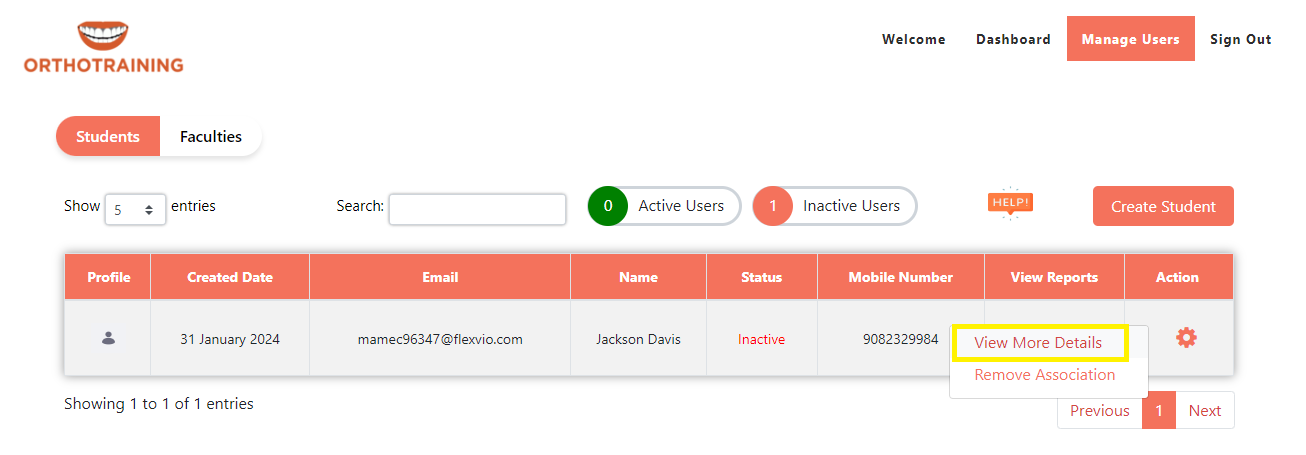
- For each user in the Action column, you will find two options: "View More Details" and "Remove Association."
- By clicking on "View More Details" you can see that particular user details in detail
-
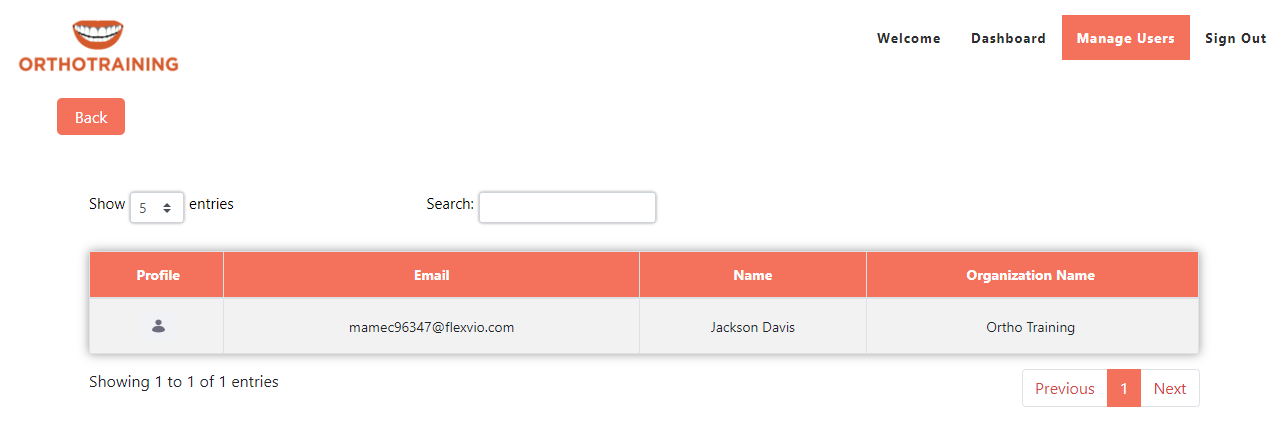
-
- By clicking on "Remove Association" you can remove association with that user
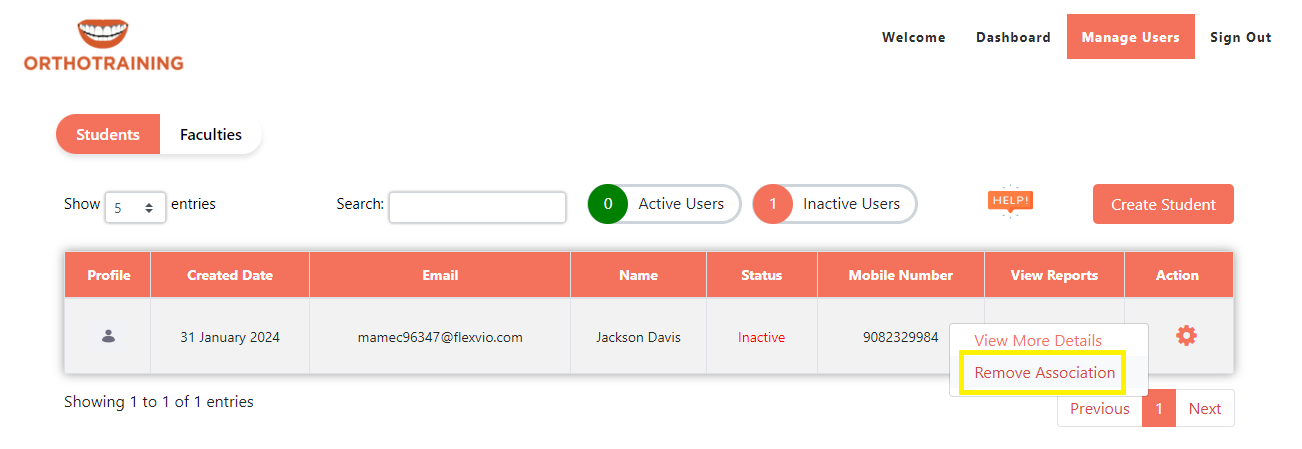
-
- Upon removing the association, the details of that specific user will not appear on the Manage User page. Note: Association can only be removed if there is no subscription between the two users.
-
How to create multiple student accounts at a time?
-
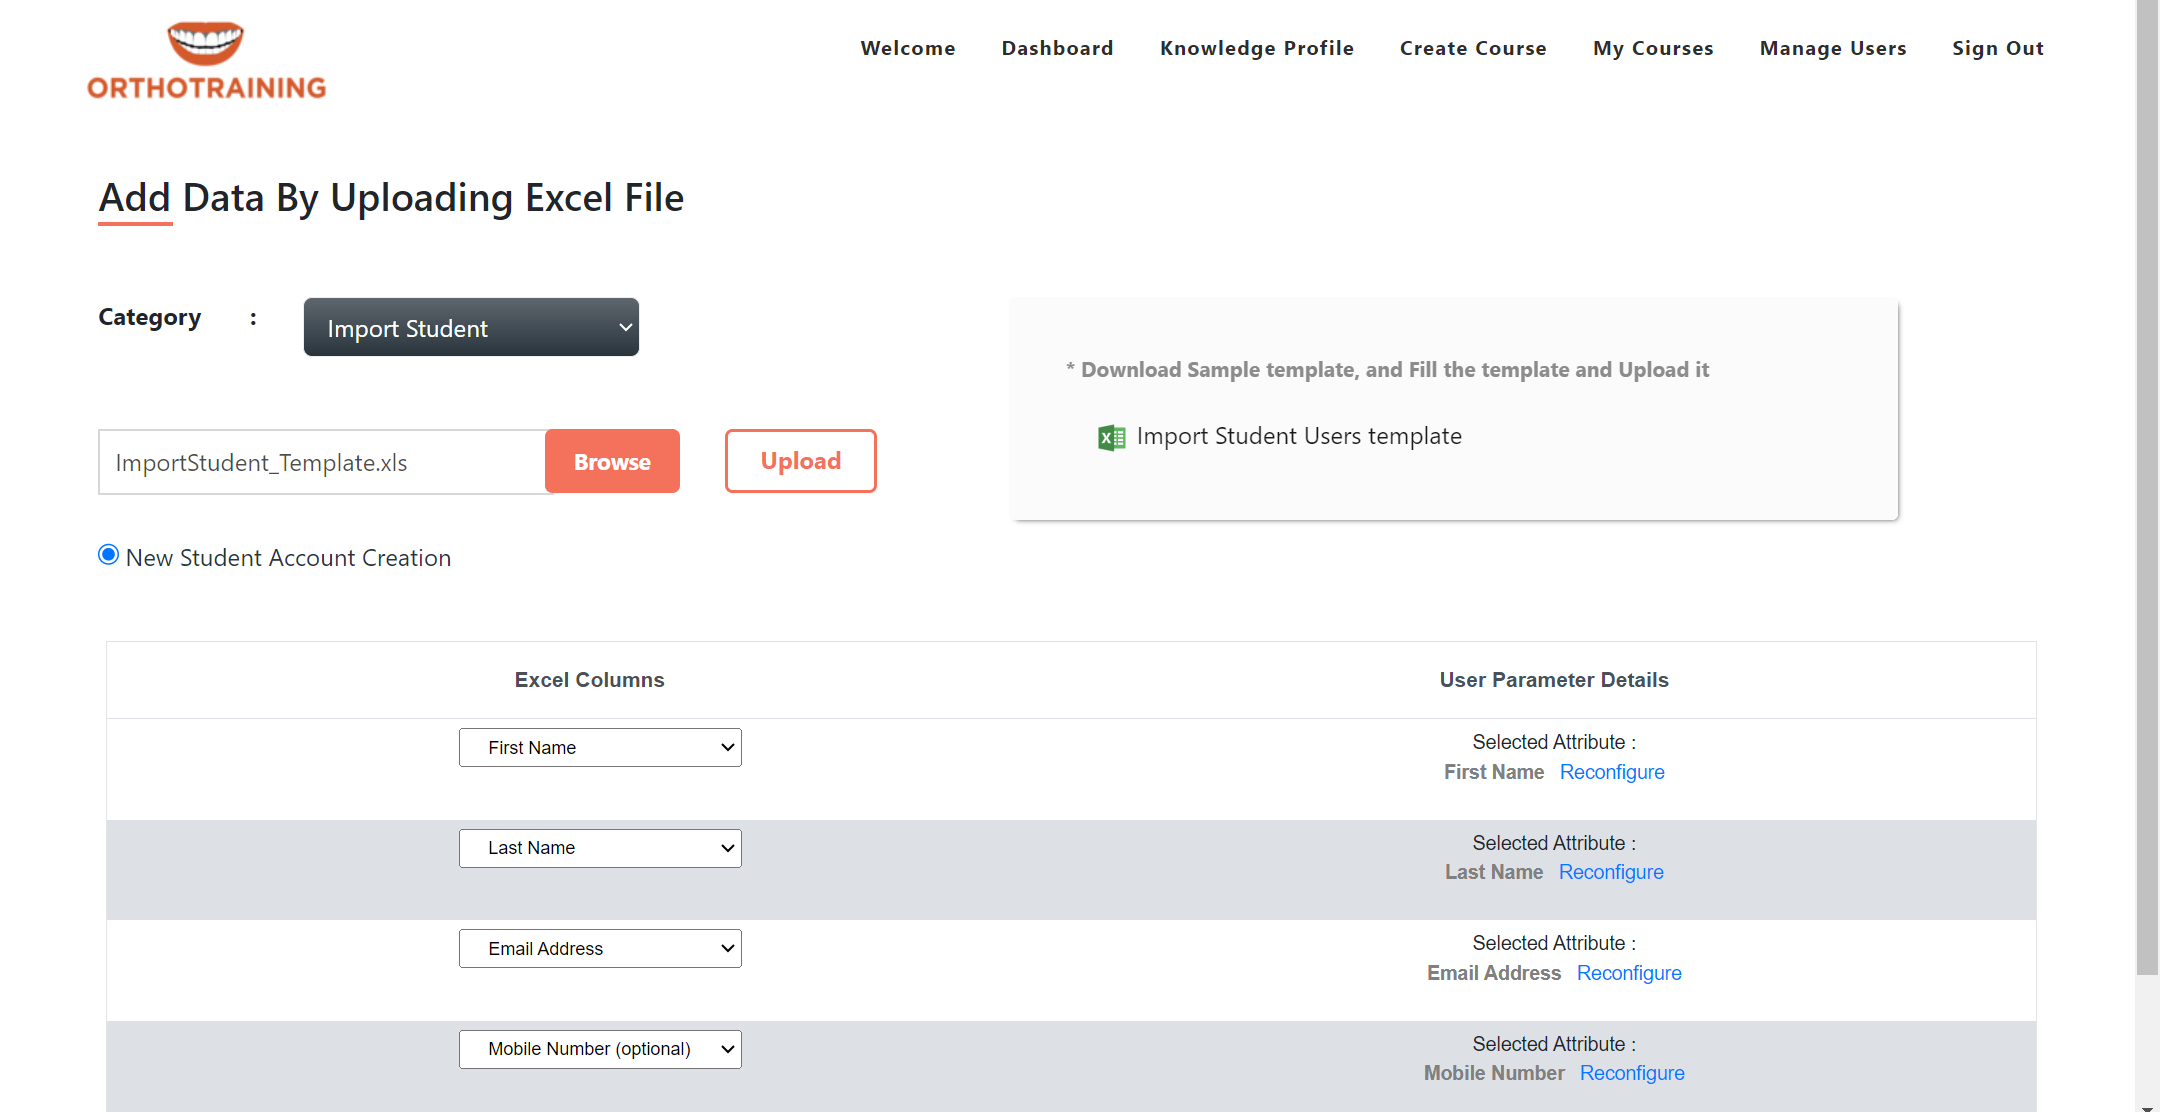
- Configure the Excel columns with the corresponding user parameter values.
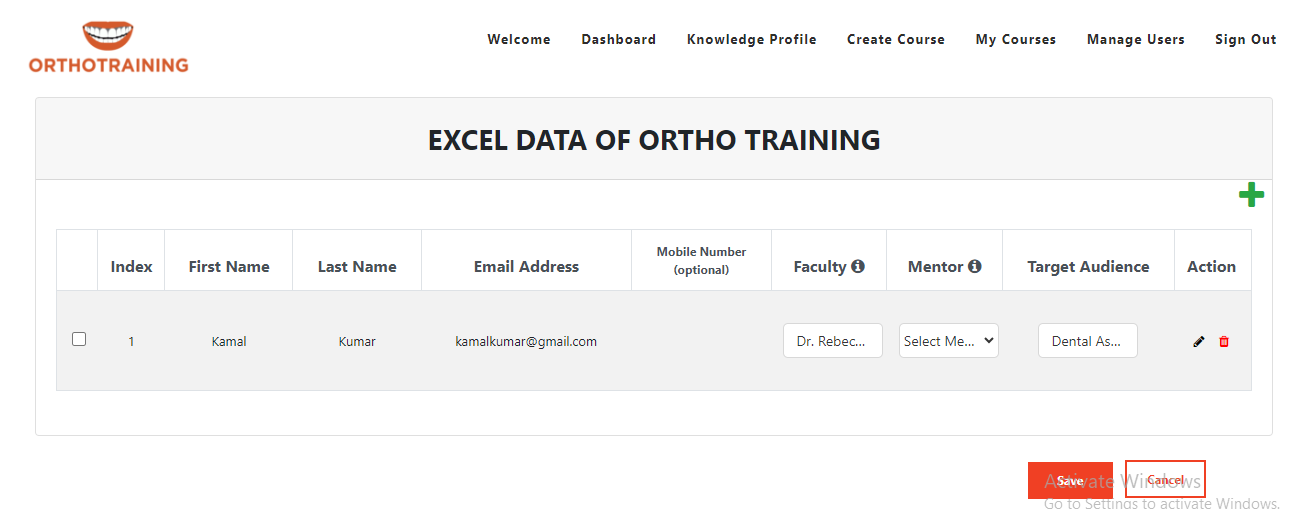
- After configuration, click on "View Upload Data" to preview the uploaded data.
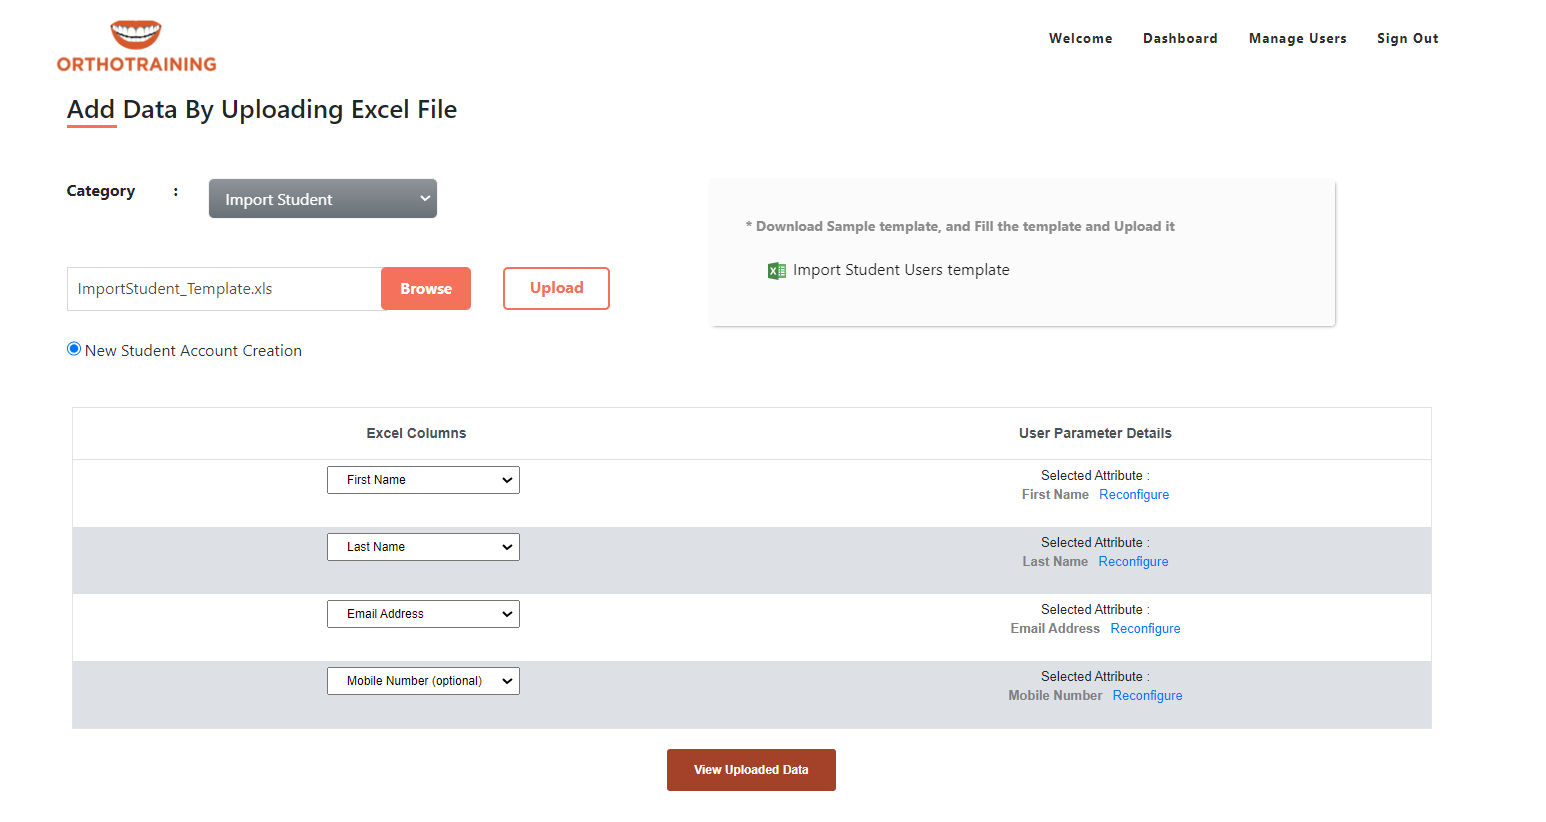
-
- To add additional rows of data, click on the "+" icon.
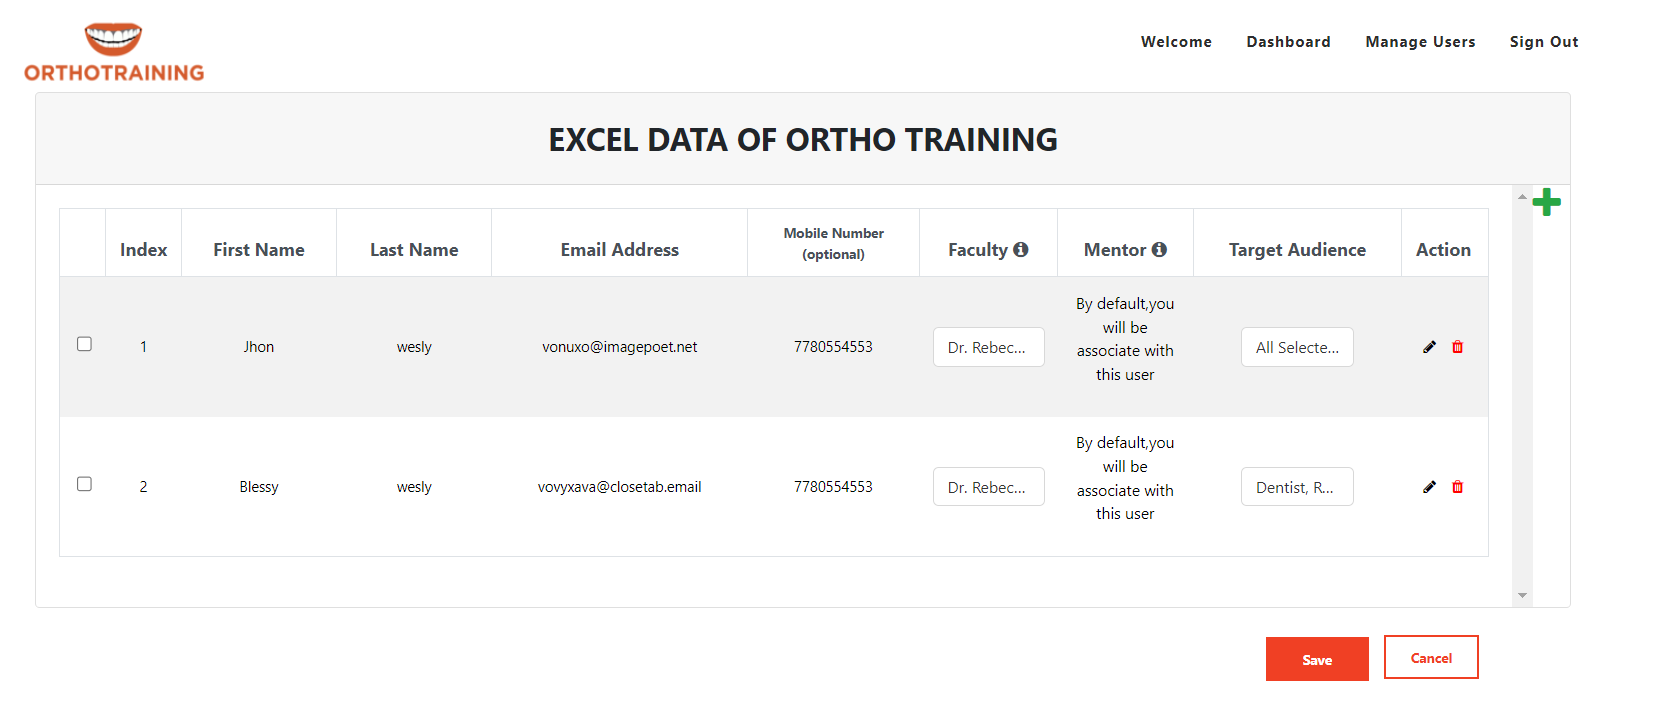
-
How can I purchase the Course Bundle for the student?
-
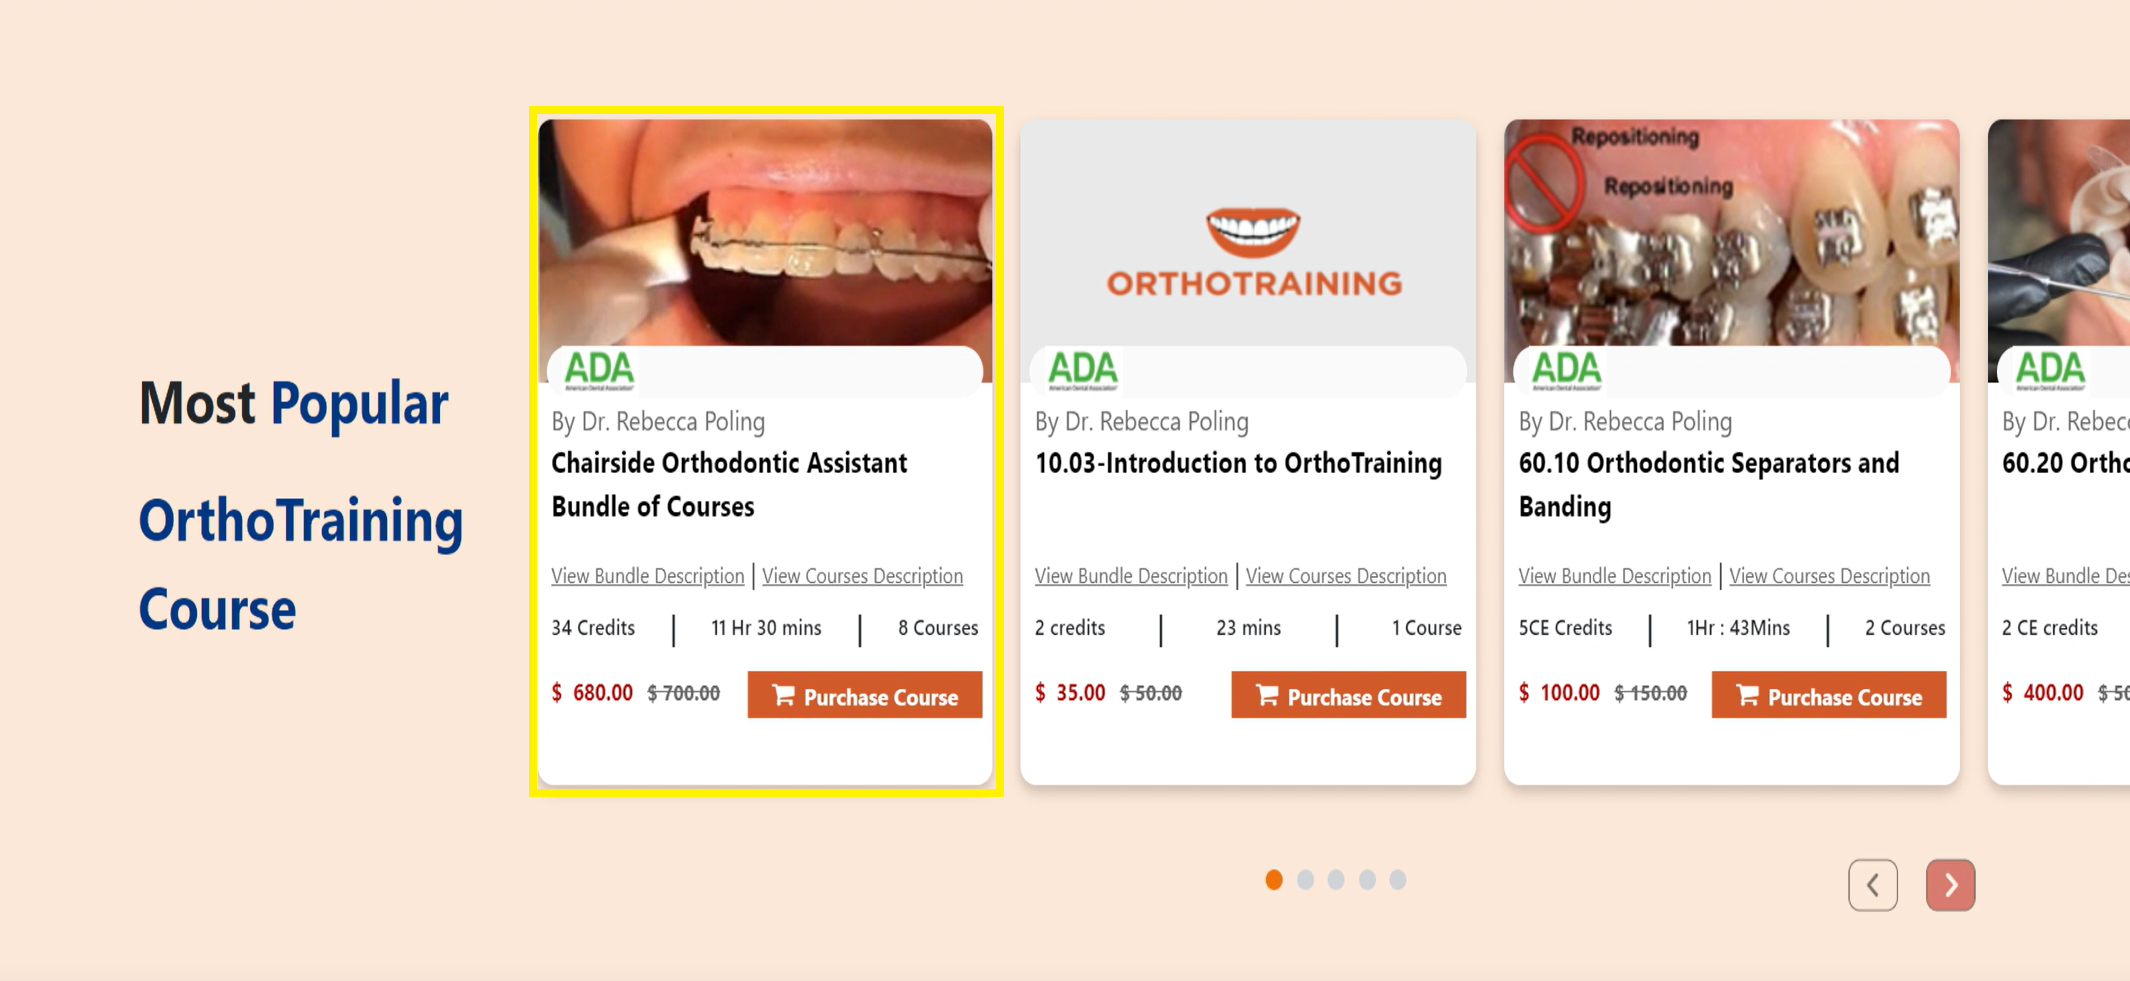
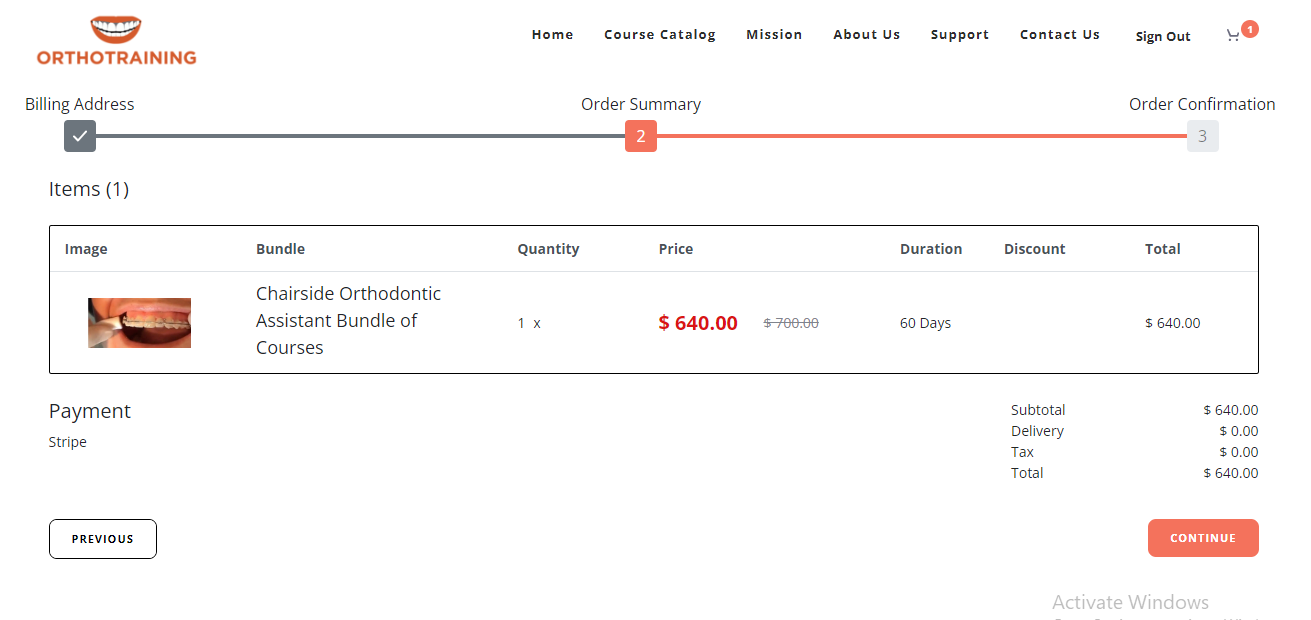
- From the list of course bundles, choose the specific bundle you wish to purchase.
-
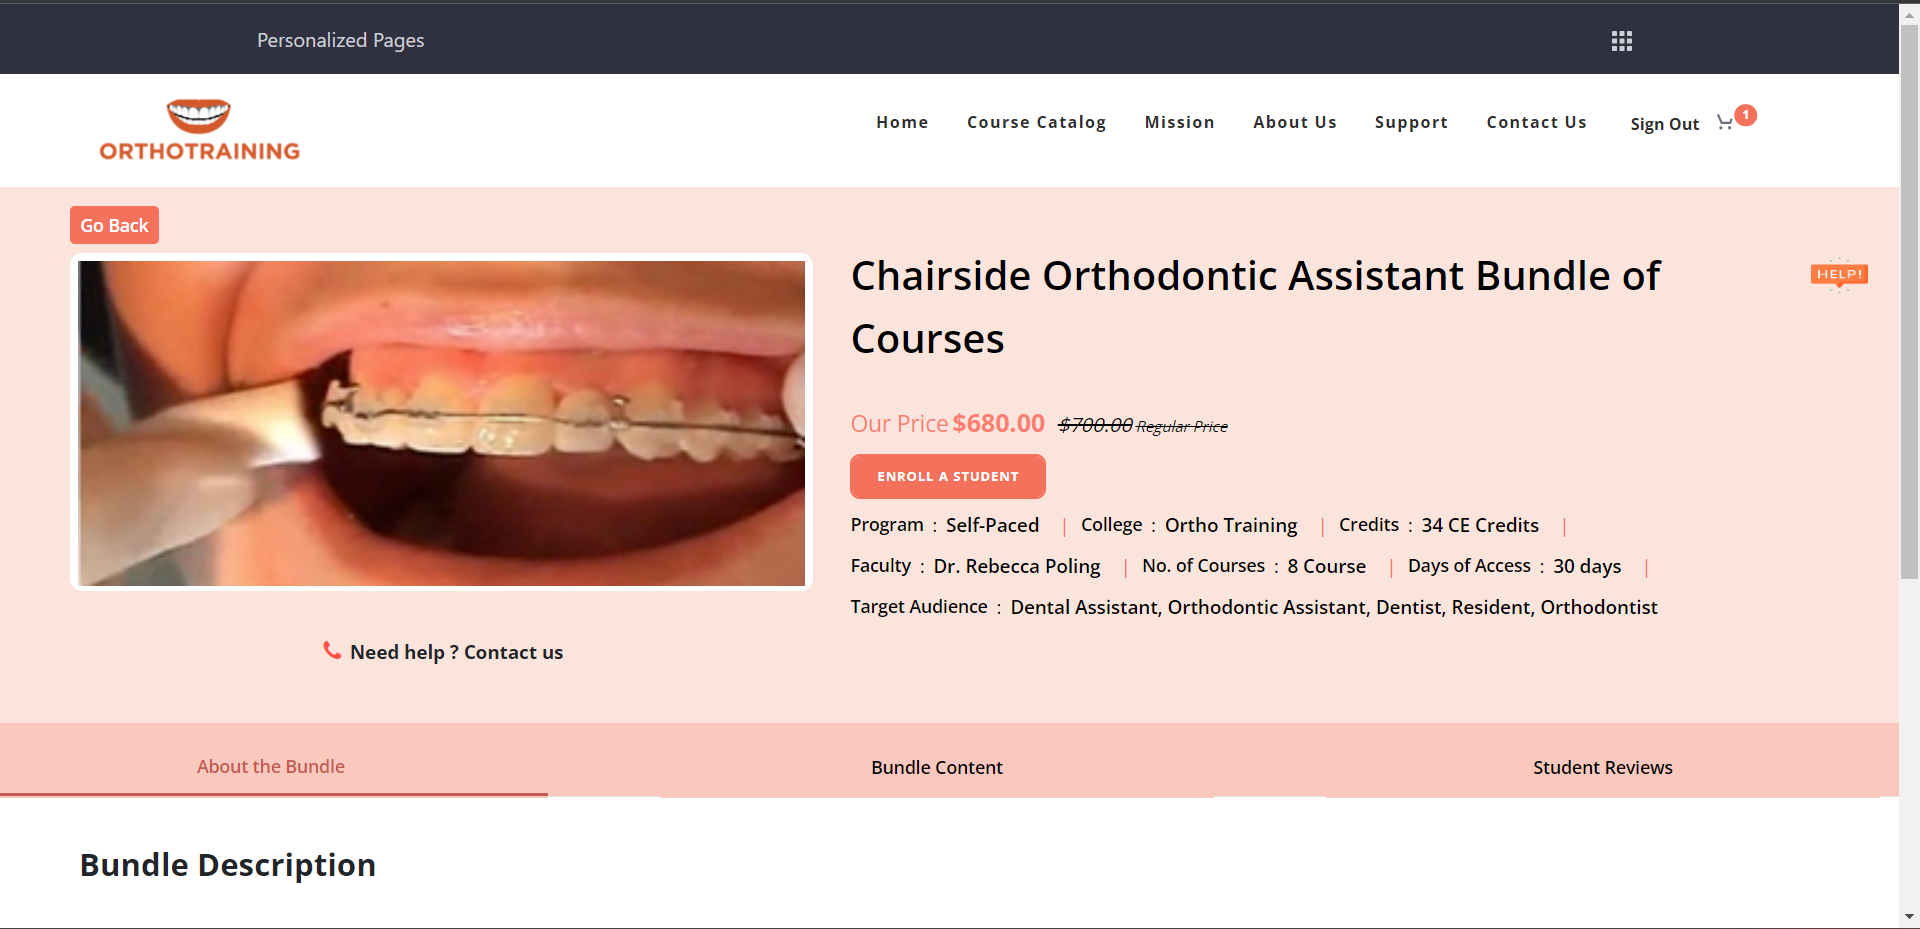
- Click on the "Purchase Course" button, and from the dropdown menu of Enroll a student, select the particular student.
-
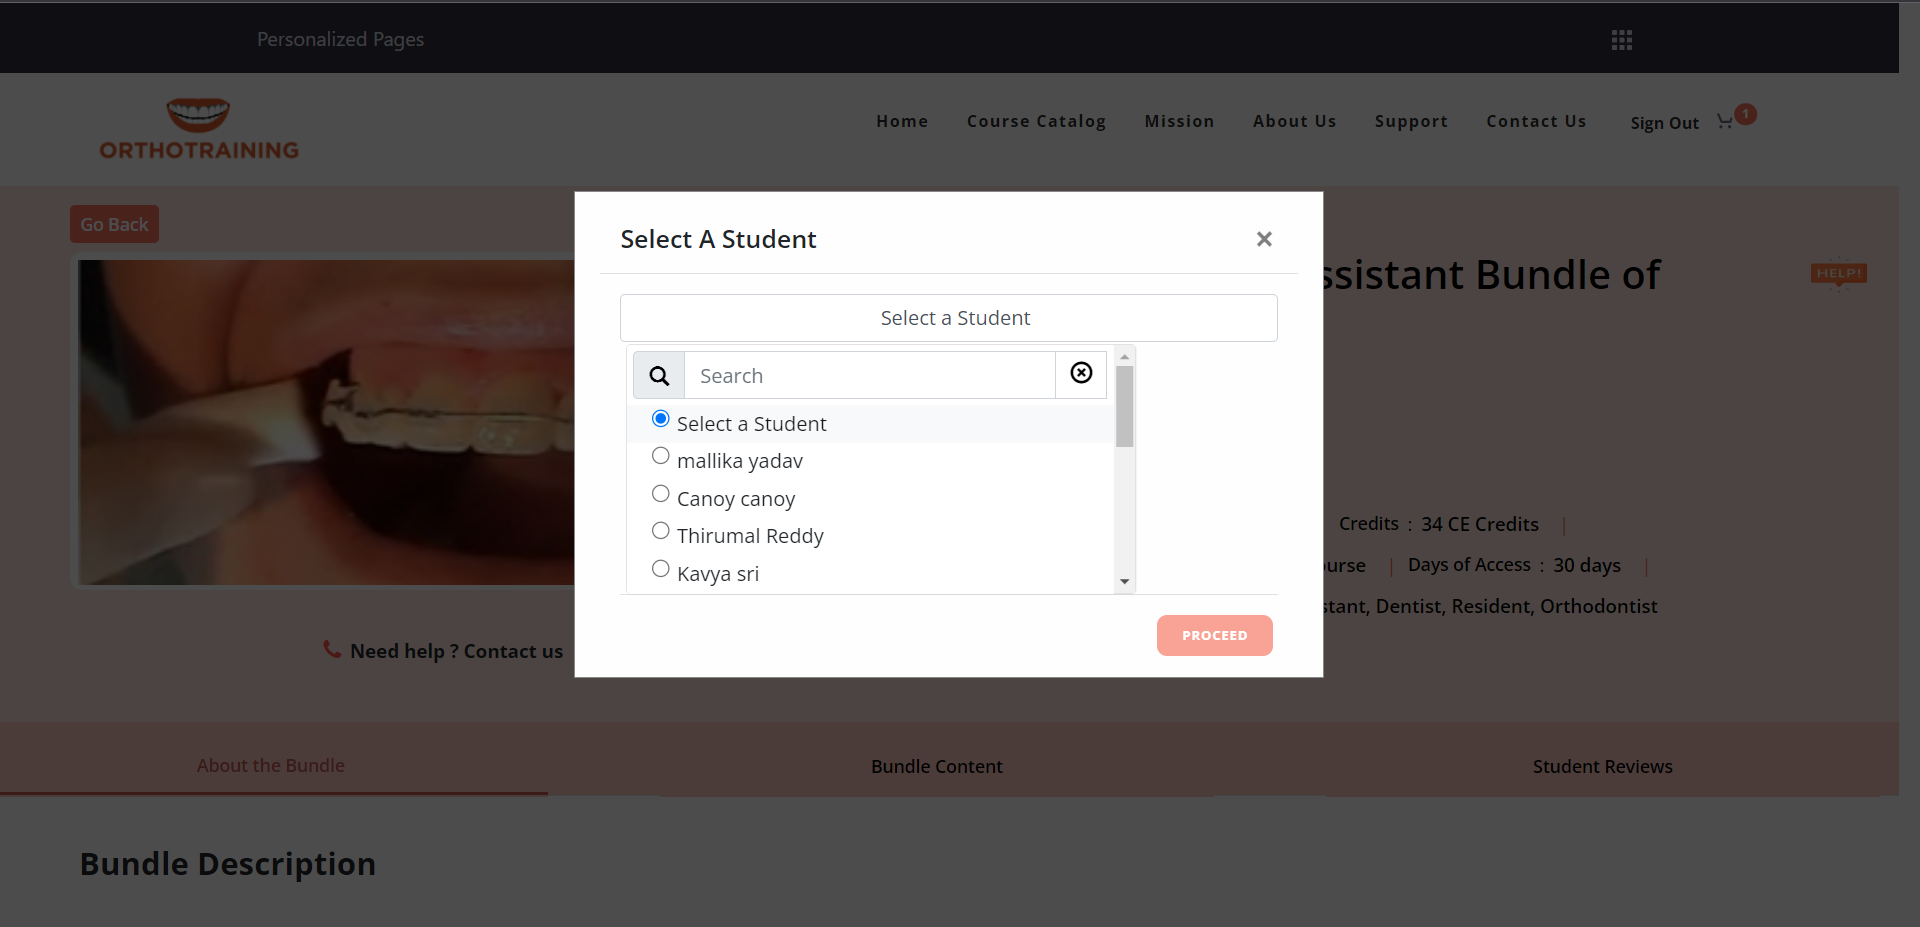
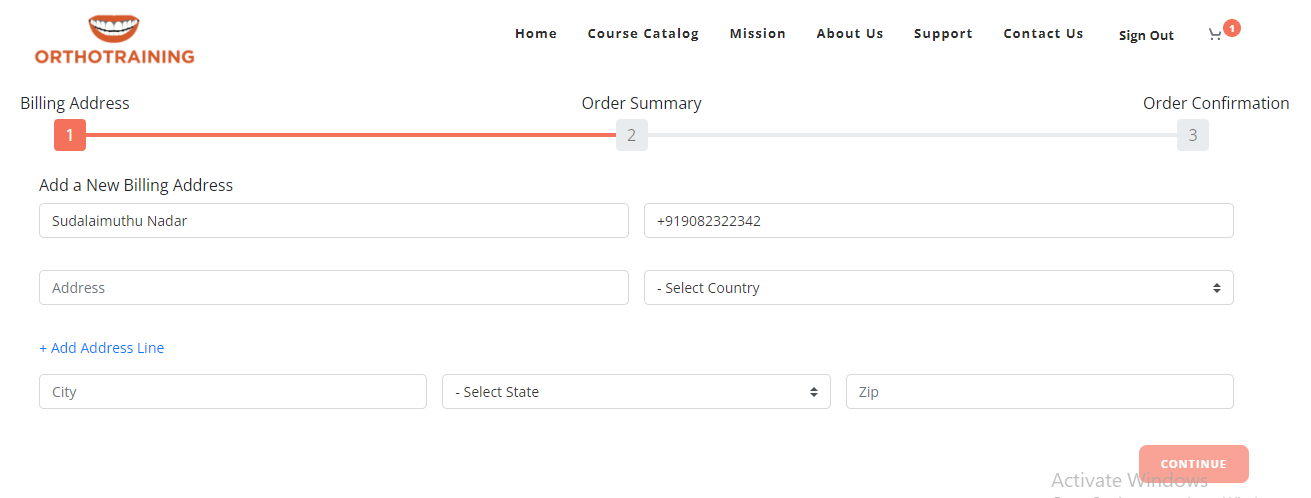
- Proceed with the purchase after selecting the student by clicking the "Proceed" button.
-
-
-
-

-
How to track the performance of the students?
-
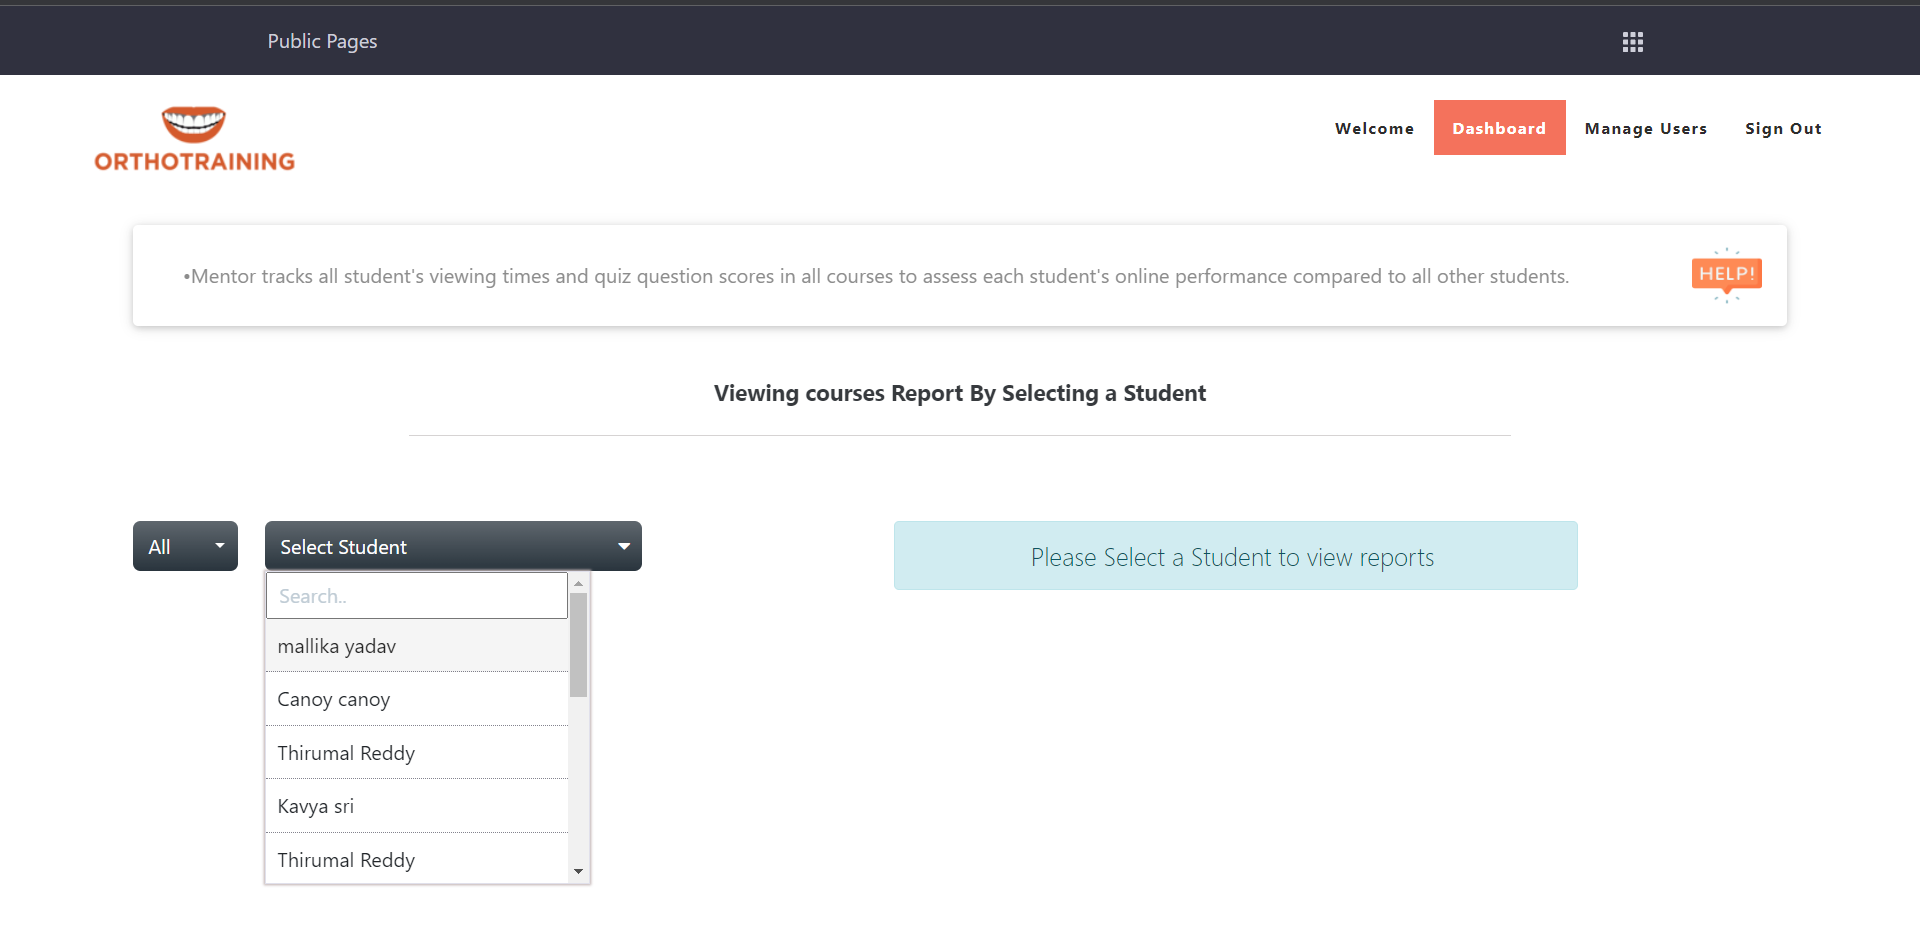
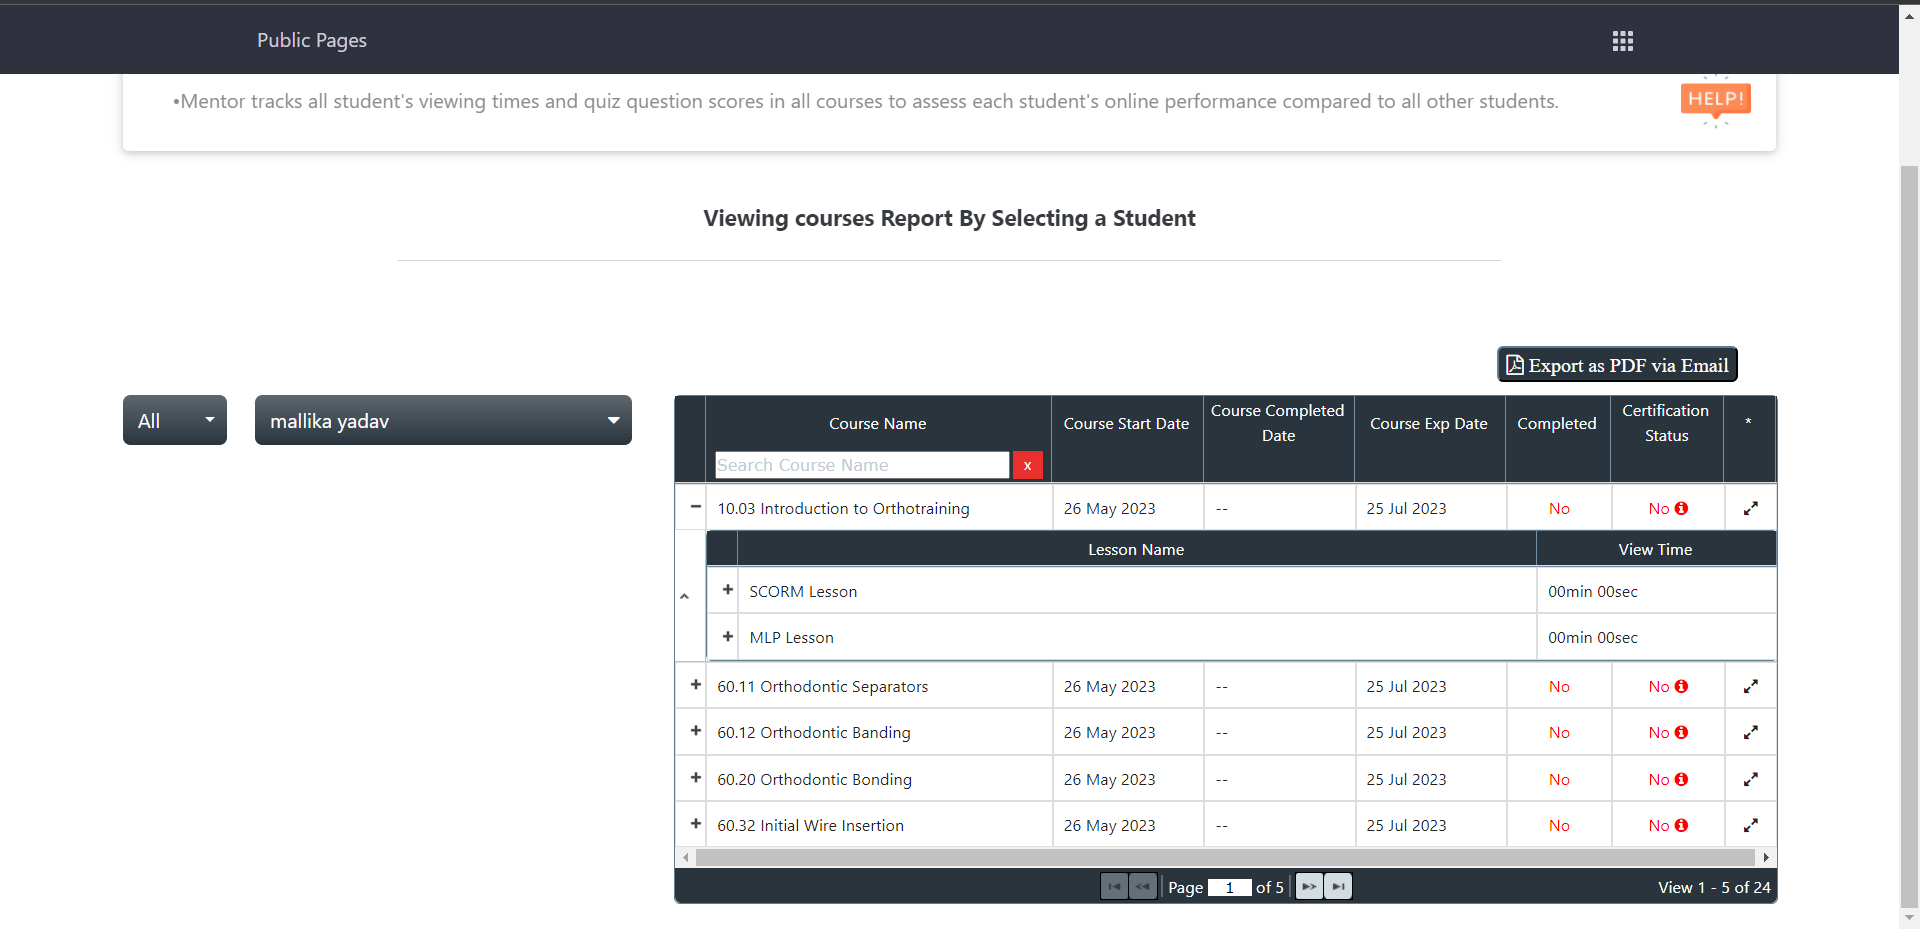
- On the Dashboard page, choose the student from the dropdown menu to view their specific course report.
- Expand the courses to view the lessons contained within each course.
-
- You can view the performance of the students like have they completed or not? When did they complete? Course start date and end date of the course. How much time they spend on the course. Are they eligible to download a certificate or not?
- Based on their performance you can communicate with the corresponding associated students through an email for further assistance.
-
- Easily create and edit a personalized practice website with customizable content and logo.
- Effortlessly create individual or batch uploads for multiple staff members at once.
- Intuitively create course categories tailored to your practice's needs.
- Seamlessly develop courses by incorporating multimedia elements such as audio, video, and textual content, along with assessments.
- Set prices for courses and map them to corresponding categories with flexibility.
- Ensure staff can effortlessly access the created courses for continuous learning.
- Provide a user-friendly interface for staff to monitor their own performance.
- Gain insights into individual or collective staff performance across single or multiple courses.
- Avail aesthetically pleasing certificate templates for course authors to publish certificates to staff upon completion.
What are the privileges I have as an admin?
-
Prerequisite
- You are supposed to log in to the website with the email address and password.
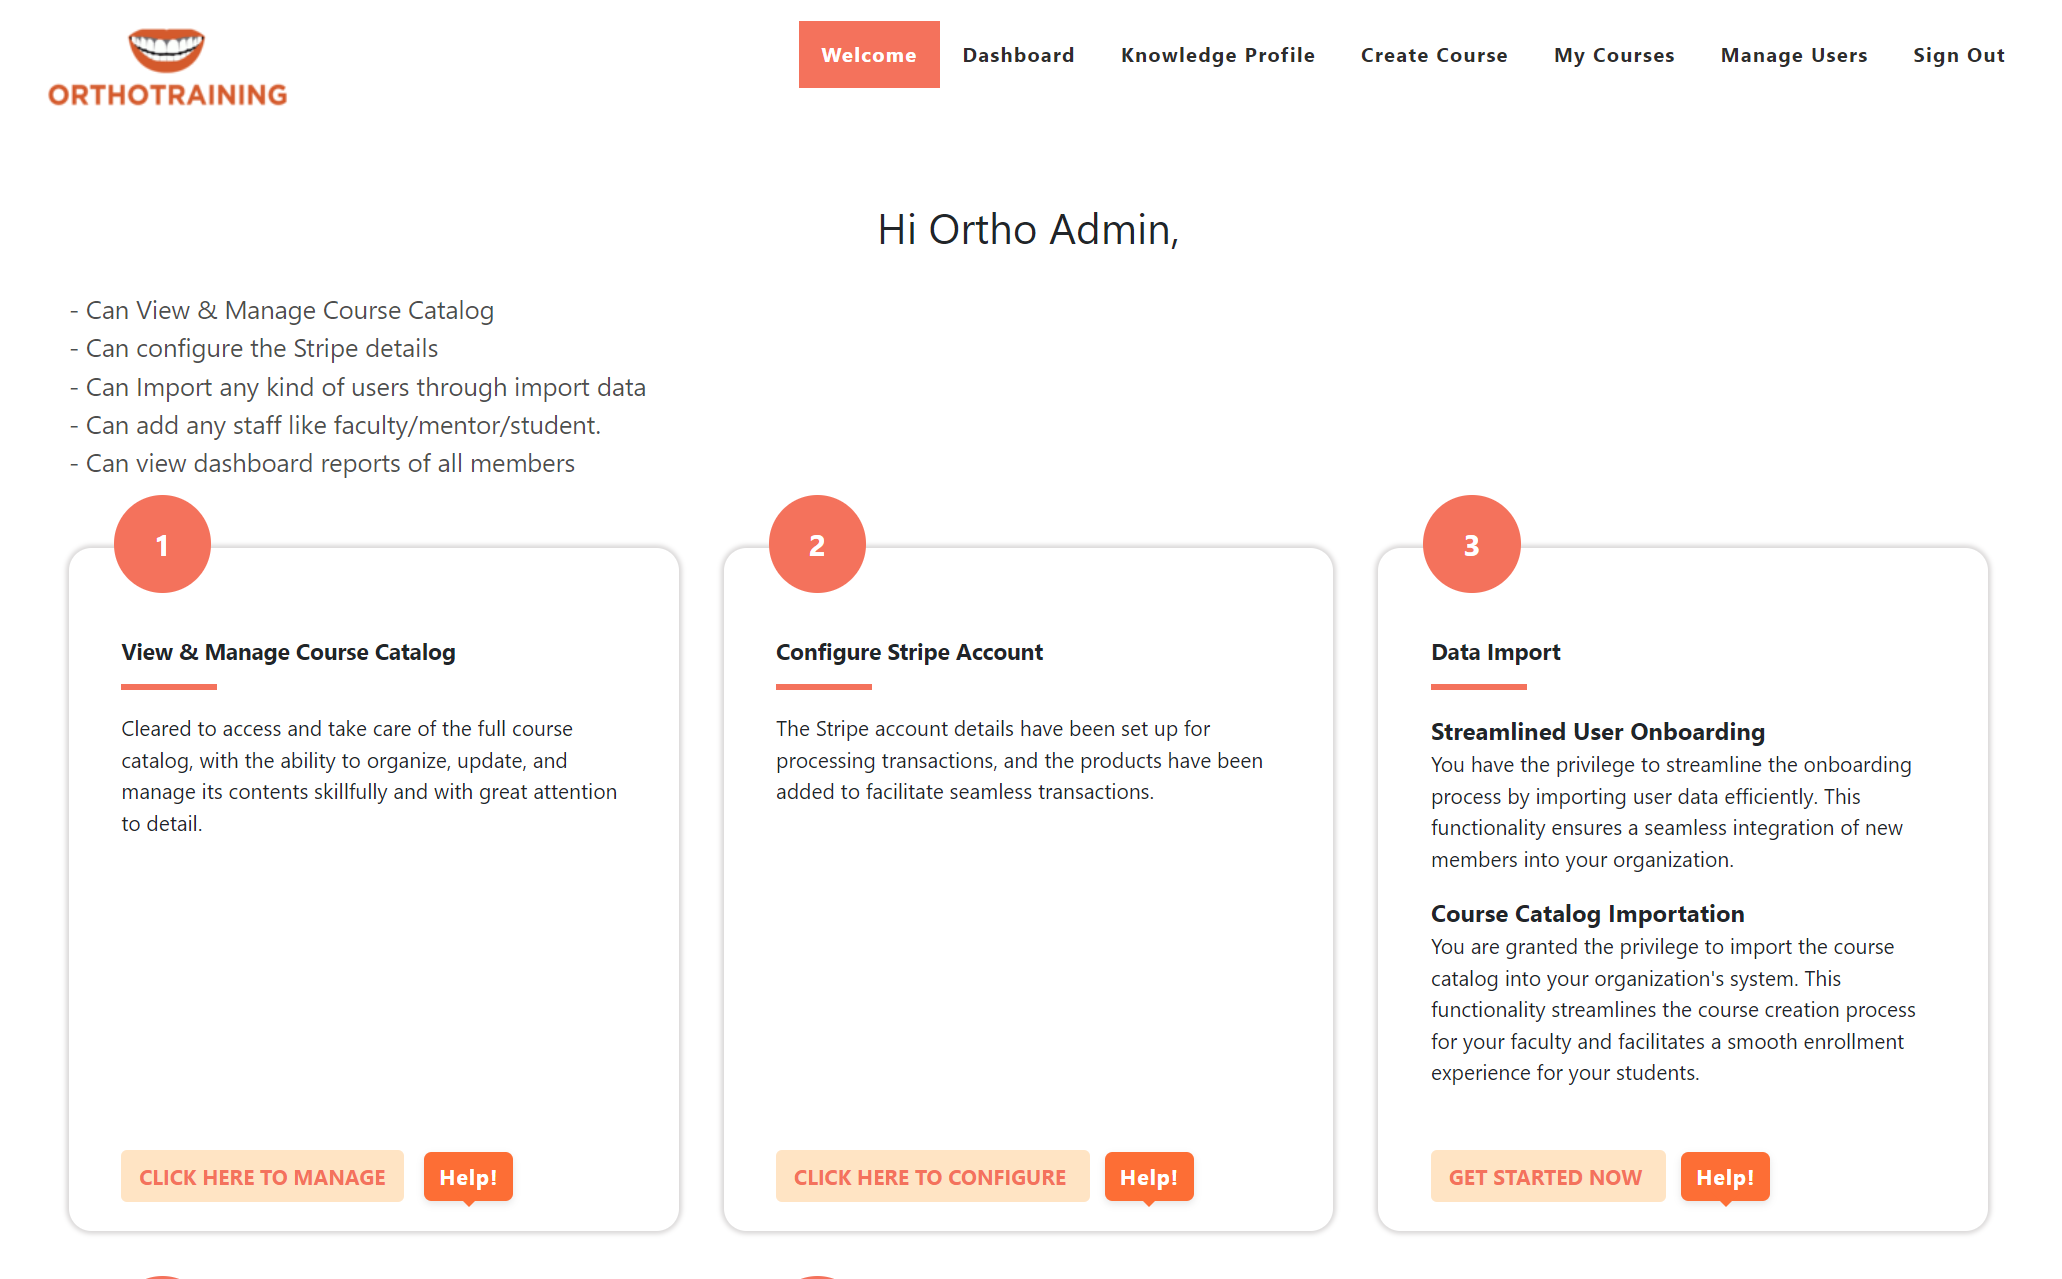
- Upon logging into the site, you will be redirected to the Welcome page.
-
Steps:
- You can view the list of the activities you can do on the website
- Creating course categories as a single or multiples as import process
- Creating the users as a single or multiple with the data import process
- View the performance of the students with associated faculty year wise
-
How to configure Stripe Account Details?
-
Steps:
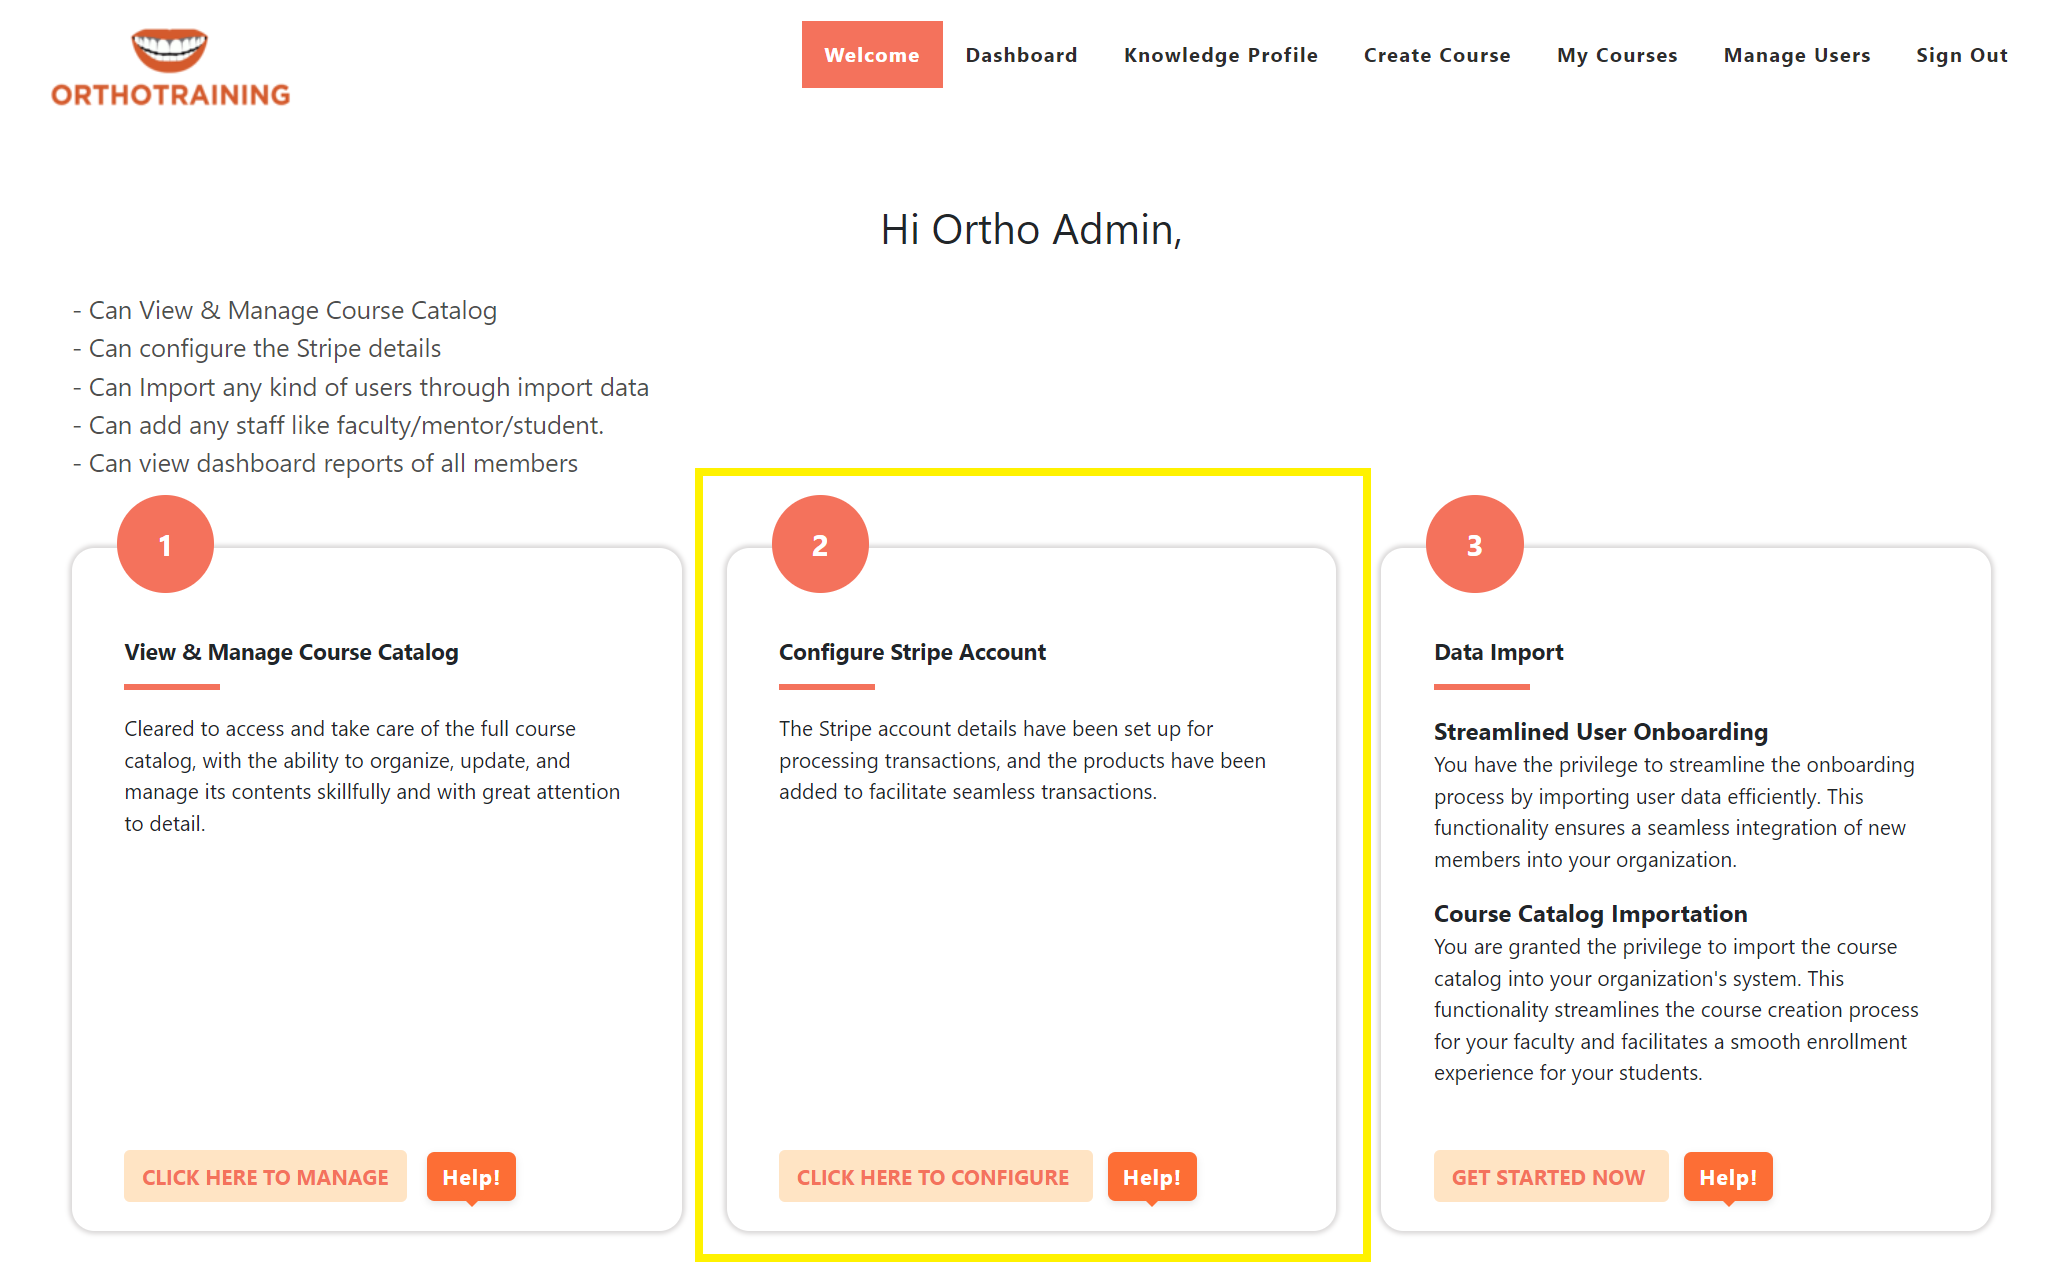
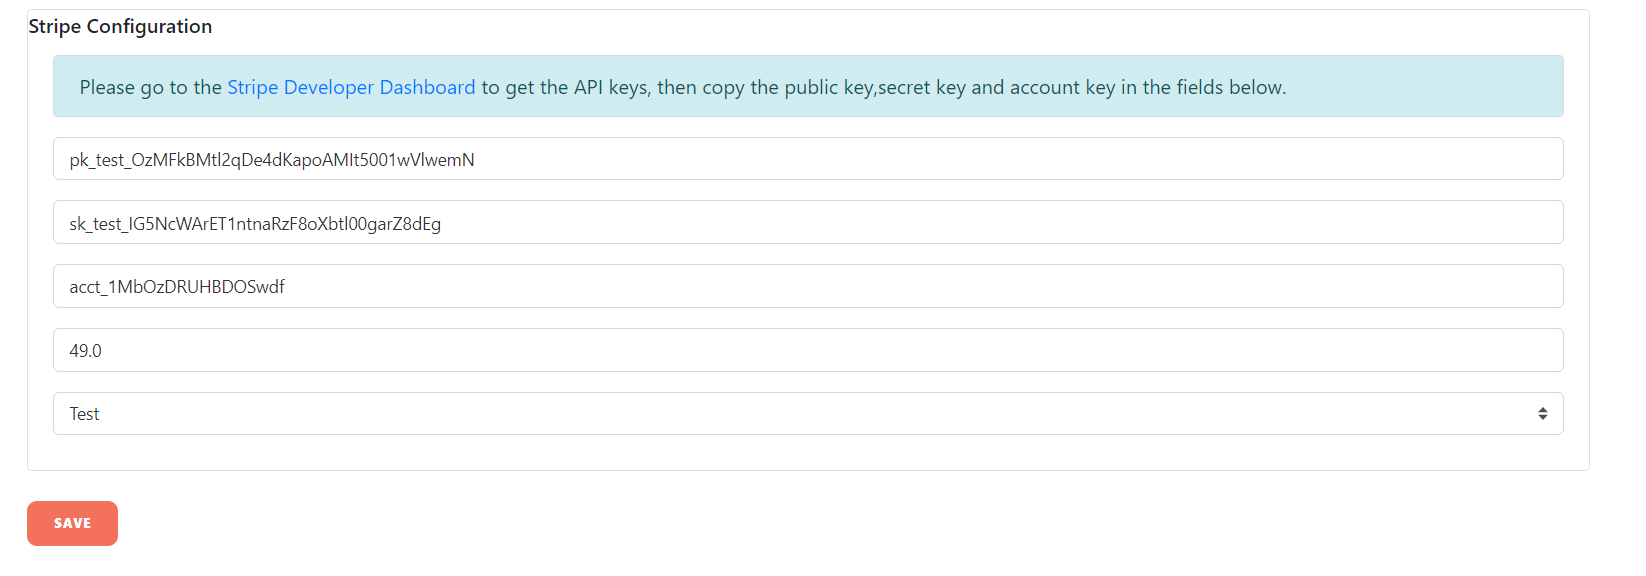
- Navigate to the Welcome page and locate the "Configure Stripe" section.
-
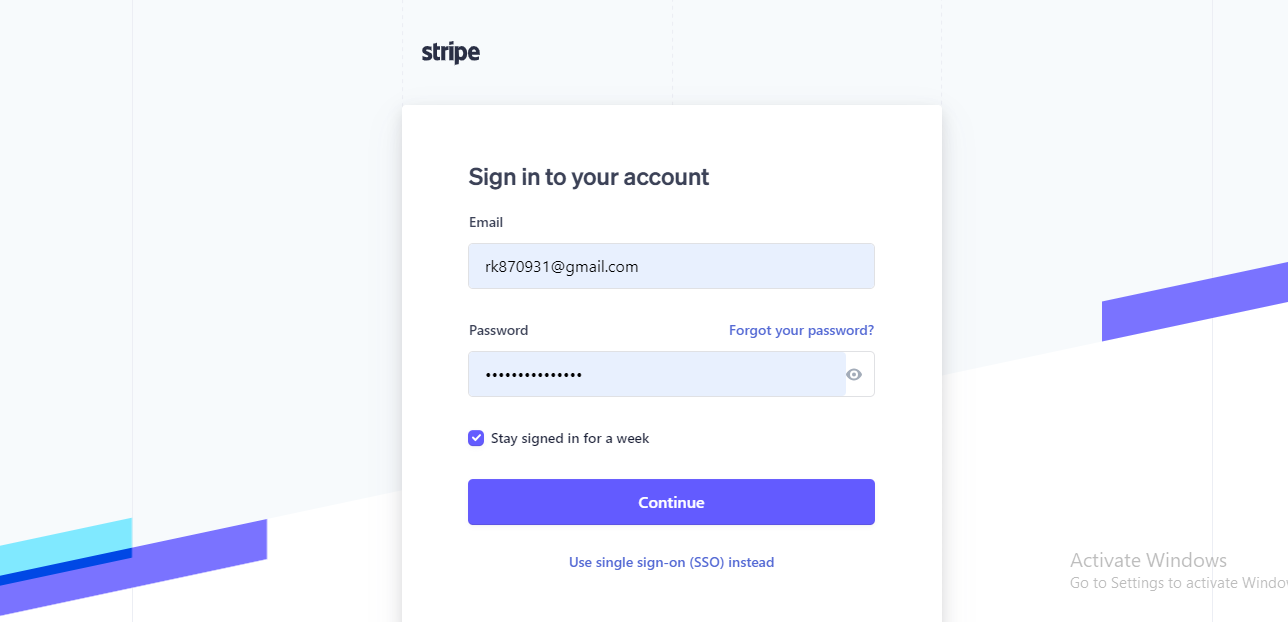
- Sign in to your Stripe account using your credentials.
-
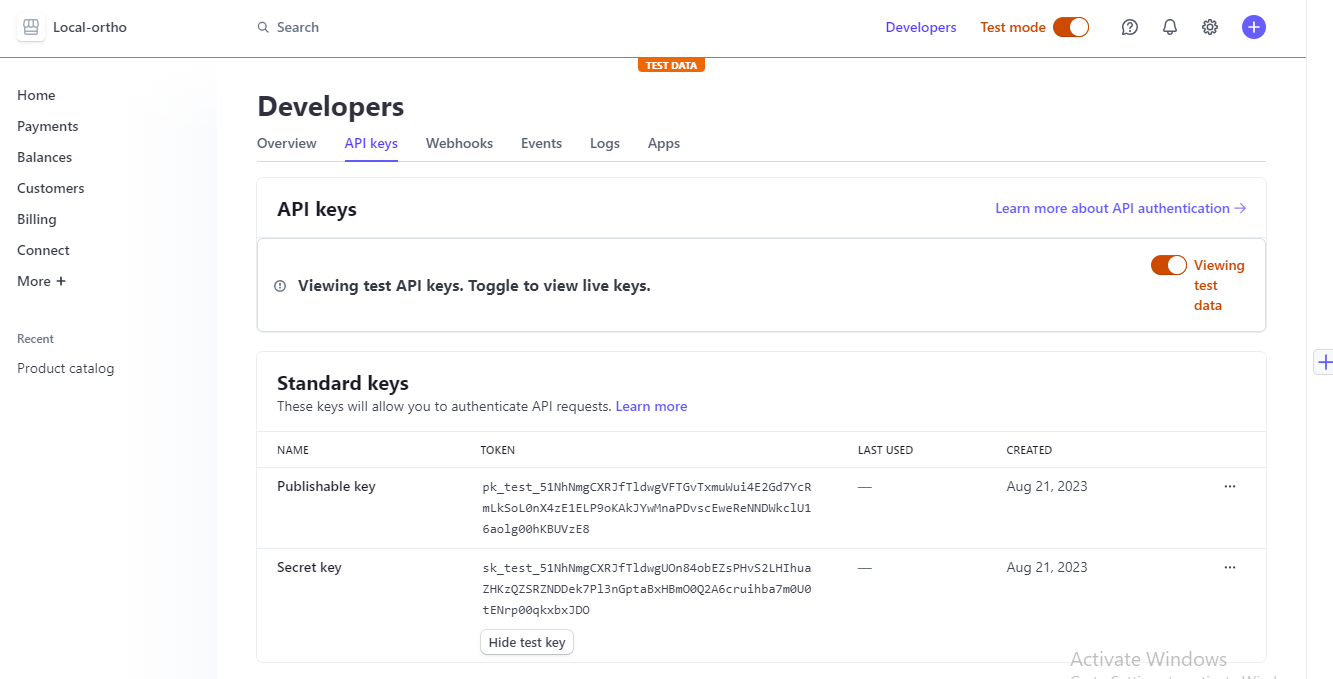
- Once logged in, access your Dashboard page on Stripe.
- From the Dashboard, copy the necessary keys - the Public Key, Secret Key, and Account Key.
-

-
- Specify the percentage of the amount you want to share with your partners. This is done by providing the account share value.
- Configuring your Stripe details will automatically create products in your account, enabling seamless transactions.
- Ensure you save the credentials securely to use them for future transactions.
-
How can I Create and Manage the Course Catalogs?
-
Steps:
- Click on Create and manage the Course Catalog
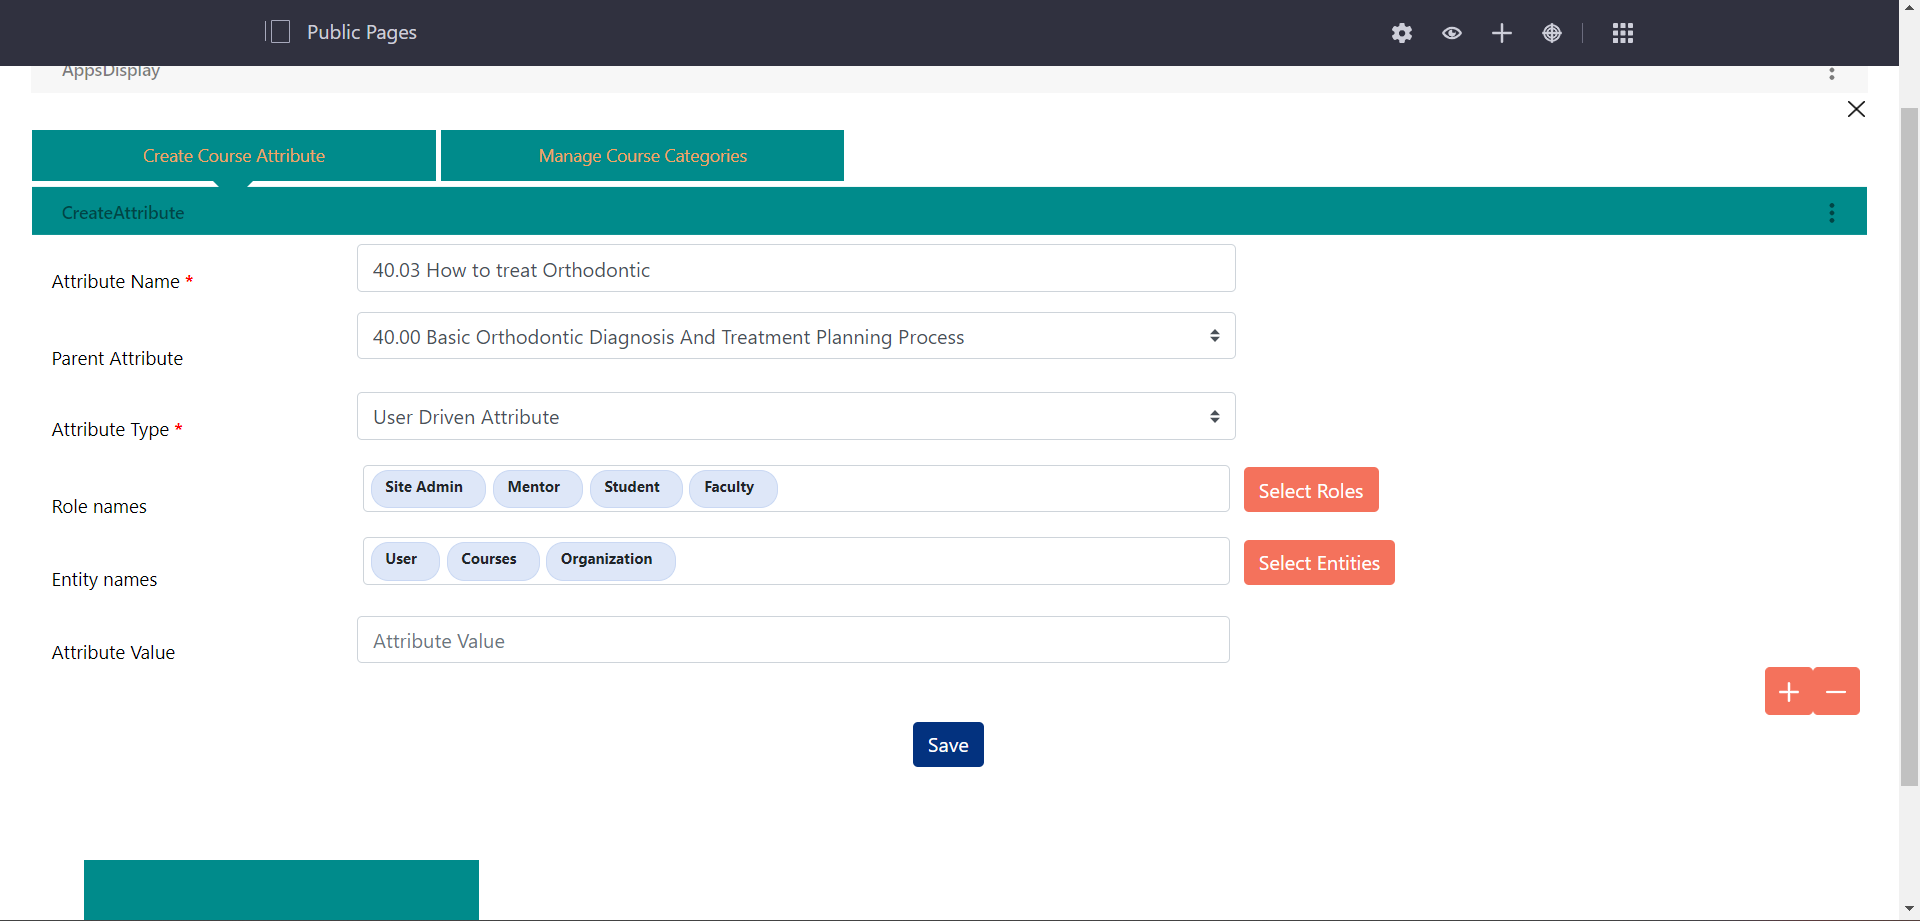
- Provide the course attribute name
- Select the User roles & Entity names
- If you want to create it as a child attribute, select the parent attribute accordingly.
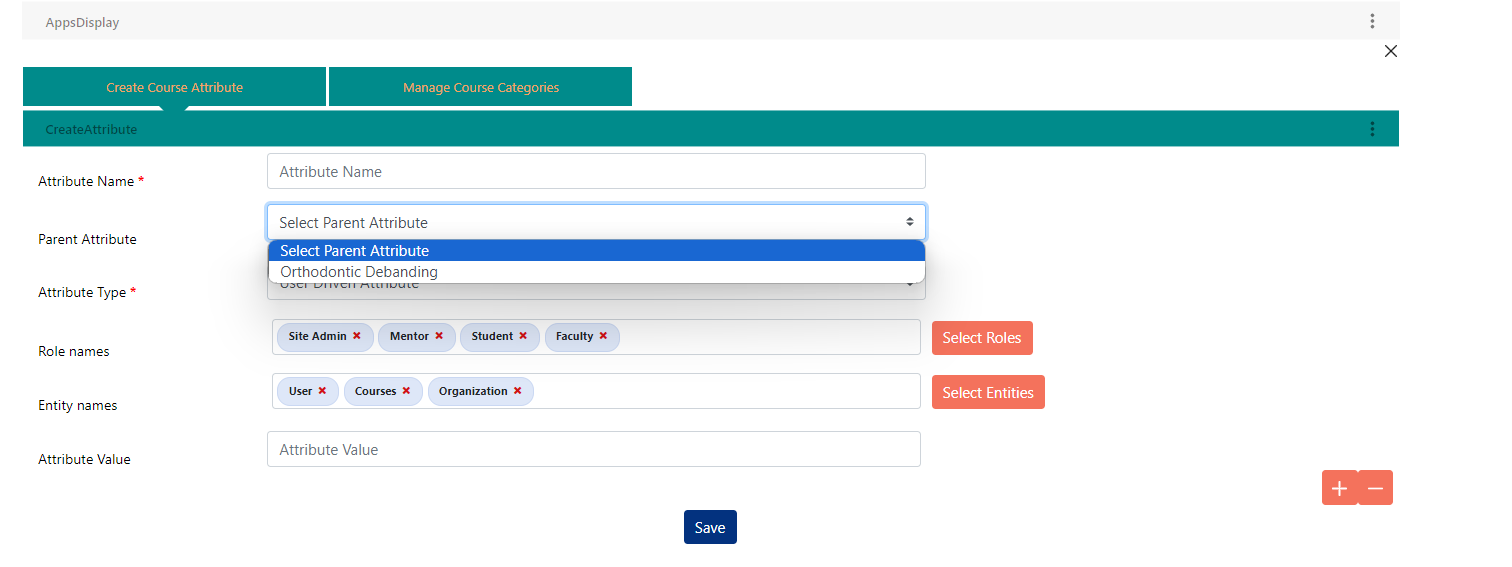
- If no attributes are found, then parent attributes selection will be empty.
-
- If you do not select any course attribute, it will be created as a parent attribute.
-
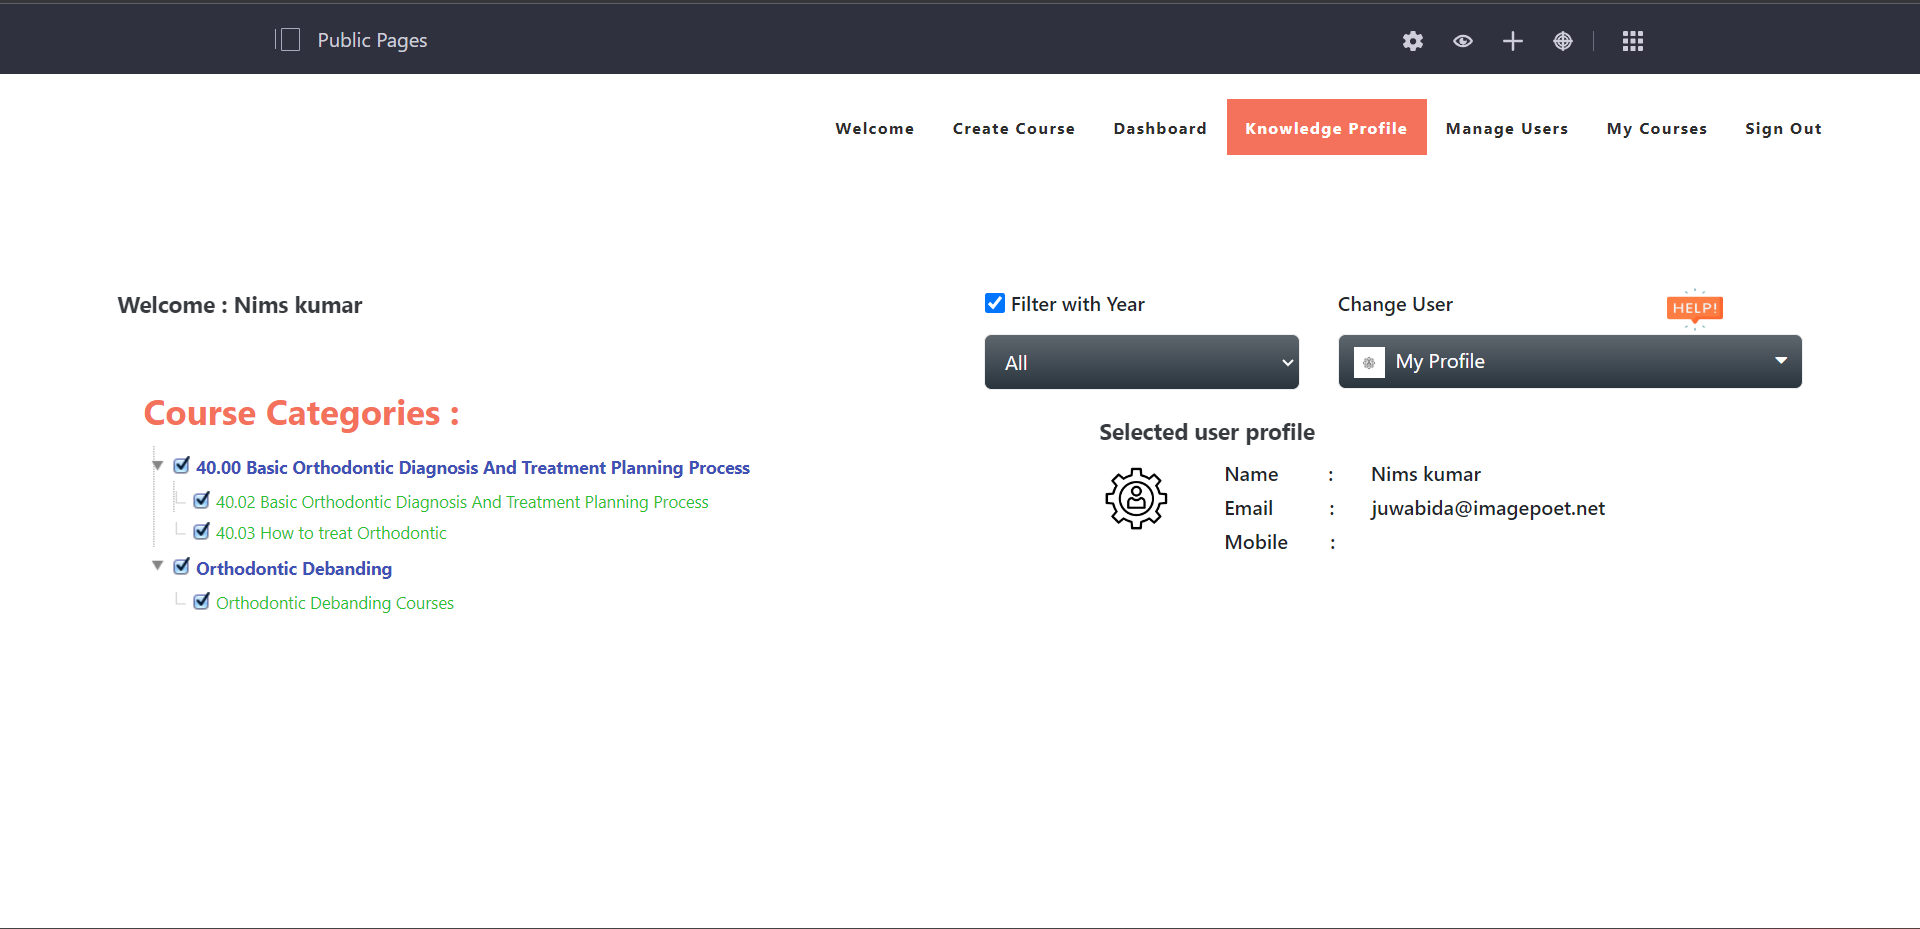
- After creating the course catalog, you can check those attributes in the Knowledge profile page.
-
How can I create multiple Course Catalogs at a time through Data Import?
-
Steps:
- Once you login to the application, navigate to the Welcome page.
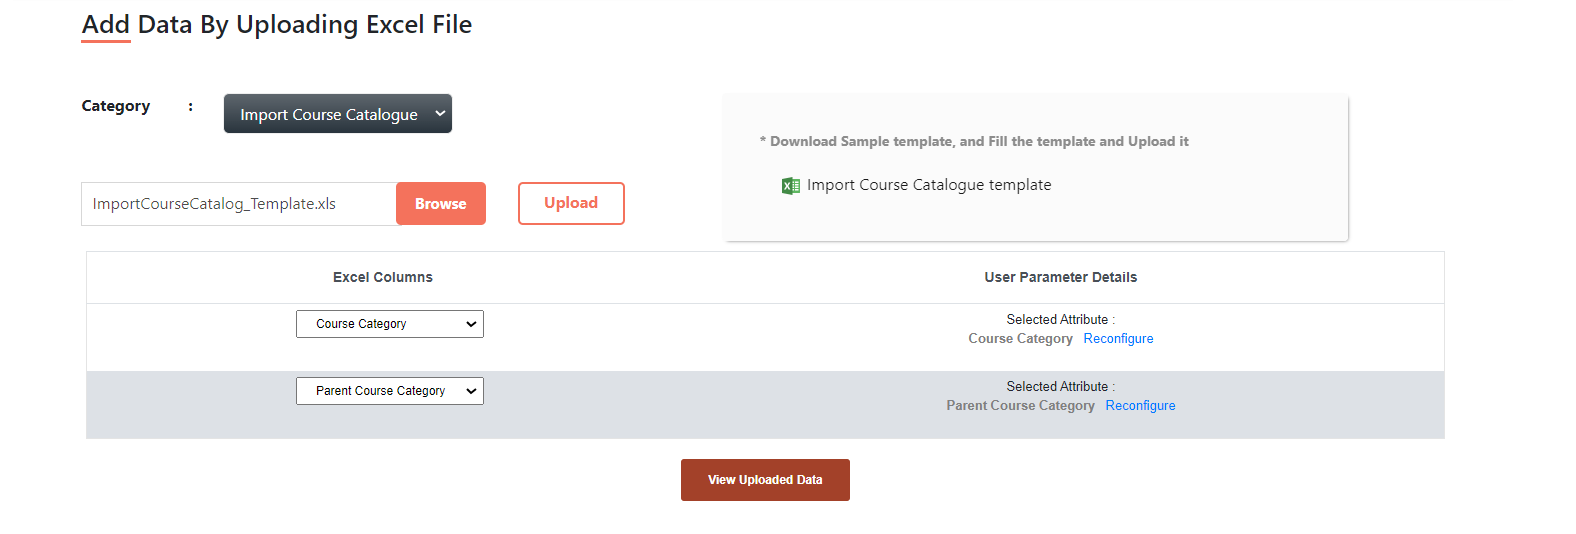
- Click on Get Started Now under Data Import, redirected to the page where you can view Add Data By Uploading Excel File.
-
- Select from the select Category dropdown as Import Course Catalog
- Download the Sample Template from the right hand side of the page
- Fill the details in the downloaded excel file and save and click on Browse and upload the file by clicking on the Upload button.
- Map the course categories of the excel column to the parent course category and click on save button.

-
- Report excel documents will be downloaded into your local system by creating the course categories. You can view newly created course categories on the course categories page (Knowledge Profile page)
-
How can I Create and Manage the users like Student, Faculty & Mentor?
-
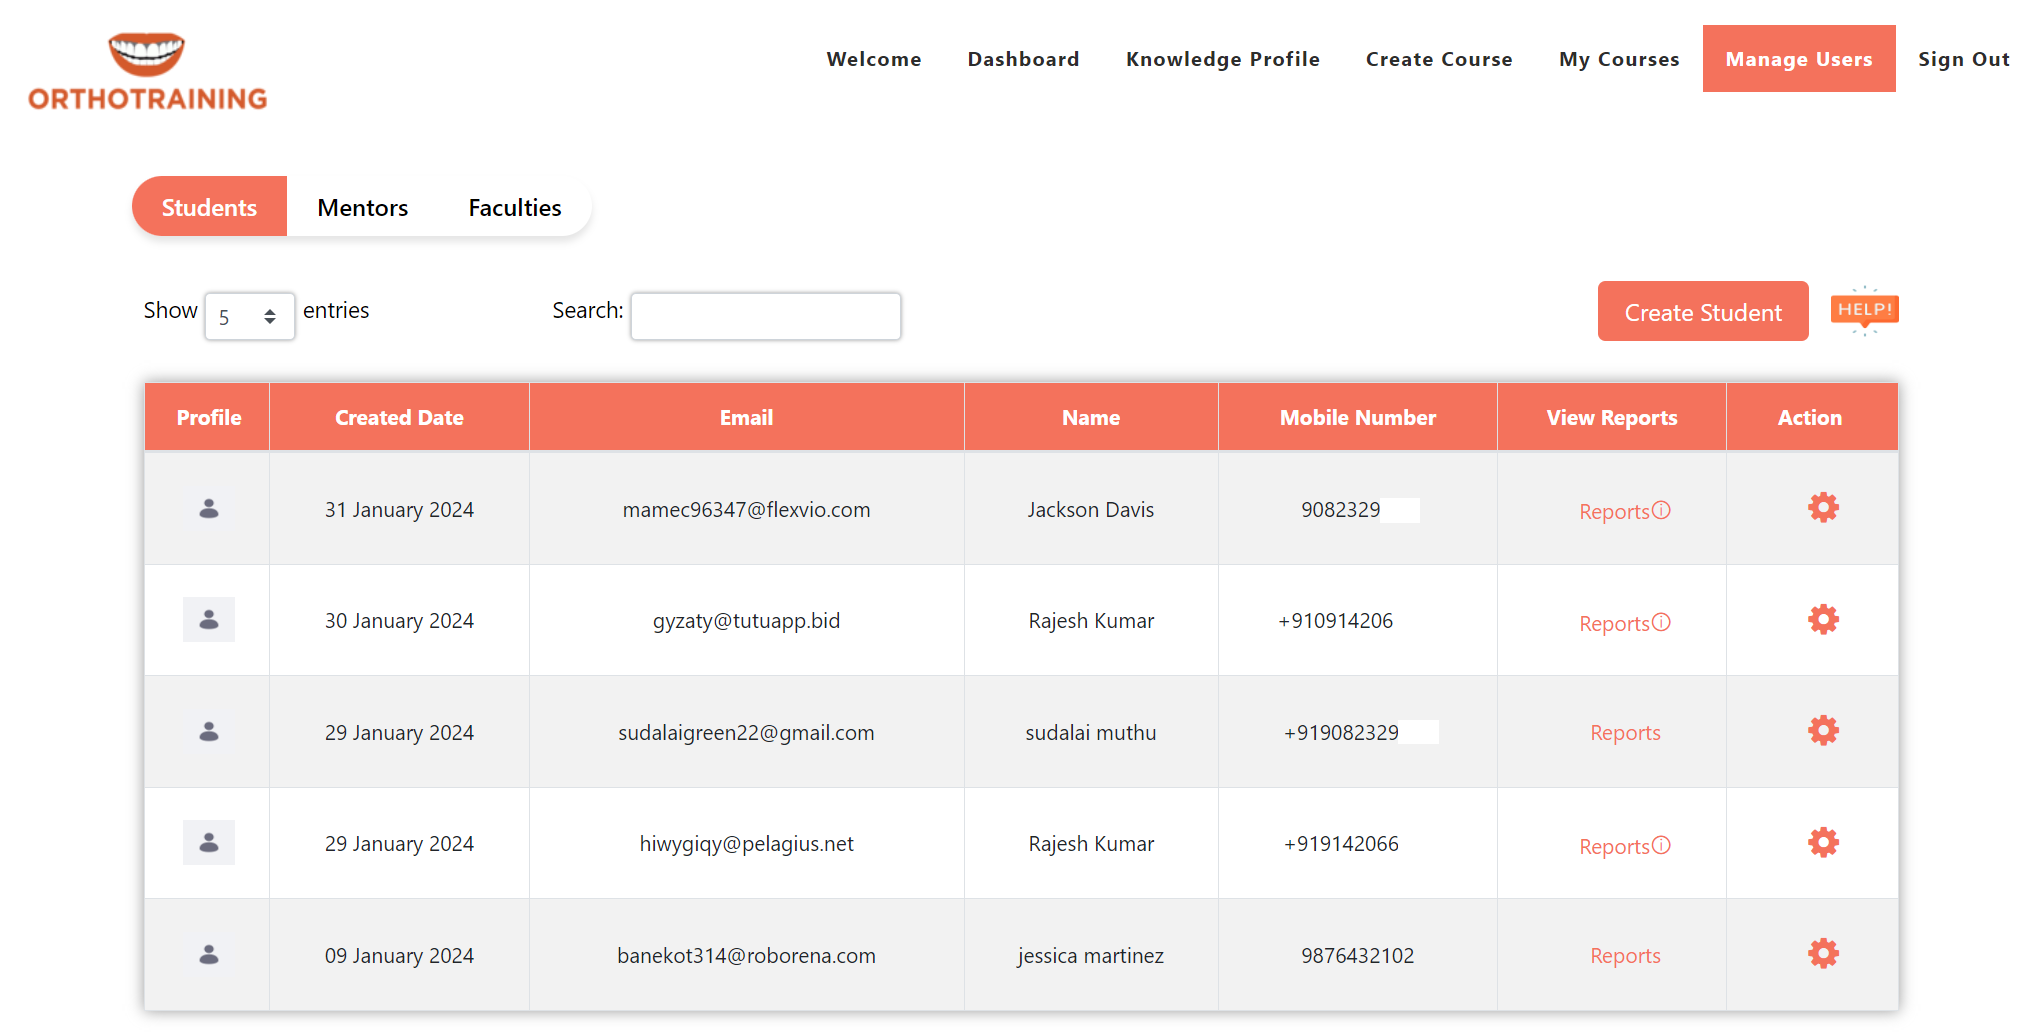
- Click on Manage users page, redirected to a page where you can view users if already created.
-
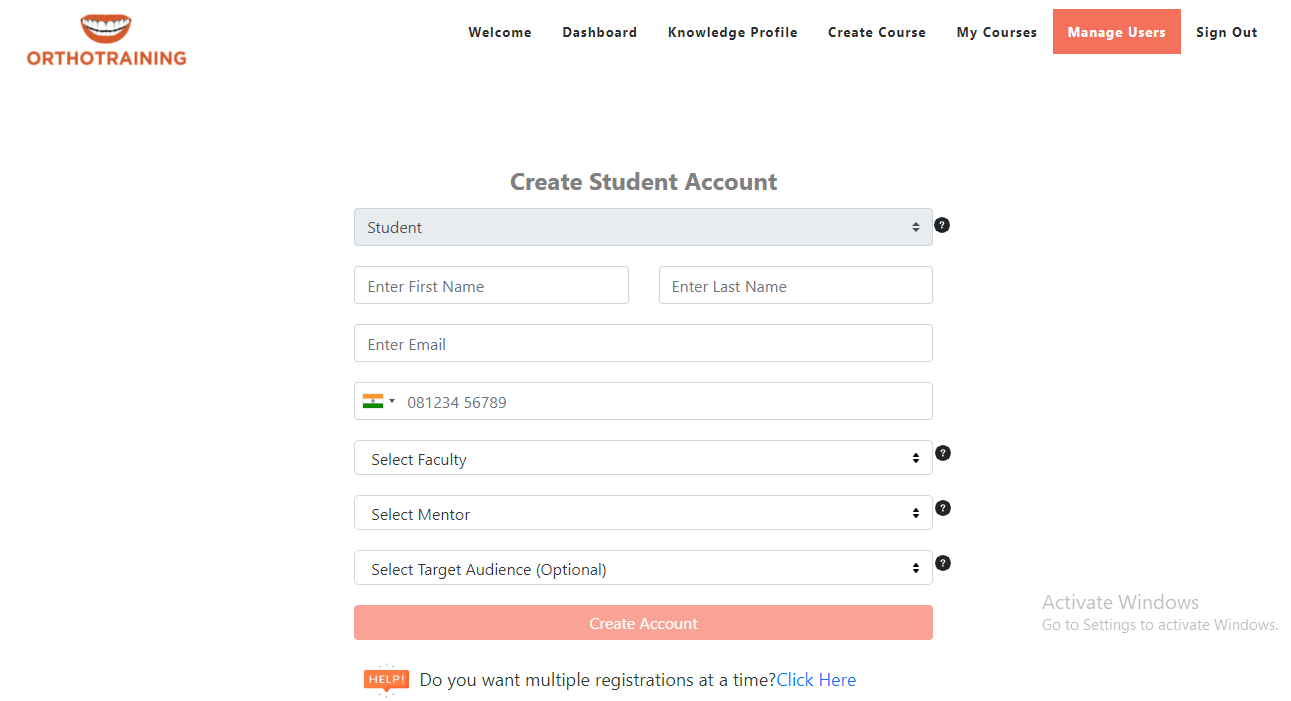
- Click on either Student, Faculty, or Mentor tabs to create them individually or multiple at a time.
-
How to create multiple student, faculty or mentor accounts at a time through Data Import??
-
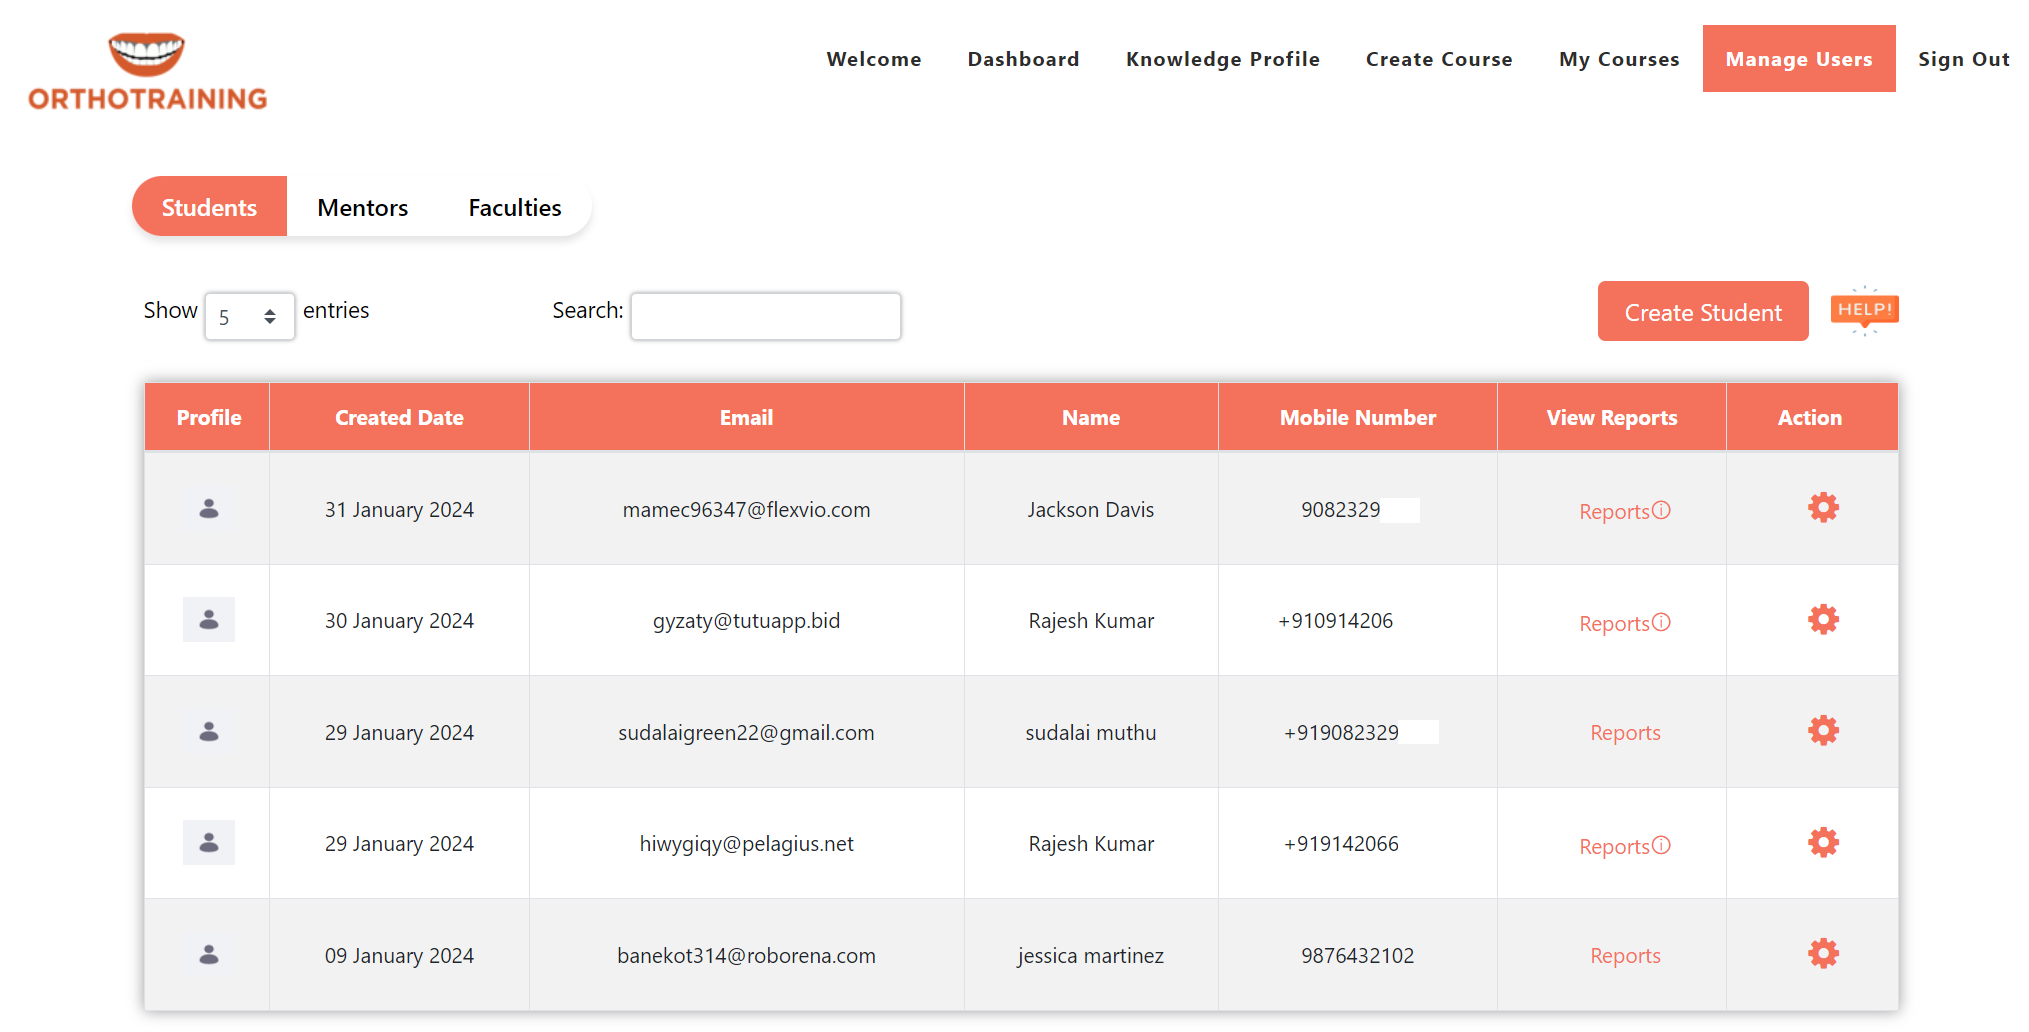
- Click on Manageusers page, redirected to a page where you can view existing users.
-
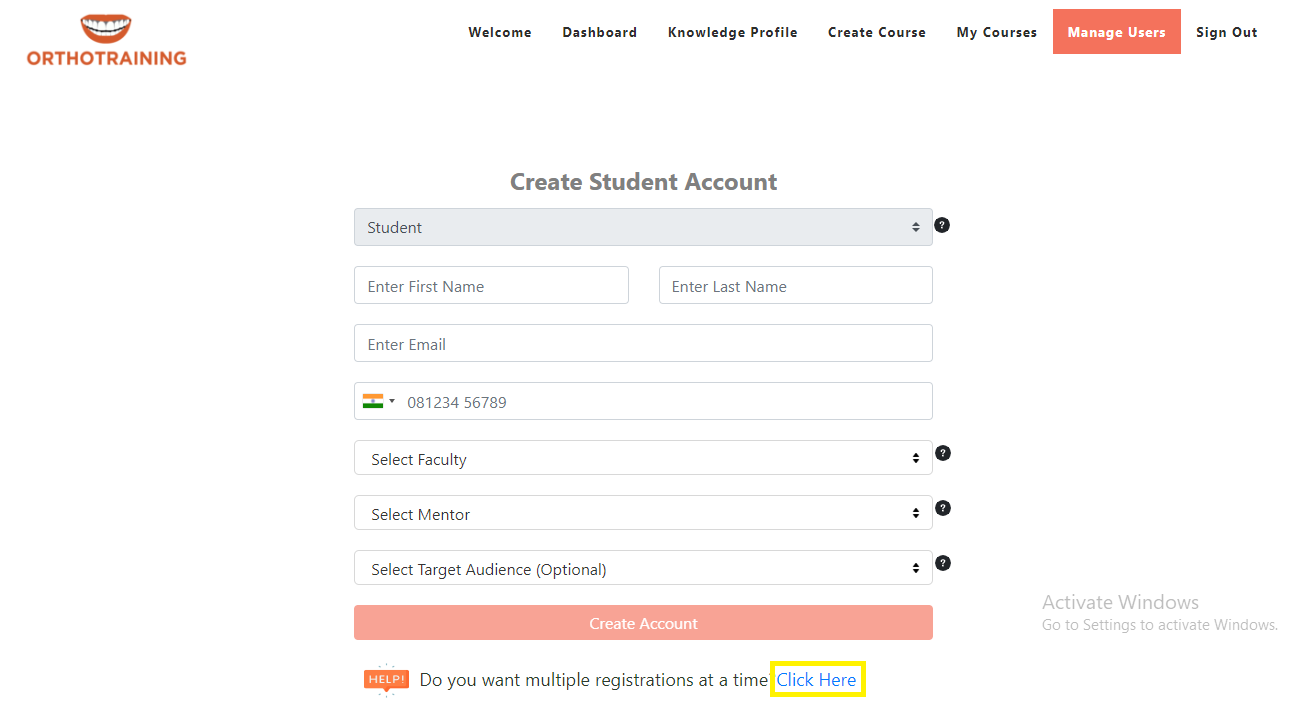
- Click on Create student/Faculty/Mentor
- Click on Click Here button beside Do you want multiple registrations at a time?
-
- You are redirected to the page where you can download the excel template to download and fill the required data and upload it.

-
-
-
- With this process, you can register multiple users at the same time and each user gets an email with the user Id and password.
-
How can I assign the course categories to my students & Faculties?
-
- Go to Knowledge Profile page
- You can view all the course categories created by you.
- For assigning a particular course category or categories, select either faculty or student from the Change user dropdown then select the course categories, then click on Save button.

-
- Based on course categories assignment to the users, will act accordingly like Faculty can create the courses and students can learn the courses.
-
How can I track the student Courses performance?
-
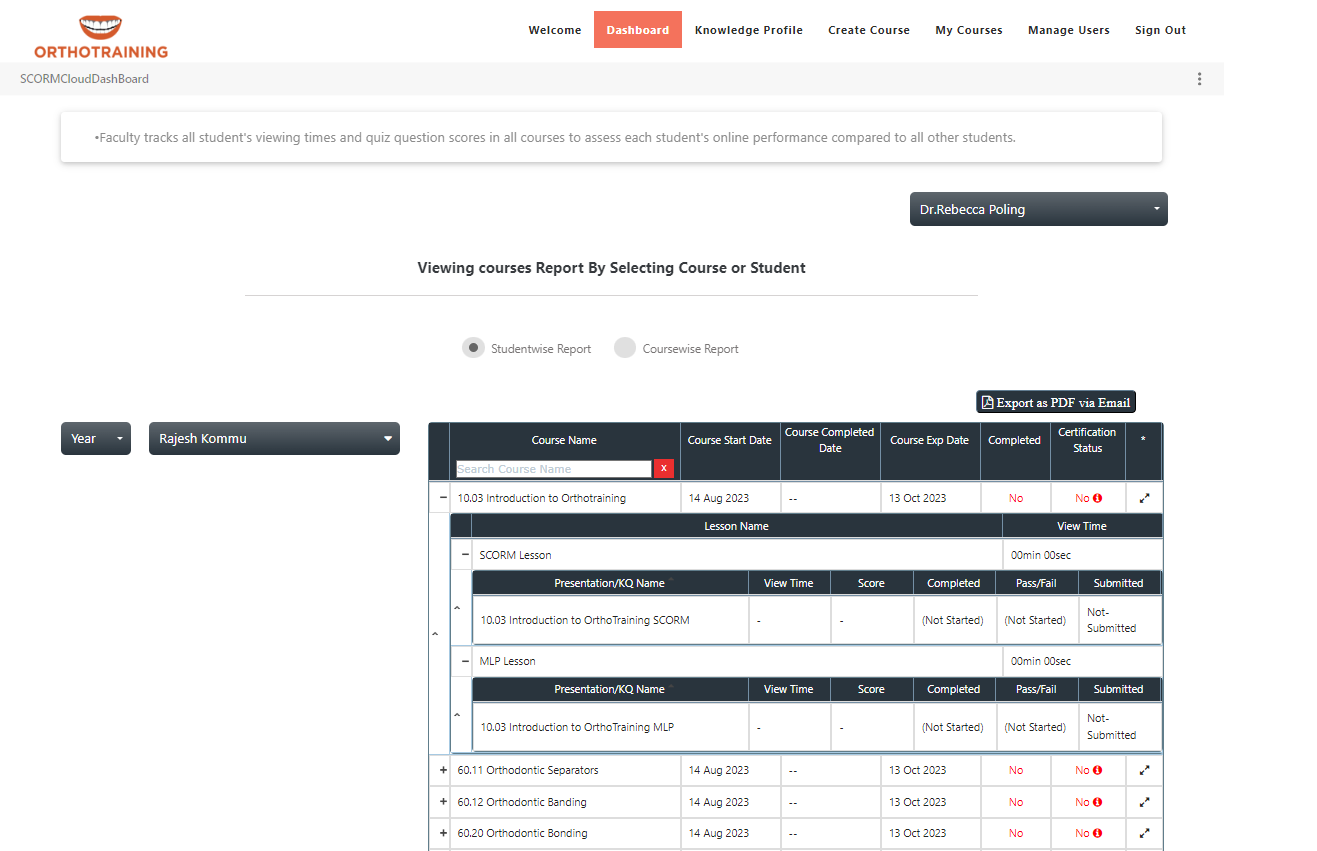
- Go to the dashboard
-
- Select a faculty
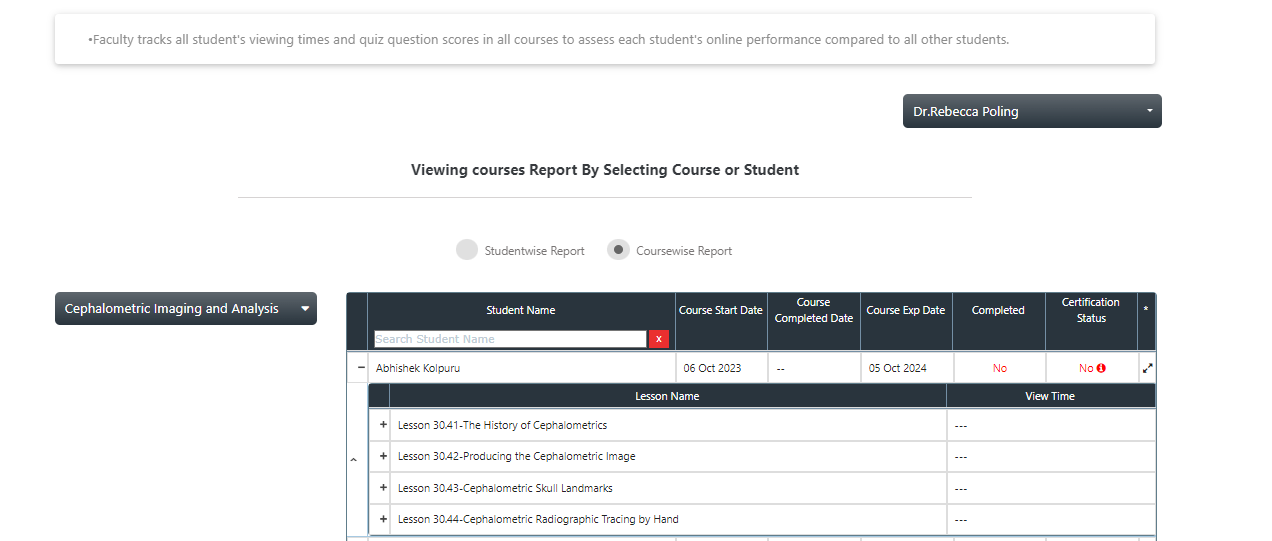
- Select either Coursewise or Studentwise Report, then can view the performance like how many courses are mapped, how many courses they have completed, how much time spent, when they completed the course and the status of the certificate.
-
Steps
Video
Steps
Video
Steps
Video
Steps
Video
